Включение и отключение функций windows с помощью dism
Содержание:
What is DISM?
Deployment Image Servicing and Management (DISM.exe) is a command-line tool that can be used to service and prepare Windows images, including those used for Windows PE, Windows Recovery Environment (Windows RE) and Windows Setup. DISM can be used to service a Windows image (.wim) or a virtual hard disk (.vhd or .vhdx).
DISM comes built into Windows and is available through the command line or from Windows PowerShell. To learn more about using DISM with PowerShell, see Deployment Imaging Servicing Management (DISM) Cmdlets in Windows PowerShell.
Image Requirements
DISM can be used to mount and service a Windows image from a .wim file, .ffu file, .vhd file, or a .vhdx file and also to update a running operating system. It can be used with older Windows image files (.wim files). However, it cannot be used with Windows images that are more recent than the installed version of DISM.
For a complete technical description of WIM, see the Windows Imaging File Format (WIM) white paper.
DISM can be used to service Windows images starting with Windows 7, Windows Server 2008 R2, and their associated versions of WinPE and WinRE. The commands and options that are available for servicing an image depend on which Windows operating system you are servicing, and whether the image is offline or a currently running operating system.
For a list of the supported platforms and architecture types, see DISM Supported Platforms.
Common Servicing and Management Scenarios
Image servicing and management solutions fall into two main categories:
- Managing the data or information included in the Windows image, such as enumerating or taking an inventory of the components, updates, drivers, or applications that are contained in an image, capturing or splitting an image, appending or deleting images within a .wim file, or mounting an image.
- Servicing the image itself, including adding or removing driver packages and drivers, modifying language settings, enabling or disabling Windows features, and upgrading to a higher edition of Windows.
Limitations
Version compatibility. DISM can be used with target images of older Windows operating systems, but not with target images of operating systems that are more recent than the installed version of DISM. For example, DISM from Windows 10, version 1511 can service Windows 10, version 1511 and version 1507 but not version 1607. To learn more, see DISM Supported Platforms.
Remote installation. Installing packages to a remote computer over a network is not supported.
Answer files. When you specify an answer file (Unattend.xml) for an image, only the settings specified in the configuration pass are applied. All other settings in the answer file are ignored. You can only specify one answer file at a time. For more information, see DISM Unattended Servicing Command-Line Options
Use an answer file to ensure package dependencies. Some packages require other packages to be installed first. Because of this dependency requirement, you should use an answer file if you are installing multiple packages. By applying an answer file by using DISM, multiple packages can be installed in the correct order. This is the preferred method for installing multiple packages.
Package installation order. Packages are installed in the order that they are listed in the command line. In the following example, 1.inf, 2.inf, and 3.inf will be installed in the order in which they are listed in the command line.
Multiple servicing commands are not supported. You can specify multiple drivers (1.inf, 2.inf) or packages, but you cannot specify multiple commands (such as /Add-Driver /Remove-Driver or /Add-Driver /Add-Package) on the same command line.
Wildcards. Wildcards are not supported in DISM command lines.
Что такое DISM?
Система обслуживания образов развертывания и управления ими (DISM.exe) — это средство командной строки, которое можно использовать для обслуживания и подготовки образов Windows, включая те, которые используются для Windows PE, среды восстановления Windows (Windows RE) и программа установки Windows. DISM можно использовать для обслуживания образа Windows (WIM) или виртуального жесткого диска (VHD или VHDX).
Система DISM встроена в Windows и доступна в командной строке или Windows PowerShell. Дополнительные сведения об использовании DISM с PowerShell см. в разделе Развертывание командлетов управления образами (DISM) в Windows PowerShell.
Требования к образу
DISM можно использовать для подключения и обслуживания образа Windows из WIM-файла, ФФУ-файла, VHD-файла или файла. VHDX, а также для обновления работающей операционной системы. Его можно использовать с более старыми файлами образа Windows (WIM-файлами). Однако его нельзя использовать с образами Windows, которые новее установленной версии DISM.
Полное техническое описание WIM см. в техническом документе формат файла образов Windows (WIM).
DISM можно использовать для обслуживания образов Windows, начиная с Windows 7, Windows Server 2008 R2 и связанных с ними версий WinPE и WinRE. Команды и параметры, доступные для обслуживания образа, зависят от операционной системы Windows, которую вы обслуживаете, а также от того, находится ли образ в автономном режиме или в работающей в данный момент операционной системе.
Список поддерживаемых платформ и типов архитектуры см. в разделе Поддерживаемые платформы DISM.
Общие сценарии обслуживания и управления
Решения для обслуживания образов и управления делятся на две основные категории:
- Управление данными или сведениями, включенными в образ Windows, например перечисление или Инвентаризация компонентов, обновлений, драйверов или приложений, содержащихся в образе, запись или разделение образа, добавление или удаление образов в WIM-файле или подключение образа.
- Обслуживание самого образа, включая добавление или удаление пакетов драйверов и драйверов, изменение языковых параметров, включение и отключение функций Windows, а также обновление до более поздней версии Windows.
Ограничений
Совместимость версий. DISM можно использовать с целевыми образами старых операционных систем Windows, но не с целевыми образами операционных систем, более ранними, чем установленная версия DISM. Например, система DISM из Windows 10 версии 1511 может обслуживать Windows 10, версии 1511 и 1507, но не версии 1607. Дополнительные сведения см. в разделе Поддерживаемые платформы DISM.
Удаленная установка. Установка пакетов на удаленный компьютер по сети не поддерживается.
Файлы ответов. При указании файла ответов (Unattend.xml) для образа применяются только параметры, указанные на этапе настройки. Все остальные параметры в файле ответов игнорируются. В каждый момент времени можно указать только один файл ответов. Дополнительные сведения см. в разделе параметры Command-Line автоматического обслуживания DISM .
Используйте файл ответов для обеспечения зависимостей пакета. Для некоторых пакетов сначала необходимо установить другие пакеты. Из-за этого требования к зависимостям при установке нескольких пакетов следует использовать файл ответов. Применив файл ответов с помощью DISM, можно установить несколько пакетов в правильном порядке. Это предпочтительный метод установки нескольких пакетов.
Порядок установки пакета. Пакеты устанавливаются в том порядке, в котором они перечислены в командной строке. В следующем примере 1. INF, 2. INF и 3. INF будут установлены в том порядке, в котором они указаны в командной строке.
Несколько команд обслуживания не поддерживаются. Можно указать несколько драйверов (1. INF, 2. INF) или пакетов, но нельзя указать несколько команд (например, /Add-Driver /Remove-Driver или /Add-Driver /Add-Package) в одной командной строке.
Подстановочные знаки. Подстановочные знаки не поддерживаются в командных строках DISM.
Get Driver Information
The driver-servicing commands can be used to enumerate driver packages in the driver store based on their .inf files. You can use the /Get commands to display basic information about third-party driver packages or all driver packages in the offline image. When you point to an offline image or a running operating system, you can determine what driver packages are in the image, and get information about the drivers.
You can display detailed information about a specific installed .inf file, or one that is not yet installed. Installed drivers in the driver store will be named Oem0.inf, Oem1.inf, and so on.
For more information about driver-servicing commands available in DISM, see DISM Driver Servicing Command-Line Options.
To list driver packages in the offline image
-
Click Start, and type deployment. Right-click Deployment and Imaging Tools Environment and then select Run as administrator.
-
Use one of the following commands to list information about all of the driver packages in a mounted offline Windows image:
For a running operating system, type one of the following commands:
The report generated includes the following information:
| Field | Description | Example |
|---|---|---|
|
Published Name |
The name of the driver package after it is added to the driver store. |
Oem0.inf |
|
Original File Name |
The original .inf file name of the driver package. |
Toaster.inf |
|
Inbox |
Yes for a default driver (inbox driver) or No for third-party driver packages. |
No |
|
Class Name |
The friendly name of the device class the driver is a member of. |
Printer |
|
Provider Name |
The provider or digital signature for the driver package. |
Microsoft |
|
Date |
The date associated with the driver, as it is specified in the .inf file. The date will be formatted appropriately for your locale. |
10/31/2006 |
|
Version |
The version number that is specified in the INF driverVer directive. |
6.1.6801.0 |
To get information about a specific driver
-
Click Start, and type deployment. Right-click Deployment and Imaging Tools Environment and then select Run as administrator.
-
List information about a specific driver package in the offline Windows image. For example, type:
For a running operating system, type:
The report generated includes the following information:
| Field | Description | Example |
|---|---|---|
|
Published Name |
The name of the driver package after it is added to the driver store. |
Oem0.inf |
|
Driver Store Path |
The path to the driver location. If the driver is installed, the path to the driver store is listed. If the driver is not installed yet, the path to the driver on the servicing host is listed. |
E:\Images\Mount_depset\Windows\System32\DriverStore\FileRepository\Fasttx2k.inf_x86_neutral_0328f62e\Fasttx2k.inf |
|
Class Name |
The friendly name of the device class the driver is a member of. |
Printer |
|
Class Description |
The description of the device class the driver is a member of. |
Printers |
|
Class GUID |
The GUID of the device class that the driver is a member of. |
{4D36E97B-E325-11CE-BFC1-08002BE10318} |
|
Date |
The date associated with the driver, as it is specified in the .inf file. The date will be formatted appropriately for your locale. |
8/6/2003 |
|
Version |
The driver version number that is specified in the INF driverVer directive. |
1.0.1.37 |
|
Boot Critical |
Yes if the driver is boot critical or No if it is not. |
No |
|
Drivers for architecture |
The architecture of the image that it is installed on. If the driver is not installed yet, the field is reported repeatedly for each supported operating system architecture. |
x86 |
|
Manufacturer |
The manufacturer of the supported device. |
Adventure Works |
|
Description |
A description of the supported device. |
Windows XP Adventure Works 376 Controller |
|
Architecture |
The architecture of the driver. |
x86 |
|
Hardware ID |
The hardware ID of the supported device. |
ABC_3376 |
|
Service Name |
The service name of the driver. |
C1232k |
|
Compatible IDs |
Alternate Plug and Play (PnP) IDs for the device, if any apply. |
12ABC |
|
Exclude IDs |
PnP IDs that will not match the device, any apply. |
A_123 |
Note
If you point to a driver that is not yet installed, the report will be slightly different.
Get Windows PE Information
You can mount a Windows Preinstallation Environment (Windows PE) image for servicing in the same way you would any Windows image. There are also Windows PE servicing commands that are specific to a Windows PE image. These commands can be used to list Windows PE settings such as scratchspace, targetpath, and profiling information. For more information about Windows PE servicing commands available in DISM, see DISM Windows PE Servicing Command-Line Options.
To list all settings in the mounted Windows PE image.
-
Click Start, and type deployment. Right-click Deployment and Imaging Tools Environment and then select Run as administrator.
-
To list information about all of the Windows PE settings in the mounted Windows PE image, at the elevated command prompt, type:
The report generated includes the following information:
| Field | Description | Example |
|---|---|---|
|
Profiling |
Reports whether Windows PE profiling is enabled or disabled. |
Disabled |
|
Scratch Space |
The amount of writeable space available on the Windows PE system volume when booted in ramdisk mode. |
32MB |
|
TargetPath |
The path to the root of the Windows PE image at boot time. |
X:</p> |
Unmounting an image
Note
This only applies to mounted images. Applied images don’t need to be unmounted.
After you modify a mounted image, you must unmount it. If you mounted your image with the default read/write permissions, you can commit your changes. This makes your modifications a permanent part of the image.
If you modified an applied image, you don’t have to do anything else. You’ll see any changes you made when you boot the PC.
-
Open a command prompt or the Deployment and Imaging Tools Environment with administrator privileges.
-
Unmount the image.
where is the location of the mount directory. If you do not specify the parameters to unmount, this option lists all of the mounted images but does not perform the unmount action.
Important
You must use either the /commit or /discard argument when you use the /unmount option.
What Is DISM?
DISM, whose full name is the Deployment Image Service and Management, is a built-in tool of Windows, first introduced in Windows 7 and Windows Server R2. It can perform servicing tasks on a Windows installation image, on an online or offline image within a folder, or on WIM files.
The DISM tool can be available from the Command Line or the Windows PowerShell. DISM tool can be used to update files and fix problems when a Windows image becomes unserviceable. However, when running the DISM tool, you may receive the error code 87 or some other codes like DISM error 50, DISM error 2, DISM error 3, DISM error 1639 and so on, as shown in the following picture:
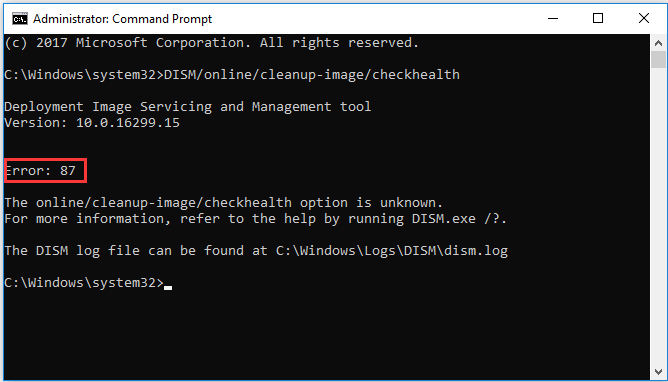
These DISM error codes mean that you cannot proceed. Therefore, do you know what may cause the DISM error 87 or other DISM error codes?
Использование опций RestoreHealth и Source в Dism
Если система сильно повреждена, чтобы восстановить ее, потребуются файлы образа ОС, записанные на съемный носитель. Команда Dism RestoreHealh обратится к ним и устранит неполадки. Чтобы это произошло, нужно указать ей местонахождение нужных компонентов через опцию Sourse.
- Запустите Command Line (помним про «Run As Administrator»).
- Впишите команду: DISM /Online /Cleanup-Image /RestoreHealth /Source:название_загрузочного_диска\install.wim и нажмите «Интер»
Если The Update Center настойчиво предлагает себя в качестве источника компонентов, можно контролировать его активность установкой: DISM /Online /Cleanup-Image /RestoreHealth /Source:название_загрузочного_диска\install.wim /LimitAccess. Заметьте, что ОС на диске (флешке) должна по всем характеристикам совпадать с текущей во избежание проблем.

Список версий файлов
Имя файла
Dism.exe
система
Windows 10
Размер файла
224672 bytes
Дата
2017-03-18
Скачать
| Подробности файла | ||
|---|---|---|
| MD5 | cc559b390c14f52101539f00c6a14d90 | |
| SHA1 | c0aae96e775d820e52be739b58d1f367011b8ae1 | |
| SHA256 | 6ed9bb4d2a4556afabae73fe97e62516a9484e09aecf530413775cf4d234d2c9 | |
| CRC32 | 89b9ad7a | |
| Пример расположения файла | C:\Windows\System32\ |
Имя файла
Dism.exe
система
Windows 8.1
Размер файла
211968 bytes
Дата
2014-11-21
Скачать
| Подробности файла | ||
|---|---|---|
| MD5 | b6a37c8c64dc87031293357f06da1a7f | |
| SHA1 | a06147b003a4f8530944a77164499a82563b7a75 | |
| SHA256 | c0551cbb37772545f50b00bde96b83d16f35ef146cf44cea124beda934d53300 | |
| CRC32 | b254f86f | |
| Пример расположения файла | C:\Windows\System32\ |
Имя файла
Dism.exe
система
Windows 8
Размер файла
200704 bytes
Дата
2012-07-26
Скачать
| Подробности файла | ||
|---|---|---|
| MD5 | 948fed6031f28bbb31e8e26de43c82a8 | |
| SHA1 | 6ad71c310c13a253a65b6e173b413743e836f64f | |
| SHA256 | 230ecfb84d22f415c8ffee6888eb7d64e1fca783a97d84976e00cd0479600ef0 | |
| CRC32 | c95094d9 | |
| Пример расположения файла | 1: C:\Windows\System32\ |
Имя файла
Dism.exe
система
Windows 7
Размер файла
202752 bytes
Дата
-0001-11-30
Скачать
| Подробности файла | ||
|---|---|---|
| MD5 | 4087f52a17eb28592a7dc0d8440a980e | |
| SHA1 | 7d8624096a4f4ac29260dd1a1f5e4bdc7b52ecd8 | |
| SHA256 | 001300a5323bf6c1812b686c1c896857d4cf85c676e48f451d8cb7b9a8f0afe0 | |
| CRC32 | 5bed0354 | |
| Пример расположения файла | C:\Windows\SysWOW64\ |
Имя файла
Dism.exe
система
Windows 7
Размер файла
274944 bytes
Дата
2009-07-14
Скачать
| Подробности файла | ||
|---|---|---|
| MD5 | 5e70ab0bf74bba785b83da53a3056a21 | |
| SHA1 | 9757d863996ea9dfe6dc1caecf8ee2795772e547 | |
| SHA256 | 3e297ed3415b6904fbf4ec66ecc4b50e20ad31605e85bf13f914ff476da14447 | |
| CRC32 | f63ce1b0 | |
| Пример расположения файла | C:\Windows\SysWOW64\ |
Requirements
You must install the Windows Assessment and Deployment Kit (Windows ADK) on your development computer in order to create DISM API applications:
-
Your customized solutions on the DISM platform are developed using the DISM SDK. This is installed when the Windows ADK is installed. For more information about supported operating systems, see the Windows Assessment and Deployment Kit (Windows ADK) Technical Reference.
-
When running customized solutions on the DISM platform, you must verify that the Windows ADK architecture version matches the operating system architecture version. For example, a customized solution developed for 32-bit PCs runs on the 32-bit version of Windows.
-
In order to properly develop and run your customized solutions on the DISM platform, you must verify you are using the DISM binaries from the Windows ADK:
-
Install the latest version of the Windows ADK on the PC that will run the customized solution.
-
The binary files for your customized solutions must be saved in the same directory as the DISM binaries installed by the Windows ADK. For example, if you are running Windows 8 (x64) and the Windows ADK for Windows 8.1, your customized solutions binaries must be located in c:\Program Files (x86)\Windows Kits\8.1\Assessment and Deployment Kit\Deployment Tools\amd64\DISM.
-
Run your customized solutions from the Deployment and Imaging Tools Environment so that the necessary environment variables are set up prior running your solutions.
From the start screen, type deployment. Right-click Deployment and Imaging Tools Environment and select Run as administrator.
Note
If you don’t run from the Deployment and Imaging Tools Environment, you must verify that the PATH environment variable uses the location of the DISM binaries from the Windows ADK.
-
-
You will need a supported Windows image file type, .wim, .vhd, or .vhdx, or an online installation of Windows to use the DISMAPI for servicing and management. Some operations are not valid on online images. For more information, see the DISM API Reference.
How To Run DISM.EXE from Windows 10 Recovery Mode
Sometimes Windows may not even boot. If you wish to repair your Windows 10 computer that does not boot at all, use the steps below:
- Download Windows 10 ISO, burn it into a DVD and boot your computer with it. For a step by step guide on how to download Window 10 ISO image, read .
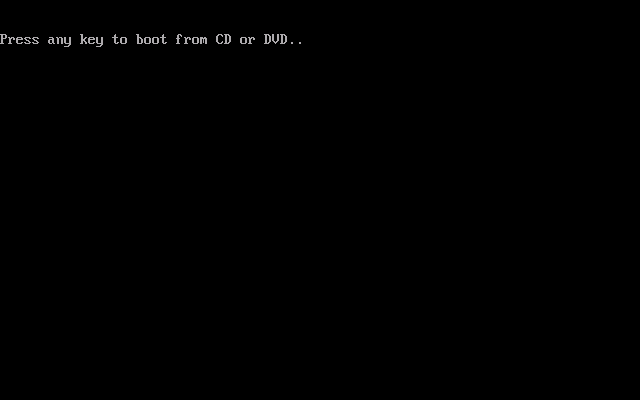
- When your computer boots to the screen shown below, press any key to boot into the Windows 10 DVD.
On the Windows Setup screen, click Next. Then click Repair your computer.
Next, click Troubleshoot. Then click Command Prompt.
Command Prompt loads.
To repair Windows 10 from the ISO, we require Install.WIM. Unfortunately, Install.WIM is not readily available in Windows 10 ISO. It has to be extracted.
To remove Windows features for on-demand installation
-
Remove a specific feature in the image without removing the feature’s manifest from the image. This option can only be used when servicing Windows 10, Windows 8.1, Windows 8, Windows Server 2016 Technical Preview, Windows Server 2012 R2, or Windows Server 2012. For more information, see Configure a Windows Repair Source.
For example, type:
To service an offline image, specify the location of the mounted image directory. For example, type:
-
Optional: Use to get the status of the feature you have disabled. For example, type:
The status is Disabled. Beginning with Windows 10, the payload is not removed from Windows client SKUs in order to support push-button reset. The payload is removed from Windows Server SKUs.
Установка Windows второй системой на другом разделе
Процесс установки Windows на другой раздел немногим отличается от переустановки системы. В среде первой системы подготавливаем раздел для второй Windows.
Форматируем его.
Монтируем установочный ISO-образ. Запускаем Dism++. Как и при переустановке, в меню «Файл» выбираем «Применить образ». Кстати, форму развёртывания образа Windows можно запускать также через меню «Восстановление», пункт «Восстановление». Эта форма идентична и для установки системы с файлов WIM/ESD дистрибутива, и для восстановления из бэкапа в формате этих же файлов.
Указываем путь к файлу install.wim или install.esd. Указываем раздел второй системы. Выбираем редакцию. И вот тут важный момент – ставим галочку опции «Доб.загр.». Она нужна для добавления второй системы в меню загрузки. Жмём «Ок».
Dism++ выдаст уведомление о добавлении сведений о загрузке новой системы в загрузчик и попросит нажать «Ок» для старта операции.
О завершении развёртывания образа программа уведомит.
Далее можем перезагружаться. При запуске нас уже будет встречать меню загрузчика. Выбираем новую установленную систему.
И продолжаем установку уже внутри неё самой.
Примечание: Dism++ умеет добавлять запись о загрузке новой системы в существующий загрузчик Windows. Но программа не умеет создавать для системы на другом жёстком диске свой автономный загрузчик. Если вопрос стоит в установке Windows на другом диске со своим отдельным загрузчиком, потребуется вручную создать системный загрузочный раздел — «Зарезервировано системой» на MBR-диске или EFI-раздел на GPT-диске. И, соответственно, также вручную создать для второй системы её загрузчик. Но это уже отдельная история.
Использование Dism с файлом Install Esd
Если вы обновляли Windows до более высокой версии, то на системном диске могут остаться пригодные компоненты для регенерации системы, можно указать путь к ним. Запускается служба следующим образом:
- Откройте Command Line (и снова через «Run As Administrator»).
- Впишите: DISM /Online /Cleanup-Image /RestoreHealth /Source:C:$Windows.~BT\Sources\Install.esd и кликните «Интер».
Опять-таки, при настойчивых рекомендациях «Центра обновлений», можно вписать команду: DISM /Online /Cleanup-Image /RestoreHealth /Source:C:$Windows.~BT\Sources\Install.esd /LimitAccess
Таким образом, он не будет вам мешать и отвлекать на себя внимание опции RestoreHealth
Разрешение для Windows 7 и Windows Server 2008 R2
Чтобы устранить эту проблему, используйте средство готовности к обновлению системы. Затем установите Windows обновления или пакета службы.
-
Скачайте средство готовности к обновлению системы.
Перейдите в каталог обновлений Майкрософт и скачайте средство, соответствующее версии Windows, запущенной на компьютере. Дополнительные сведения о том, как найти установленную версию Windows, см. в этой версии Узнайте, работает ли компьютер с 32-битной или 64-битнойверсией Windows .
Примечание
Этот инструмент обновляется регулярно, рекомендуется всегда скачивать последнюю версию. Этот инструмент доступен не на всех поддерживаемых языках. Проверьте приведенную ниже ссылку, чтобы узнать, доступна ли она на вашем языке.
-
Установите и запустите средство.
-
Выберите скачивание на веб-странице Центра скачивания, а затем сделайте одно из следующих:
- Чтобы немедленно установить средство, выберите Open или Run, а затем выполните инструкции на экране.
- Чтобы установить средство позже, выберите Сохранить, а затем скачать файл установки на компьютер. Когда вы будете готовы установить средство, дважды выберите файл.
-
В диалоговом окне Windows обновления автономных установщиков выберите Да.
-
-
При установке средства он автоматически запускается. Хотя для запуска обычно требуется менее 15 минут, на некоторых компьютерах это может занять гораздо больше времени. Даже если планка прогресса, как представляется, останавливается, сканирование по-прежнему запущено, поэтому не выберите Отмена.
-
Когда вы увидите полное завершение установки, выберите Закрыть.
-
Переустановка обновления или пакета служб, которые вы пытались установить ранее.
Чтобы вручную устранить ошибки коррупции, которые обнаруживает средство, но не может быть исправлено, см. в статью Как устранить ошибки, обнаруженные в файле
Best Practices
Memory management. Certain DISM API functions return structures or arrays of structures. These structures are returned to the user as a pointer to an object on the heap. The heap memory is allocated by the DISM API. The client must call the DismDelete Function to ensure that this memory is released.
Mounting a VHD with the DiskPart tool. When possible, you should use the DISM API to mount and unmount images you want to service within the DISM framework. Using another tool, such as the DiskPart tool, to mount and unmount the image can have unexpected effects.
File paths. All paths accepted by DISM API functions can be relative or absolute. As a best practice, limit the length of file paths. File paths that are too long or exceed the maximum length limitation for Windows will cause failures in DISM.
Matching calls to open and close sessions. Always release a DISM Session by using the DismCloseSession Function before calling the DismShutdown Function. You can also unmount the image with the DismUnmountImage Function after closing the session and before calling the DismShutdown Function.
How to Fix DISM.exe /Online /Cleanup-Image /Restorehealth Error 87
There are so many reasons why you may receive error 87 when you run the “DISM.exe /Online /Cleanup-Image /Restorehealth” command. Here are some of the causes of the error and how to fix them.
DISM.exe /Online /Cleanup-Image /Restorehealth Error 87: Solution 1
From my research, the top on the list is when you run the command without adding the required spaces in the switches. Below is the DISM command without spaces:
Solution
Run the command with spaces as shown below:
DISM.exe /Online /Cleanup-Image /Restorehealth Error 87: Solution 2
Another reason for error 87 could be pending updates.
SolutionThe solution is to install all and any pending updates.
To check for and install any pending update, follow the steps below:
Right-click Windows logo on the left of your task bar . Then click System .
When Settings loads, type updates in the search bar . Then select Check for updates. Check the part labelled for pending updates. If any click install.