Устранение неполадок буферизации plex
Содержание:
Audio
Tip!: For more in-depth information and configuration help, Please check out our dedicated Plex Media Player .
Device Type
The Device Type settings allows users to select between Basic, Optical (S/PDIF), and HDMI depending on their configuration.
Channels
Channel settings allow the user to configure their audio setup based on the number of channels their home theater setup supports. Most users will want to select Stereo if they are using a built-in audio system on devices such as laptops.
Device
The Device setting allows users to change the output device when multiple are detected by the system. Most users will want to select Built-in Output when using standard configurations.
Normalize Downmixed Volume
When downmixing from surround (5.1) to stereo channels, Plex Media player will try to normalize the volume to make the quieter sounds more audible. If you hear distortion you can try disabling this.
Passthrough: Dolby Digital (AC3)
This enables passthrough audio for AC3 audio. By default this option is disabled, resulting in the audio data being decoded to PCM. (This is not inferior sound to passthrough.)
Passthrough: DTS (DCA)
This enables passthrough audio for DTS audio. By default this option is disabled, resulting in the audio data being decoded from the standard DTS core audio track to PCM. (This is not inferior sound to passthrough.)
Passthrough: Dolby Digital Plus (EAC3)
This enables passthrough audio for Dolby Digital Plus audio. By default this option is disabled, resulting in the audio data being decoded to PCM. (This is not inferior sound to passthrough.)
Passthrough: DTS-HD Master Audio
This enables passthrough audio for DTS-HD audio. By default this option is disabled, resulting in the audio data being decoded from the standard DTS core audio track to PCM. (This is not inferior sound to passthrough.)
Dolby TrueHD
This enables passthrough audio for Dolby TrueHD audio. By default this option is disabled, resulting in the audio data being decoded to PCM. (This is not inferior sound to passthrough.)
Note: Due to platform limitations, passthrough of DTS-HD Master Audio, Dolby Digital Plus, and Dolby TrueHD, audio is limited to Windows and Linux only.
The “Free to Use” Parts: The Server and Apps
There are some details to get into, but the summary of “free” is simple:
- The video/music/photo media you own is yours. Of course, we don’t charge you in any way for that.
- The Plex Media Server is free to use and includes the Plex Web App.
- Our ‘Movies & TV’ streaming service is free to all users and ad-supported.
- Free TV streaming is available from our ad-supported Live TV on Plex service
- Connect a compatible tuner and antenna to your server to let you watch over-the-air broadcasts available at your location live. (Recording of broadcasts requires a Plex Pass subscription.)
- “Podcasts” and “Web Shows” support are free for all users.
- All of our non-mobile, public apps are free. These include Amazon Fire TV, Android TV, Apple TV, Chromecast, Plex Media Player, Roku, Smart TVs, Windows & macOS computers and game consoles (PlayStation and Xbox).
- 30-second previews of songs from TIDAL are available to anyone in the app.
- Our mobile apps (Android and iOS) can be used for free, but have limitations.
Related Page: Plex DownloadsRelated Page: Plex Media ServerRelated Page: Related Page:
Player Apps and Platforms
-
- Getting Started with Alexa Voice Control
- Alexa Voice Commands
-
- Navigating the Mobile Apps
- Customizing the Mobile Apps
- Settings: Plex for Android (mobile)
- Unlocking or Activating Plex for Android
- What are the features and limitations without unlocking the app?
- Android, Android TV, Fire TV, Portal Logs
- Purchasing a Plex Pass Subscription Through Google Play
- Android Auto
- I have Plex Pass, so how do I use Plex for Android for free?
- Purchasing a Plex Pass Subscription Through Amazon
- Opening a Local Video File (mobile)
-
- Navigating the Big Screen Apps
- Customizing the Big Screen Apps
- Settings: Android TV
- Android, Android TV, Fire TV, Portal Logs
- Purchasing a Plex Pass Subscription Through Google Play
- Purchasing a Plex Pass Subscription Through Amazon
- How do I use the old TV Layout with pre-4.4 Android devices?
-
- Navigating the Big Screen Apps
- Customizing the Big Screen Apps
- Settings: Plex for Apple TV
- How do I get Plex content to show up in the Top Shelf?
- How do I delete content using the Apple TV app?
- Do I need a Plex account to use the Apple TV app?
- Apple TV Logs
-
- Casting Support
- Cast from Browser or Desktop
- Cast from Android
- Cast from iOS
- Does content stream directly to the Chromecast or through the casting device?
- Why does the Chromecast show my BT router page?
- Why can’t I see Chromecast on my Amazon-based Android device?
- Why can’t I see Chromecast on my iOS 5 device?
-
- Navigating the Mobile Apps
- Customizing the Mobile Apps
- Settings: Plex for iOS
- Unlocking or Activating Plex for iOS
- Purchasing a Plex Pass Subscription Through iTunes
- iOS Media Playback
- Using Mobile Sync
- iOS Logs
- Do I need a Plex account to stream locally?
- What are the features and limitations without unlocking the app?
- Can I use the in-app purchase with Family Sharing?
- Can I AirPlay if I require secure connections and have DNS Rebinding protection?
- Will Plex work on my older iOS devices?
- iOS App System Permissions
-
- NAS Compatibility List
- NAS Devices and Limitations
- Is Plex Media Server on a NAS Right for Me?
- Mounting Network Resources
- Installing Plex Media Server on FreeNAS
- Install Plex Media Server on a TerraMaster NAS
- Western Digital My Cloud Home
-
- Setting Up and Managing Plex Media Server on NVIDIA SHIELD
- Media Storage Options for NVIDIA SHIELD
- Accessing SHIELD Storage
- Limitations When Running Plex Media Server on NVIDIA SHIELD
- Moving server data storage location on NVIDIA SHIELD
-
- Navigating the Big Screen Apps
- Customizing the Big Screen Apps
- Settings: PlayStation
- What media formats are supported?
- Why can’t it find my local server?
- Where is Plex for PlayStation available?
- Logging for PlayStation
- Is it for the PlayStation 3 or PlayStation 4?
- Is it available for the PlayStation TV and PlayStation Vita?
- Is a PlayStation Plus subscription required?
-
- Getting Started
- Navigating the Big Screen Apps
- Customizing the Big Screen Apps
- Settings: Plex Media Player
- Controlling the App
- Audio Configuration Guide – Plex Media Player
- Create your own inputmap
- Plex Media Player Logs
- Advanced Configuration
- Uninstalling Plex Media Player
- How do I set up WiFi on an embedded Plex Media Player?
- Is Plex Media Player based on Kodi/XBMC?
- How do I create the disk image for my SD Card or USB Stick?
-
- Customizing Plex Web
- Overview
- Opening Plex Web App
- Cinema Trailers & Extras – Plex Web App
- Why are there old or duplicate Server entries in the Dashboard sidebar?
- Interface Overview
- Using the Library View
- Viewing Item Details
- Plex Web App Player
- Plex Web App Settings
- Search
- Devices
- Server Status and Dashboard
- Plex Account
- Updating Plex Web App
- Plex Web App Logs
-
- Navigating the Big Screen Apps
- Customizing the Big Screen Apps
- What models are supported for the Plex for Roku channel?
- Purchasing a Plex Pass Subscription Through the Roku App
- Settings: Plex for Roku
- Roku Logs
- Is 4K content supported on the Roku?
- Do I need a Plex account to use the Roku channel?
- Is Plex for Roku open source?
-
- Plex VR for Gear VR & Oculus Go
- Plex VR for Daydream
-
- Navigating the Big Screen Apps
- Customizing the Big Screen Apps
- Which Smart TV models are supported?
- Why can’t it find my local server?
- What media formats are supported?
- How do streaming quality selections work?
- Logging for Smart TVs & TiVo
-
- Requirements for using Plex for Sonos
- Control Sonos Playback With a Plex App
- Installing the Plex for Sonos Service
- Navigating Plex for Sonos
- Sonos Playback
-
- Introduction and Installation
- Configuration and Usage Options
- Download for Offline Access – Windows & MacOS
- Windows/Mac app logs
- Audio Configuration
-
Xbox
- Settings: Xbox
- Xbox One Logs
- Xbox One Controller Mapping
- What media formats are supported?
- Why can’t the Xbox One app find my local server?
- What information is sent to Microsoft?
- Is Xbox Live Gold required?
Intro to Plex
-
- What is Plex?
- Quick-Start & Step by Step Guides for Plex Media Server
- Plex: Free vs Paid
- Exploring More of Plex
-
- Plex Media Server Requirements
- Internet and Network Requirements
-
- What is Plex Pass?
- Plex Pass Feature Overview
- Free Access to Plex Apps
- Plex Pass Subscription Management
- Early Access & Beta Releases
- Sales Tax information
-
- Plex Accounts
- Sign in to Your Plex Account
- Use Google, Facebook, or Apple to Sign in with Plex
- Secure Your Account with Two-Factor Authentication
- Account Audio/Subtitle Language Settings
- I forgot my Plex Account PIN; how can I reset it? How can I change my PIN?
-
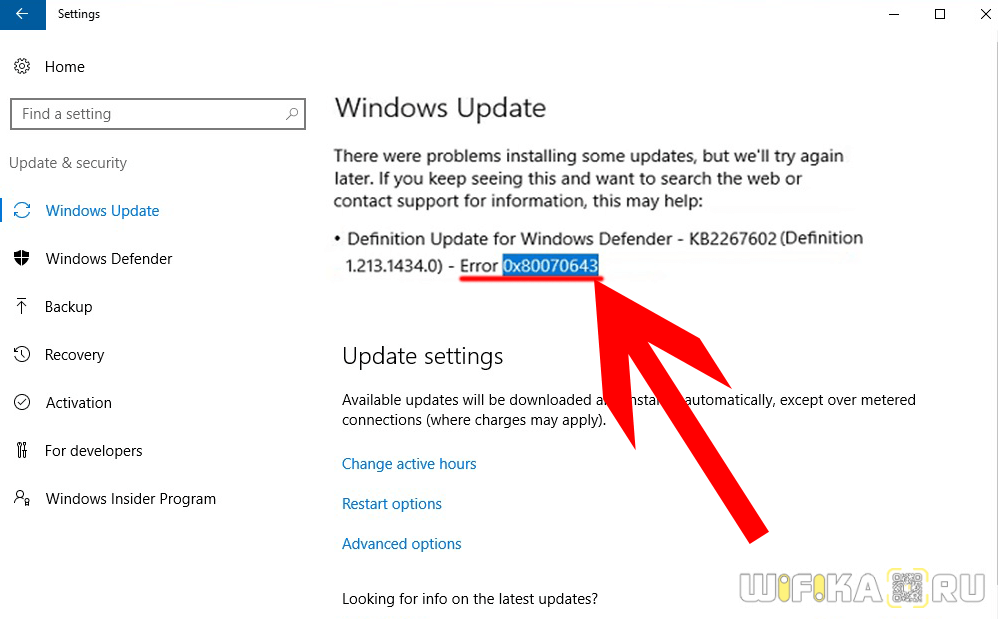
- Why can’t the Plex app find or connect to my Plex Media Server?
- Why is my video stream buffering?
- How do I choose the right Streaming Quality in an app?
- Why is some of my content not found?
- Is Plex like Netflix?
- Changelogs and Release Notes
- Log Files
- Why don’t videos from iTunes, Amazon, etc. play?
- Using plex.tv resources information to troubleshoot app connections
- Is Plex Illegal?
-
Guides
- Connect a Player App to Your Plex Account
- Using Hardware-Accelerated Streaming
- Automatically Adjust Quality when streaming
- How to Use Secure Server Connections
- Server Settings – Bandwidth and Transcoding Limits
- Accessing a Server through Relay
- Reporting Security Issues
- Getting Started with Plex Music
- Quick Guide to Mobile Sync
- Forum Community Guidelines
- License Information
Трюк второй: использование приложений DLNA в качестве запасного варианта
В дополнение к отключению локальной авторизации, как мы это делали в предыдущем разделе, есть еще одна хитрость, которой мы хотим воспользоваться. Есть некоторые клиенты Plex, которые, несмотря на наши изменения на сервере Plex, по-прежнему не будут работать без авторизации с основного сервера Plex. На этом уроке одним из наиболее ярких примеров этой проблемы является официальное приложение Plex для Apple TV — даже если вы настроили IP-конфигурацию, как мы только что сделали, клиент Apple TV испугается, если не сможет получить доступ к Интернету.,
Для того, чтобы сыграть в нее дополнительно, безопасно, мы собираемся использовать отличную резервную систему: DLNA. DLNA — это более старый стандарт, который позволяет локальным устройствам в вашей сети соединяться друг с другом для доступа к мультимедиа. По умолчанию в Plex должен быть включен DLNA, но давайте подтвердим, что это безопасно. В тех же настройках «Сервера», к которым мы обращались в предыдущем разделе, найдите «DLNA» на боковой панели и выберите его.
В разделе DLNA убедитесь, что установлен флажок «Включить сервер DLNA».
Хотя использование Plex Media Server в качестве сервера DLNA не дает вам полного опыта Plex, оно дает вам доступ ко всем вашим медиафайлам. Любой медиаплеер или клиент с поддержкой DLNA в вашей локальной сети автоматически обнаружит ваш сервер Plex, и вы сможете получить доступ к медиафайлам.
Если, например, у вас есть Apple TV, и вы разочарованы тем, что основное приложение Plex не работает без доступа к Интернету, вы все равно можете получить доступ к фильмам и шоу на своем сервере Plex с помощью DLNA-совместимого приложения, такого как VLC. Фактически, в нашем руководстве по использованию VLC с Apple TV вы даже можете увидеть наш медиа-сервер Plex на некоторых снимках экрана, благодаря интеграции DLNA.
После проверки, чтобы убедиться, что DLNA включена, найдите время, чтобы просмотреть ваши любимые приложения и даже руководства для ваших умных телевизоров и медиа-ресиверов, чтобы найти упоминания о «DLNA» или «UPnP». Узнайте о том, как эти функции работают, и протестируйте их на своем Plex Media Server, чтобы после выхода в Интернет вы были готовы к работе.
Вот и все, что нужно сделать: с двумя небольшими изменениями в программном обеспечении Plex Media Server вы не готовы получить доступ к вашим медиафайлам, даже если интернет не работает или вы собрали всю свою установку Plex в домик, далекий от цивилизации.
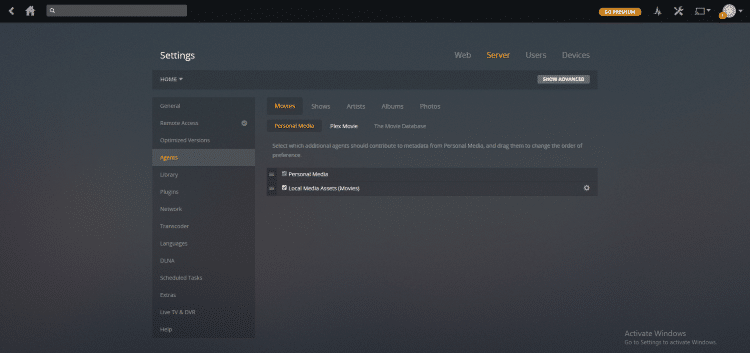
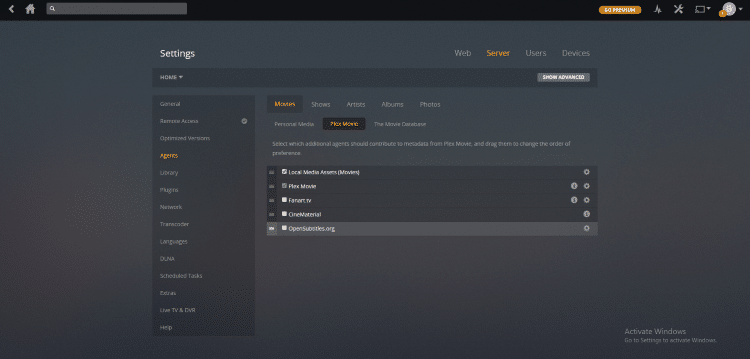
1. Организуйте агентов Plex
Plex может автоматически вставлять метаданные для вашего контента. Хотя вам нужно очень точно отформатировать медиафайлы Plex, чтобы это работало, это стоит сделать.
Конечно, Plex может добавлять постеры к фильмам и названия сериалов, но метаданные идут гораздо глубже. Он будет знать, какие актеры были в шоу, на каком телеканале транслировалось шоу, кто поставил каждый фильм и что различные критики на известных сайтах обзора думали о содержании. После того как вы добавили метаданные, вы даже можете использовать их для поиска связанных шоу, других фильмов, в которых снимались некоторые актеры, и так далее.
Но ничего из этого не сработает, если вы неправильно настроите своих агентов. Вам необходимо убедиться, что Local Media настроен для других источников метаданных. Если нет, Plex будет использовать существующие локальные метаданные в файле в качестве основного источника. Во многих случаях эти метаданные будут неверными.
Чтобы изменить порядок, перейдите в « Настройки»> «Настройки»> «Агенты» . Используя вкладки в верхней части экрана, выберите «Фильмы»> «База данных фильмов» . Перетащите локальные медиаресурсы (фильмы) под базу данных фильмов . Затем перейдите в « Программы»> «TheTVDB» и переместите « Local Media Assets (TV)» в « TheTVDB» .
Television Specials
Shows sometimes air “specials” or other content that isn’t part of the standard season. “Specials” episodes are always part of season zero (i.e. season number “00”) and should be placed inside a folder named either or .
/TV Shows/ShowName/Specials/ShowName – s00e13 – Optional_Info.ext
Where you specify the correct episode numbers. If you’re unsure whether a particular episode is a Special or not, check the episode on TheTVDB and name it as you see it there.
If an “episode” you have doesn’t appear in TheTVDB (e.g. DVD Specials or goof reel), place this content in the or folder named using s00eYY using a false “YY” number (e.g.: Heroes s00e99). The show will be available to play in a Plex App but won’t have any special metadata gathered, such as a summary.
Создание медиатеки
Для использования PLEX необходимо зарегистрироваться на сайте. Большинство возможностей доступно на бесплатном аккаунте, а за PLEX Pass придется заплатить, но об этом позже.
PLEX позволяет создать медиатеки с разным контентом — фильмы, домашнее видео, музыка, фотографии. Для каждой медиатеки будет выбран определенный способ индексации — сканер.
Сканер автоматически подгружает обложки для альбомов, постеры к фильмам, имена актеров и исполнителей, скачанные сериалы будут разбиты на сезоны.
Можно упростить задачу сканеру — подготовить каталог с файлами в нужной сортировке. Я предполагаю, что вы бережно относитесь к своей коллекции и уже сделали это, но в любом случае можно обратиться к рекомендациям на сайте PLEX.
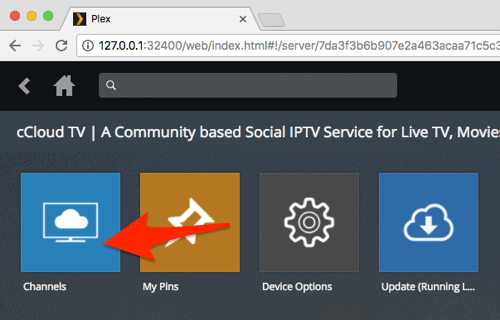
Pre-loaded IPTV Player for Plex
- If you don’t have an IPTV provider, you can try your luck with quite a few free ones. The problem, as you’ll quickly discover, is that they aren’t very reliable and don’t offer as much content. The one I’ve found to be consistently solid and has a decent variety of content (for a free service) is CCloud TV. This one requires absolutely no setup or configuration, so once you’ve installed it – you’re done.
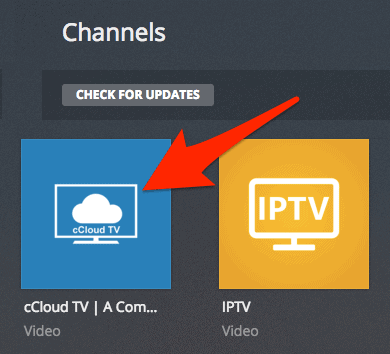
Launch it up from the Channels section of Plex. Select the Channels button from the first group of options.
From here you’ll be presented with a series of ways to start viewing TV shows, movies etc. If you select List View you’ll get a list of every ‘channel’ – but it will take a long time to load (and may timeout). Instead, select Page View
This lets you go through all of the channels in groups of 10, which will load much more quickly.
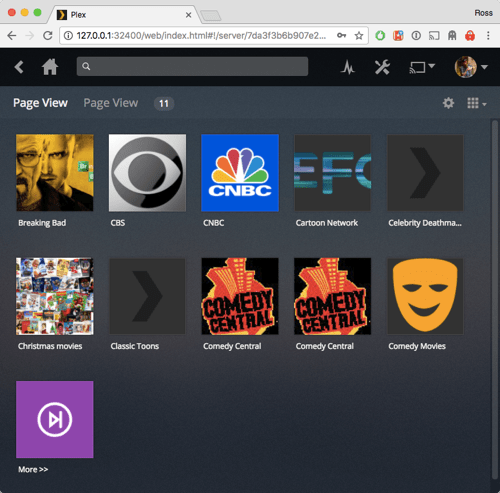
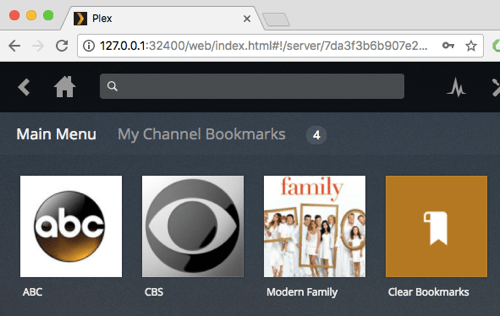
One feature to look at which will save you time is the Bookmark option. They really speed up the time it takes to find your frequently watched channels.
As it happens, CCloud TV actually does support m3u file support as well 🙂 Just open its settings and paste the URL into the space provided. Note: I have found that CCloud TV times out and/or outright crashes more frequently than Cigaras IPTV, so if it’s m3u support you’re looking for, I would recommend Cigaras IPTV over CCloud TV.

If this article helped you, I’d be grateful if you could share it on your preferred social network — it helps me a lot. If you’re feeling particularly generous, you could buy me a coffee and I’d be super grateful 🙂
Home » Multimedia » How to Watch IPTV in Plex
WebTools
(https://github.com/ukdtom/WebTools.bundle)
WebTools, пожалуй, самый популярный плагин для Plex. Его часто называют неофициальным магазином приложений Plex, потому что он позволяет пользователям загружать любые неофициальные дополнения для своих серверов Plex.
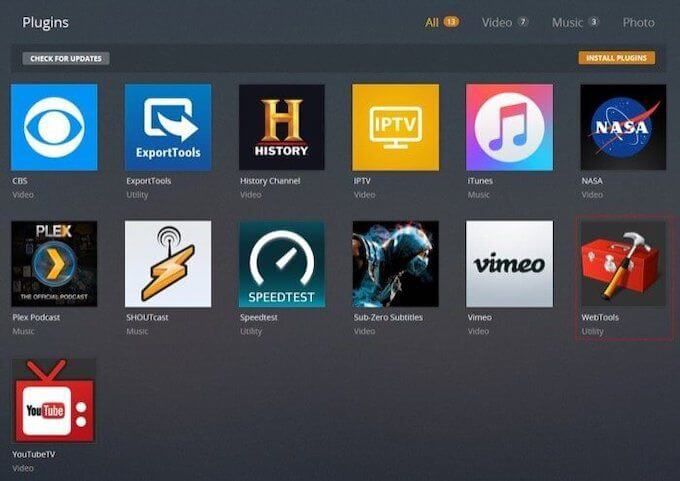
Кроме того, он может похвастаться инструментами ведения журнала, которые помогают отслеживать активность в Plex, системой управления субтитрами, инструментами управления списком воспроизведения и утилитой, которая сканирует отсутствующие медиа. Если у вас большая библиотека Plex, может быть сложно все отслеживать. WebTools делает это намного проще.
VPN on the Plex Media Server Computer
The platforms on which some Plex apps run don’t allow us to actively scan the network to try and find available Plex Media Servers. Other platforms don’t allow direct communication to any private IP (e.g. any IP on your local network). Among others, the PlayStation, Smart TVs, and Xbox apps are affected by these restrictions.
That means we have to get connection information in another way, which is provided when both the Plex Media Server and the app sign into your Plex account. This is accomplished because your Plex Media Server will send its private and public IP address to plex.tv, which can then be retrieved and used by the Plex app to find servers.
When using a VPN (Virtual Private Network), the IP information can be incorrect because of the VPN and thus the Plex app doesn’t have the correct/necessary information to be able to find your Plex Media Server and connect.
What You Can Do
Essentially, you want to make sure that your VPN isn’t interfering when your Plex Media Server sends the connection information to plex.tv.
- Disable the VPN
- Launch Plex Media Server
- Ensure that the Server successfully signs in under Settings > Server > General
- Enable the VPN
When You Should Do It
You should take the above steps whenever new connection information would be sent to plex.tv, which includes:
- Launching or restarting the Server
- Signing in to the Server
- Whenever your computer experiences a network change (e.g. a laptop switching from wired to wireless connection)
Last modified on: April 12, 2019
Accessing or Restricting the Content
Can my family watch this content?
Absolutely. Our ad-supported Live TV streaming is available to all users for free. If your family members already have their own, regular Plex account, then they’ll have access directly, or they can choose to enable/disable the media source for themselves, as desired.
You can also create a managed user for a family member and add them to your Plex Home for fast user switching.
Related Page: Related Page: Plex Home
Can I restrict the content my child can access?
If you’ve set up a managed user for your child, you can personalize the channel lineup displayed for their account. Do that by switching to their account and personalizing the guide as normal. You can reorder the channels (e.g. putting the “kids” channels at the top) or hide any channels you don’t want them watching.
Note: While you can hide channels for that user, you cannot currently “lock” things or prevent them from personalizing the guide themselves. That includes potentially making channels visible again.
Related Page:
How do I turn Live TV off so I don’t see it?
If you simply don’t want it in the sidebar of your app, you can unpin it via normal customization. You’d still be able to access it (when desired) under the More sidebar entry.
Alternatively, if you’re simply not interested in the service at all, you can disable it for your account altogether. Instructions are available in our “” article.
Related Page:
Last modified on: March 30, 2021
4. Installing Plex Apps
Downloading Apps
Whether you have an iPhone, Android, Roku, Smart TV, Xbox, or other device, you will want to download a Plex App from our website or the device’s app store. When on the Plex Downloads page, check the list of apps and follow the instructions for your preferred device.
Related Page: Plex Downloads
Network Connectivity
Once you have downloaded the app, make sure you are on the same local network as the server. If both are on the same network, everything should work, and you will be able to browse and play media from the device.
If you are trying to access Plex Media Server from a device outside of your home network, remote access will need to be set up and running.
Related Page:
Connecting to Plex with Remote Access
One of the great features of Plex is the ability to access and stream your media when you’re away from home. By default, your Plex Media Server will attempt to set up this Remote Access feature for you automatically. While the automatic setup works for a lot of our users, it can fail on some home networks. If you have trouble getting it set up or decide you’d rather not have it enabled, we have additional resources and troubleshooting information available.
Related Page: Related Page:
4. Оптимизируйте свои видео Plex.
Функцию оптимизации лучше всего рассматривать как «предварительный транскодер». Это позволяет вам выбирать определенные видео и конвертировать их в другой формат.
Например, если вы знаете, что хотите посмотреть «Историю игрушек», «Красавица и чудовище» и «Бэтмена» на своем iPad во время путешествия на следующей неделе, вы можете заранее оптимизировать видеофайлы. Это означает, что они будут немедленно готовы к игре на выбранном вами устройстве. Дальнейшего перекодирования не потребуется.
Оптимизация мультимедиа полезна, даже если вы знаете, что многие люди будут одновременно смотреть видео удаленно, поскольку это снизит нагрузку на ваш процессор.
Вы можете оптимизировать отдельное шоу, серию или даже всю библиотеку. Для начала перейдите к контенту, который хотите отредактировать, нажмите на три горизонтальные точки и выберите « Оптимизировать» .
В новом окне вы можете выбрать, хотите ли вы оптимизировать определенное количество видео или только непросмотренные видео
Что еще более важно, вы можете установить качество оптимизации. Вы можете выбрать Оптимизировать для мобильных устройств , Оптимизировать для ТВ , Исходное качество или Пользовательское
Параметр Custom позволяет указать конкретное устройство, разрешение и битрейт.
Если вы настроили длинный список элементов для оптимизации, вы можете управлять очередью, выбрав « Настройки»> «Статус»> «Конверсия» . Вы можете управлять уже оптимизированными файлами в разделе «Настройки»> «Управление»> «Оптимизированные версии» .
3. Управление транскодированием Plex
Plex может перекодировать ваши видео, чтобы их можно было воспроизводить на других устройствах. Например, настольные ПК и ноутбуки обычно имеют мощные процессоры, которые могут обрабатывать большинство форматов файлов, кодеков, разрешений и субтитров. Однако могут возникнуть проблемы с мобильными устройствами и приставками для потоковой передачи. Таким образом, Plex может редактировать ваши видео на лету, чтобы гарантировать их совместимость с другими гаджетами.
Обратной стороной транскодирования является то, что для этого требуется много ресурсов процессора. Если ваш сервер Plex работает на невыделенном компьютере, вы, вероятно, не хотите, чтобы потреблялась вся мощность вашего процессора. Даже если у вас есть выделенный сервер, вы в конечном итоге достигнете его пределов, если многие элементы перекодируются одновременно.
Решение — изменить настройки транскодера ( Настройки> Настройки> Транскодер ). Вам необходимо знать три значения (нажмите « Показать дополнительные», чтобы увидеть их все):
- Качество транскодирования: вы можете определить качество транскодирования с помощью раскрывающегося меню. Чем выше качество, тем медленнее будет перекодирование.
- Фоновое перекодирование x264 Preset: этот параметр определяет скорость фонового перекодирования, например, при использовании Mobile Sync, Cloud Sync или Media Optimizer. Чем медленнее перекодировка, тем меньше размер файла и выше качество, но тем медленнее время.
- Максимальное количество одновременных сеансов перекодирования — это самый важный параметр для большинства пользователей. Логика подсказывает, что чем больше разрешено одновременных перекодировок, тем больше нагрузка на ЦП. Учитывайте мощность вашего ЦП, независимо от того, является ли он выделенным сервером, и сколько людей будут одновременно вести потоковую передачу, и установите соответствующее число. С вашей стороны может потребоваться метод проб и ошибок.
Update:
Unfortunately Plex has decided to retire the entire plugin system. This means if you want to watch IPTV in Plex you’ll need to use an older version of the server, which isn’t recommended. Even if you use an older version of the server, you’ll only be able to access an IPTV plugin via the web based Plex client. You are much better off simply using a different method to watch IPTV (here are guides for Windows and macOS).
We’re keeping these instructions up and online in case you do decide to find an older version of Plex Media Server and use it. A good place to start looking for an older version would be the Plex Community Forums.
We’re going to cover two ‘types’ of IPTV plugins (called “Channels”) for Plex – an .m3u playlist based player and a “pre-loaded” player. The M3U-based player allows you to input your IPTV providers .m3u file or URL – meaning you need an existing IPTV service in order to use it. The “pre-loaded” player comes with content already available for you to stream – ie. no IPTV provider is required.
If you need help installing ‘unsupported’ plugins (Channels) in Plex, see this tutorial.
As with all things “online streaming” – using a VPN while watching TV online strongly advised. It’s no one’s business what you’re watching. If you need help setting up a VPN we’ve got you covered. We have detailed, step by step guides for setting up/configuring VPNs in Windows, macOS, iOS and Android and Linux. If you’re already using a VPN give yourself a pat on the back and carry on 🙂
Plex Subtitles
For those who have trouble hearing or simply enjoy closed caption when streaming, Plex also has the ability to enable subtitles.
Prior to integrating subtitles with your content, you must have an OpenSubtitles account. OpenSubtitles works with Plex and tons of other apps as shown in our Subtitle guide below:
The process for Plex, however, is a little different than other streaming apps. Follow the guide below to enable subtitles within Plex:
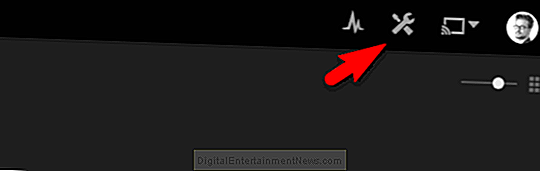
1. Launch Your Plex Server and click Settings (tool icon) in the upper right-hand corner
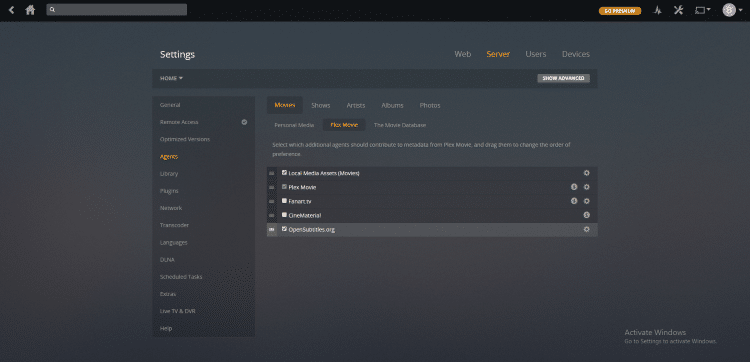
2. Select Agents and choose Plex Movie
3. Click the Gear icon next to OpenSubtitles.org
4. Enter your OpenSubtitles login credentials, choose your language preferences, and click Save
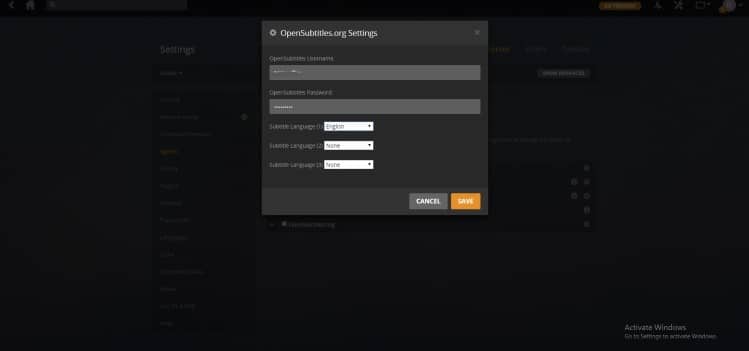
5. Check the box next to OpenSubtitles
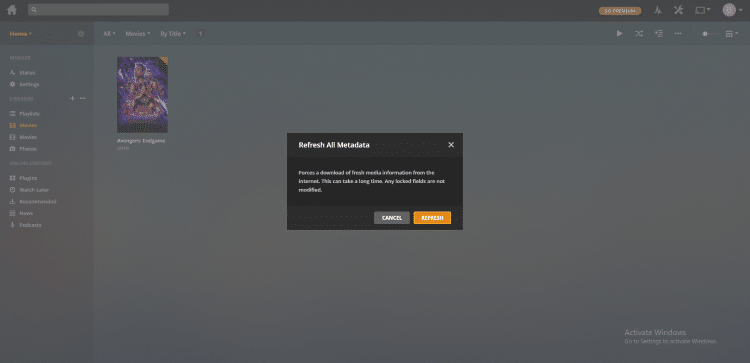
6. Return to the homepage of your Server and click the options button next to the content you want subtitles added and select Refresh All Metadata
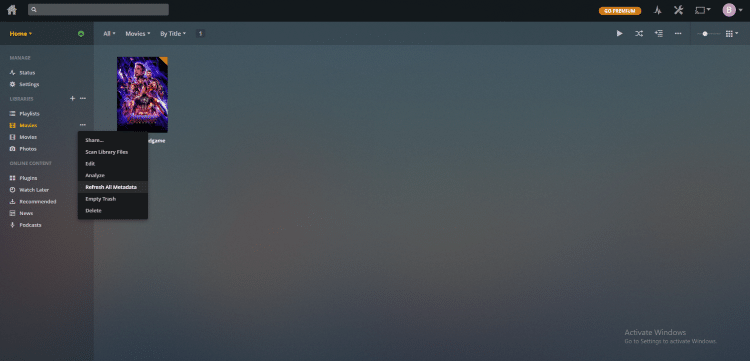
7. When prompted, click Refresh
8. Wait for metadata to refresh and that’s it! You can now enjoy Subtitles on your synced content from any device.
To activate subtitles on your Plex Client app, simply play your chosen content and enable within settings of the movie/tv show.
Enjoy!
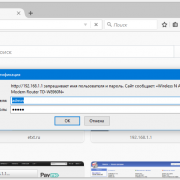
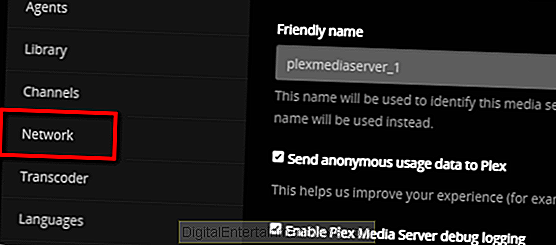
Трюк первый: отключите проверку подлинности Plex в локальной сети
Первым делом стоит подключиться к вашему Plex Media Server через веб-панель управления, расположенную по умолчанию по адресу
. Нажмите на значок гаечного ключа в правом верхнем углу, чтобы получить доступ к меню настроек.
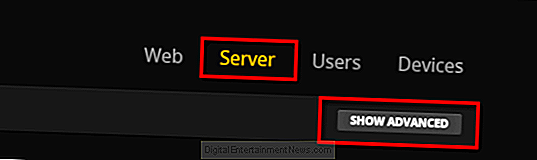
В меню «Настройки» перейдите на вкладку «Сервер» и, кроме того, нажмите кнопку «Показать дополнительные», если вы еще не включали расширенный просмотр.
Выберите «Сеть» в левой панели навигации.
Прокрутите страницу настроек «Сеть», пока не увидите запись «Список IP-адресов и сетей, которые разрешены без авторизации».
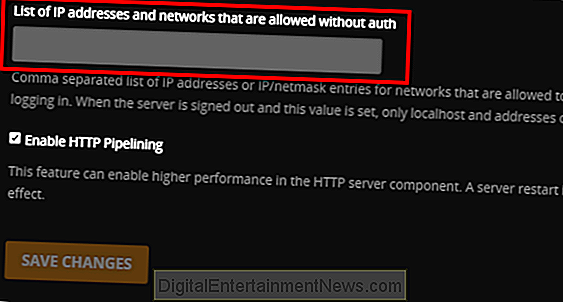
Вы можете заполнить поле двумя различными типами записей. Вы можете ввести отдельные IP-адреса, разделенные запятыми, или вы можете назначить целый блок IP-адресов, используя маску сети. Мы не рекомендуем использовать трюк с индивидуальным IP-адресом, если у вас нет веских причин для этого, поскольку для этого требуется, чтобы каждое устройство в вашей сети, которому вы хотите предоставить автономный доступ к Plex в автономном режиме, имело статический IP-адрес и вводил все их здесь.
Гораздо более простой способ приблизиться к этому — использовать маску сети, то есть просто способ указать несколько адресов. Например, если ваша локальная сеть использует IP-адреса в формате 10.0.0.x, вы можете ввести:
10.0.0.1/255.255.255.0
Это говорит в сетевой маске «все адреса от 10.0.0.1 до 10.0.0.254», что будет охватывать все доступные адреса в вашей локальной сети.
Если ваша локальная сеть использует 192.168.1.x, вы должны ввести:
192.168.1 / 255.255.255.0
..и так далее.
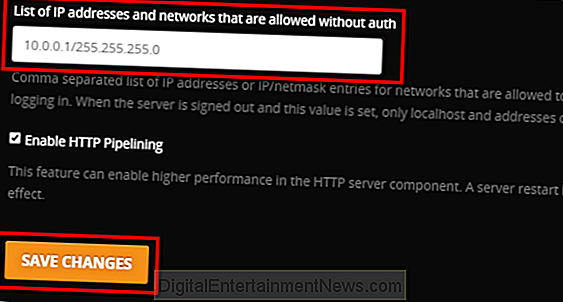
Обязательно сохраните изменения, и все готово. Ваш локальный сервер Plex будет оставаться открытым для бизнеса даже без активного интернет-соединения с домашним телефоном.