Python print format
Содержание:
Многострочные F-Strings
У вас могут быть многострочные f-strings:
Python
name = «Eric»
profession = «comedian»
affiliation = «Monty Python»
message = (
f»Hi {name}. »
f»You are a {profession}. »
f»You were in {affiliation}.»
)
print(message)
# Вывод: ‘Hi Eric. You are a comedian. You were in Monty Python.’
|
1 2 3 4 5 6 7 8 9 10 11 12 |
name=»Eric» profession=»comedian» affiliation=»Monty Python» message=( f»Hi {name}. « f»You are a {profession}. « f»You were in {affiliation}.» ) print(message) # Вывод: ‘Hi Eric. You are a comedian. You were in Monty Python.’ |
Однако помните о том, что вам нужно разместить f вначале каждой строки. Следующий код не будет работать:
Python
message = (
f»Hi {name}. »
«You are a {profession}. »
«You were in {affiliation}.»
)
print(message)
# Вывод: ‘Hi Eric. You are a {profession}. You were in {affiliation}.’
|
1 2 3 4 5 6 7 8 |
message=( f»Hi {name}. « «You are a {profession}. « «You were in {affiliation}.» ) print(message) # Вывод: ‘Hi Eric. You are a {profession}. You were in {affiliation}.’ |
Если вы не внесете f в начале каждой индивидуальной строки, то получите обычную, старую версию строк, без приятных новшеств.
Если вы хотите размножить строки по нескольким линиям, у вас также есть возможность избежать возвратов при помощи \:
Python
message = f»Hi {name}. » \
f»You are a {profession}. » \
f»You were in {affiliation}.»
print(message)
# Вывод: ‘Hi Eric. You are a comedian. You were in Monty Python.’
|
1 2 3 4 5 6 |
message=f»Hi {name}. «\ f»You are a {profession}. «\ f»You were in {affiliation}.» print(message) # Вывод: ‘Hi Eric. You are a comedian. You were in Monty Python.’ |
Но вот что произойдет, если вы используете «»»:
Python
message = f»»»
Hi {name}.
You are a {profession}.
You were in {affiliation}.
«»»
print(message)
# Вывод: ‘\n Hi Eric.\n You are a comedian.\n You were in Monty Python.\n’
|
1 2 3 4 5 6 7 8 |
message=f»»» Hi {name}. print(message) # Вывод: ‘\n Hi Eric.\n You are a comedian.\n You were in Monty Python.\n’ |
Инструкция по отступам доступна в PEP 8.
Пример 3: Форматирование чисел с заполнением для int и float
# integer numbers with minimum width
print("{:5d}".format(12))

# width doesn't work for numbers longer than padding
print("{:2d}".format(1234))

# padding for float numbers
print("{:8.3f}".format(12.2346))

# integer numbers with minimum width filled with zeros
print("{:05d}".format(12))

# padding for float numbers filled with zeros
print("{:08.3f}".format(12.2346))
Выход
Вот:
- в первом операторе {: 5d} принимает целочисленный аргумент и присваивает минимальную ширину 5. Поскольку выравнивание не задано, оно выравнивается по правому краю.
- Во втором утверждении вы можете видеть, что ширина (2) меньше числа (1234), поэтому он не занимает места слева, но также не усекает число.
- В отличие от целых чисел, числа с плавающей запятой имеют как целую, так и десятичную части. И минимальная ширина, определенная для числа, предназначена для обеих частей в целом, включая «.».
- В третьем операторе {: 8.3f} усекает десятичную часть на 3 разряда, округляя последние 2 цифры. И число, теперь 12,235, принимает ширину 8 в целом, оставляя 2 места слева.
- Если вы хотите заполнить оставшиеся места нулями, поместите ноль перед описателем формата. Он работает как для целых чисел, так и для чисел с плавающей запятой: {: 05d} и {: 08.3f}.
Запись файлов Excel
>>> import openpyxl
>>> wb = openpyxl.Workbook()
>>> wb.sheetnames

>>> wb.create_sheet(title = 'Первый лист', index = 0)
<Worksheet "Первый лист">
>>> wb.sheetnames

>>> wb.remove(wb)
>>> wb.sheetnames

>>> wb.save('example.xlsx')
Метод возвращает новый объект , который по умолчанию становится последним листом книги. С помощью именованных аргументов и можно задать имя и индекс нового листа.
Метод принимает в качестве аргумента не строку с именем листа, а объект . Если известно только имя листа, который надо удалить, используйте . Еще один способ удалить лист — использовать инструкцию .
Не забудьте вызвать метод , чтобы сохранить изменения после добавления или удаления листа рабочей книги.
Запись значений в ячейки напоминает запись значений в ключи словаря:
>>> import openpyxl
>>> wb = openpyxl.Workbook()
>>> wb.create_sheet(title = 'Первый лист', index = 0)
>>> sheet = wb
>>> sheet = 'Здравствуй, мир!'
>>> sheet.value
'Здравствуй, мир!'
Заполняем таблицу 3×3:
import openpyxl

# создаем новый excel-файл
wb = openpyxl.Workbook()

# добавляем новый лист
wb.create_sheet(title = 'Первый лист', index = )

# получаем лист, с которым будем работать
sheet = wb'Первый лист'

for row in range(1, 4)
    for col in range(1, 4)
        value = str(row) + str(col)
        cell = sheet.cell(row = row, column = col)
        cell.value = value

wb.save('example.xlsx')
Можно добавлять строки целиком:
sheet.append('Первый', 'Второй', 'Третий')
sheet.append('Четвертый', 'Пятый', 'Шестой')
sheet.append('Седьмой', 'Восьмой', 'Девятый')
Standard Format Specifiers
If an object does not define its own format specifiers, a standard
set of format specifiers is used. These are similar in concept to
the format specifiers used by the existing ‘%’ operator, however
there are also a number of differences.
The general form of a standard format specifier is:
align]
The brackets ([]) indicate an optional element.
Then the optional align flag can be one of the following:
'<' - Forces the field to be left-aligned within the available
      space (This is the default.)
'>' - Forces the field to be right-aligned within the
      available space.
'=' - Forces the padding to be placed after the sign (if any)
      but before the digits.  This is used for printing fields
      in the form '+000000120'. This alignment option is only
      valid for numeric types.
'^' - Forces the field to be centered within the available
      space.
Note that unless a minimum field width is defined, the field
width will always be the same size as the data to fill it, so
that the alignment option has no meaning in this case.
The optional ‘fill’ character defines the character to be used to
pad the field to the minimum width. The fill character, if present,
must be followed by an alignment flag.
The ‘sign’ option is only valid for numeric types, and can be one
of the following:
'+'  - indicates that a sign should be used for both
       positive as well as negative numbers
'-'  - indicates that a sign should be used only for negative
       numbers (this is the default behavior)
' '  - indicates that a leading space should be used on
       positive numbers
If the ‘#’ character is present, integers use the ‘alternate form’
for formatting. This means that binary, octal, and hexadecimal
output will be prefixed with ‘0b’, ‘0o’, and ‘0x’, respectively.
‘width’ is a decimal integer defining the minimum field width. If
not specified, then the field width will be determined by the
content.
If the width field is preceded by a zero (‘0’) character, this enables
zero-padding. This is equivalent to an alignment type of ‘=’ and a
fill character of ‘0’.
The ‘precision’ is a decimal number indicating how many digits
should be displayed after the decimal point in a floating point
conversion. For non-numeric types the field indicates the maximum
field size — in other words, how many characters will be used from
the field content. The precision is ignored for integer conversions.
Finally, the ‘type’ determines how the data should be presented.
The available integer presentation types are:
'b' - Binary. Outputs the number in base 2.
'c' - Character. Converts the integer to the corresponding
      Unicode character before printing.
'd' - Decimal Integer. Outputs the number in base 10.
'o' - Octal format. Outputs the number in base 8.
'x' - Hex format. Outputs the number in base 16, using lower-
      case letters for the digits above 9.
'X' - Hex format. Outputs the number in base 16, using upper-
      case letters for the digits above 9.
'n' - Number. This is the same as 'd', except that it uses the
      current locale setting to insert the appropriate
      number separator characters.
'' (None) - the same as 'd'
The available floating point presentation types are:
'e' - Exponent notation. Prints the number in scientific
      notation using the letter 'e' to indicate the exponent.
'E' - Exponent notation. Same as 'e' except it converts the
      number to uppercase.
'f' - Fixed point. Displays the number as a fixed-point
      number.
'F' - Fixed point. Same as 'f' except it converts the number
      to uppercase.
'g' - General format. This prints the number as a fixed-point
      number, unless the number is too large, in which case
      it switches to 'e' exponent notation.
'G' - General format. Same as 'g' except switches to 'E'
      if the number gets to large.
'n' - Number. This is the same as 'g', except that it uses the
      current locale setting to insert the appropriate
      number separator characters.
'%' - Percentage. Multiplies the number by 100 and displays
      in fixed ('f') format, followed by a percent sign.
'' (None) - similar to 'g', except that it prints at least one
      digit after the decimal point.
Objects are able to define their own format specifiers to
replace the standard ones. An example is the ‘datetime’ class,
whose format specifiers might look something like the
arguments to the strftime() function:
"Today is: {0:%a %b %d %H:%M:%S %Y}".format(datetime.now())
Производительность
F-строки не только гибкие, но и быстрые. И для сравнения производительности разных подходов к форматированию я подготовил два шаблона:
- простой, в который нужно вставить всего два значения: строку и число;
- сложный, данные для которого собираются из разных переменных, а внутри происходит преобразование даты, вещественного числа, а также округление.
Финальная простая строка получается такой:
Сложная строка на выходе такая:
Далее я написал 5 функций, каждая из которых возвращает строку отформатированную одним из способом, а после запустил каждую функцию много раз. Пример всех функций и тестового скрипта можете скачать тут.
После недолгого тестирования я получил следующие результаты:
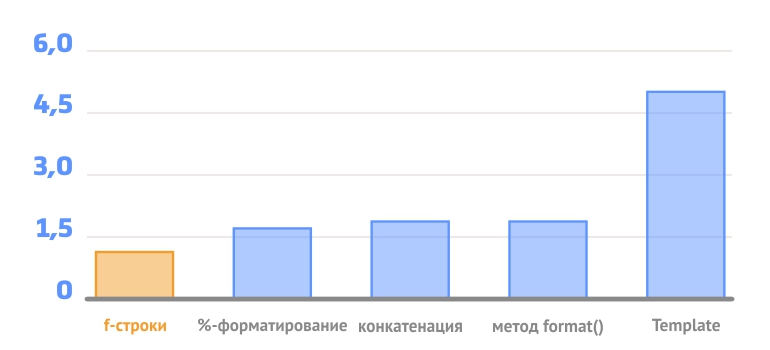
На простых примерах f-строки показывают самые лучшие результаты.На 25% быстрее %-форматирования и метода format().
Решение задач
1. Поэкспериментируйте с переводом в различные типы данных
2. Пользователь вводит свое имя и фамилию. Выведите:
Hello, имя фамилия
# На месте слов с % должны быть введенные данные
3. Посчитайте сумму трех введенных целых чисел
4. Посчитайте сумму трех введенных дробных чисел. Подумайте в какой тип данных нужно преобразовать значение, возвращенное функцией input
5. Дано число, выведите предыдущее и следущее за ним числа в таком формате:
# Число равно 10
Число предшествующее числу 10 равно 9
Число следующее за числом 10 равно 11
6. Вводятся имя и возраст. Выведите, где введенное имя = Максим, а возраст = 20
Привет, Максим! Ваш возраст равен 20!
String Methods
The built-in string class (and also the unicode class in 2.6) will
gain a new method, ‘format’, which takes an arbitrary number of
positional and keyword arguments:
"The story of {0}, {1}, and {c}".format(a, b, c=d)
Within a format string, each positional argument is identified
with a number, starting from zero, so in the above example, ‘a’ is
argument 0 and ‘b’ is argument 1. Each keyword argument is
identified by its keyword name, so in the above example, ‘c’ is
used to refer to the third argument.
There is also a global built-in function, ‘format’ which formats
a single value:
print(format(10.0, "7.3g"))
The String .format() Method: Arguments
Let’s start with a quick example to get you acquainted before you dive into more detail on how to use this method in Python to format strings. For review, here’s the first example from the previous tutorial on the :
>>>
Here, you used the string modulo operator in Python to format the string. Now, you can use Python’s string method to obtain the same result, like this:
>>>
In this example, is the string . The replacement fields are , , and , which contain numbers that correspond to the zero-based positional arguments , , and . Each positional argument is inserted into the template in place of its corresponding replacement field:
The next example uses keyword arguments instead of positional parameters to produce the same result:
>>>
In this case, the replacement fields are , , and . These fields specify keywords that correspond to the keyword arguments , , and . Each keyword value is inserted into the template in place of its corresponding replacement field:
You’ll learn more about positional and keywords arguments there in the next tutorial in this introductory series, which explores functions and argument passing. For now, the two sections that follow will show you how these are used with the Python method.
Reordering Formatters with Positional and Keyword Arguments
When we leave curly braces empty without any parameters, Python will replace the values passed through the method in order. As we have seen, so far, a formatter construction with two empty curly braces with two values passed through will look like this:
The first pair of curly braces is substituted with the string value of , and the second pair is substituted with the string value of .
The values that exist within the method look like this:
They are essentially the tuple data type and each individual value contained in the tuple can be called by its index number, which starts with the index number 0.
We can pass these index numbers into the curly braces that serve as the placeholders in the original string:
In the above example, the output will be what we get without passing index numbers into the braces as we are calling the values in the tuple in order:
But, if we reverse the index numbers with the parameters of the placeholders we can reverse the values being passed into the string:
If you call an index number of 2 in a tuple that has values at index positions 0 and 1, then you are calling on a value that is out of range. When you call an index number that is out of range, you’ll receive an error message:
The error message we see refers to the tuple only having values at index numbers 0 and 1, therefore placing index number 2 out of range.
Let’s add a few more placeholders and a few more values to pass to them, so we can understand how we can reorder formatters a little better. First, here is a new string with four placeholders:
Without parameters, the values that are passed into the method are concatenated into the string in order.
The string values contained in the tuple correspond to the following index numbers:
| “happy” | “smiling” | “blue” | “shark” |
|---|---|---|---|
| 1 | 2 | 3 |
Let’s use the index numbers of the values to change the order that they appear in the string:
Since we started with index number 3, we called the last value of first. The other index numbers included as parameters change the order of how the words appear within the original string.
In addition to positional arguments, we can also introduce keyword arguments that are called by their keyword name:
This example shows the use of a keyword argument being used with positional arguments. We can fill in the keyword argument alongside positional arguments, and can move these arguments around to change the resulting string:
Positional and keyword arguments used with string formatters give us more control over manipulating our original strings through reordering.
Добавление формул
Формулы, начинающиеся со знака равенства, позволяют устанавливать для ячеек значения, рассчитанные на основе значений в других ячейках.
sheet'B9' = '=SUM(B1:B8)'
Эта инструкция сохранит в качестве значения в ячейке . Тем самым для ячейки задается формула, которая суммирует значения, хранящиеся в ячейках от до .
Формула Excel — это математическое выражение, которое создается для вычисления результата и которое может зависеть от содержимого других ячеек. Формула в ячейке Excel может содержать данные, ссылки на другие ячейки, а также обозначение действий, которые необходимо выполнить.
Использование ссылок на ячейки позволяет пересчитывать результат по формулам, когда происходят изменения содержимого ячеек, включенных в формулы. Формулы Excel начинаются со знака . Скобки могут использоваться для определения порядка математических операции.
Примеры формул Excel: =27+36, =А1+А2-АЗ, =SUM(А1:А5), =MAX(АЗ:А5), =(А1+А2)/АЗ.
Хранящуюся в ячейке формулу можно читать, как любое другое значение. Однако, если нужно получить результат расчета по формуле, а не саму формулу, то при вызове функции ей следует передать именованный аргумент со значением .
Python string formatting
Here, we will see python string formatting with an example.
The format() method allows the formatting of the selected parts of a string. We use format to make sure that the string will display as expected.
To control such value, add a placeholder curly bracket {} in the text and then run the values through the format() method.
Example:
To get the output, I have used print(msg.format(roll)). You can refer to the below screenshot for the output.

Python string formatting
This is how we can do string formatting in Python.
You may also like, How to concatenate strings in python? and How to add two variables in Python.
Method 4: Use the logging module
We can use Python’s logging module to print to the file. This is preferred over Method 2, where explicitly changing the file streams is not be the most optimal solution.
import logging

# Create the file
# and output every level since 'DEBUG' is used
# and remove all headers in the output
# using empty format=''
logging.basicConfig(filename='output.txt', level=logging.DEBUG, format='')

logging.debug('Hi')
logging.info('Hello from AskPython')
logging.warning('exit')
This will, by default, append the three lines to . We have thus printed to the file using , which is one of the recommended ways of printing to a file.
Идите с миром и форматируйте!
Разумеется, вы можете использовать старые методы форматирования строк, но с f-строками у вас есть более лаконичный, читаемый и удобный способ, который одновременно и быстрее, и менее вероятно приведет к ошибке. Упростить свою жизнь используя f-строки — отлична причина пользоваться Python 3.6, если вы еще не перешли к этой версии. (Если вы все еще пользуетесь Python 2.7, не беспокойтесь, 2020 год не за горами!)
Согласно дзену Python, когда вам нужно выбрать способ решения задачи, всегда “есть один — и желательно только один очевидный способ сделать это”. Кстати, f-строки не являются единственным способом форматирования строк. Однако, их использование вполне может стать единственным адекватным способом.
Погружене в f-строки
f-строки делают очень простую вещь — они берут значения переменных, которые есть в текущей области видимости, и подставляют их в строку. В самой строке вам лишь нужно указать имя этой переменной в фигурных скобках.
f-строки также поддерживают расширенное форматирование чисел:
С помощью f-строк можно форматировать дату без вызова метода strftime():
Они поддерживают базовые арифметические операции. Да, прямо в строках:
Позволяют обращаться к значениям списков по индексу:
А также к элементам словаря по ключу:
Причем вы можете использовать как строковые, так и числовые ключи. Точно также как в обычном Python коде:
Вы можете вызывать в f-строках методы объектов:
А также вызывать функции:
f-строки очень гибкий и мощный инструмент для создания самых разнообразных шаблонов.
Со всеми возможностя f-строк вы можете ознакомится в PEP498.
Форматирование индекса с форматом Python ()
Функция формата () также обслуживает цель строки форматирования в Пользовательские позиции I.e. Мы можем изменить положение строки или значения, которое нужно разместить на выходе, указав Индексные значения внутри фигурных скобок.
Пример:
s1 = 'Python'
s2 = 'with'
s4 = 'Data Science'

res = "{2} {1} {0}".format(s1, s2, s4)
print(res)
В приведенном выше фрагментах кода формат (S1, S2, S4) внутренне назначает их значения индекса как 0, 1, 2, и поэтому значение, передаваемые функции.
То есть S1 назначается индексом 0, S2 назначается индексом 1, а S4 назначается индексом 2.
Таким образом, путем передачи значения индекса строки в {} мы можем изменить положение строки по значению индекса.
Выход:
Data Science with Python
Using Formatters to Organize Data
Formatters can be seen in their best light when they are being used to organize a lot of data in a visual way. If we are showing databases to users, using formatters to increase field size and modify alignment can make your output more readable.
Let’s look at a typical for loop in Python that will print out , , and in the range from 3 to 12:
While the output is organized in a way, the numbers overflow into each other’s columns, making the bottom of the output less readable. If you are working with a bigger data set with many small and big numbers, this can pose a problem.
Let’s use formatters to give more space to these numbers:
Here, in our curly braces, we didn’t add the field name for index number and started with the colon, followed by the number for the field size, and a conversion type since we’re working with integers. In this example, we accommodated for the size of each expected output, giving 2 extra character spaces for each, depending on the maximum possible number size, so our output looks like this:
We can specify a consistent field size number in order to have even columns, making sure that we accommodate the larger numbers:
We can also manipulate the alignment of the columns by adding , , and for text alignment, change to to add decimal places, change field name index numbers, and more to ensure that we are displaying the data as we would like.
5 способов форматирования строк
1. Конкатенация. Грубый способ форматирования, в котором мы просто склеиваем несколько строк с помощью операции сложения:
2. %-форматирование. Самый популярный способ, который перешел в Python из языка С. Передавать значения в строку можно через списки и кортежи , а также и с помощью словаря. Во втором случае значения помещаются не по позиции, а в соответствии с именами.
3. Template-строки. Этот способ появился в Python 2.4, как замена %-форматированию (), но популярным так и не стал. Поддерживает передачу значений по имени и использует $-синтаксис как в PHP.
4. Форматирование с помощью метода format(). Этот способ появился в Python 3 в качестве замены %-форматированию. Он также поддерживает передачу значений по позиции и по имени.
5. f-строки. Форматирование, которое появилось в Python 3.6 (). Этот способ похож на форматирование с помощью метода format(), но гибче, читабельней и быстрей.
Скорость
Буква f в f-strings может также означать и “fast”. Наши f-строки заметно быстрее чем % и () форматирования. Как мы уже видели, f-строки являются выражениями, которые оцениваются по мере выполнения, а не постоянные значения. Вот выдержка из документации:
Во время выполнения, выражение внутри фигурных скобок оценивается в собственной области видимости Python и затем сопоставляется со строковой литеральной частью f-строки. После этого возвращается итоговая строка. В целом, это все.
Рассмотрим сравнение скорости:
Python
>>> import timeit
>>> timeit.timeit(«»»name = «Eric»
… age = 74
… ‘%s is %s.’ % (name, age)»»», number = 10000)
0.003324444866599663
|
1 2 3 4 5 6 |
>>>importtimeit >>>timeit.timeit(«»»name = «Eric» … age = 74 … ‘%s is %s.’ % (name, age)»»»,number=10000) |
Python
>>> timeit.timeit(«»»name = «Eric»
… age = 74
… ‘{} is {}.’.format(name, age)»»», number = 10000)
0.004242089427570761
|
1 2 3 4 5 |
>>>timeit.timeit(«»»name = «Eric» … age = 74 … ‘{} is {}.’.format(name, age)»»»,number=10000) |
Python
>>> timeit.timeit(«»»name = «Eric»
… age = 74
… f'{name} is {age}.'»»», number = 10000)
0.0024820892040722242
|
1 2 3 4 5 |
>>>timeit.timeit(«»»name = «Eric» … age = 74 … f'{name} is {age}.'»»»,number=10000) |
Как вы видите, f-строки являются самыми быстрыми.
Однако, суть не всегда в этом. После того, как они реализуются первыми, у них есть определенные проблемы со скоростью и их нужно сделать быстрее, чем str.format(). Для этого был предоставлен специальный опкод BUILD_STRING.
Повторите список в Python С Помощью Модуля Numpy
Третий способ перебора списка в Python – это использование модуля Numpy. Для достижения нашей цели с помощью этого метода нам нужны два метода numpy, которые упоминаются ниже:
- numpy.nditer()
- numpy.arange()
Iterator object nditer предоставляет множество гибких способов итерации по всему списку с помощью модуля numpy. Функция href=”http://numpy.org/doc/stable/reference/generated/numpy.nditer.html”>nditer() – это вспомогательная функция, которая может использоваться от очень простых до очень продвинутых итераций. Это упрощает некоторые фундаментальные проблемы, с которыми мы сталкиваемся в итерации. href=”http://numpy.org/doc/stable/reference/generated/numpy.nditer.html”>nditer() – это вспомогательная функция, которая может использоваться от очень простых до очень продвинутых итераций. Это упрощает некоторые фундаментальные проблемы, с которыми мы сталкиваемся в итерации.
Нам также нужна другая функция для перебора списка в Python с помощью numpy, которая является numpy.arrange().numpy.arange возвращает равномерно распределенные значения в пределах заданного интервала. Значения генерируются в пределах полуоткрытого интервала [start, stop) (другими словами, интервала, включающего start, но исключающего stop).
Синтаксис:
Синтаксис numpy.nditer()
Синтаксис numpy.arrange()
- start: Параметр start используется для предоставления начального значения массива.
- stop: Этот параметр используется для предоставления конечного значения массива.
- шаг: Он обеспечивает разницу между каждым целым числом массива и генерируемой последовательностью.
Объяснение
В приведенном выше примере 1 программа np.arange(10) создает последовательность целых чисел от 0 до 9 и сохраняет ее в переменной x. После этого мы должны запустить цикл for, и, используя этот цикл for и np.nditer(x), мы будем перебирать каждый элемент списка один за другим.
Пример 2:
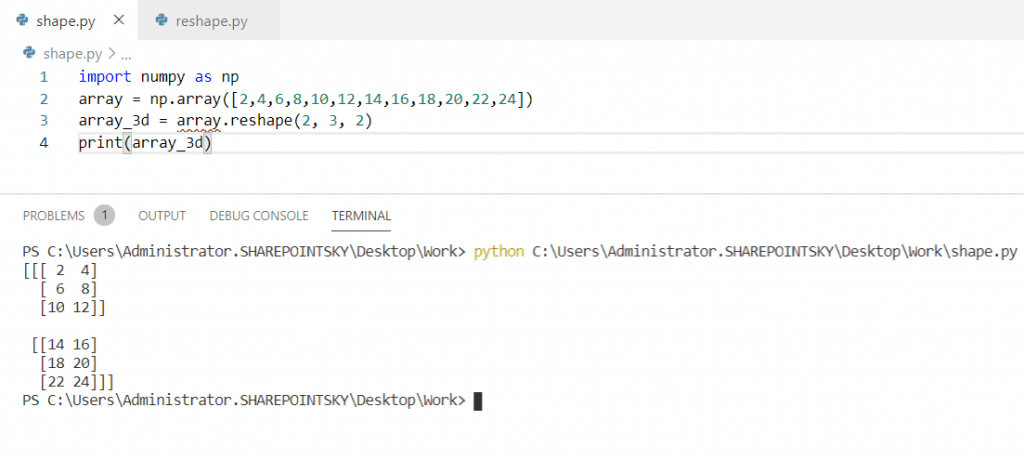
В этом примере мы будем итерировать 2d-массив с помощью модуля numpy. Для достижения нашей цели нам здесь нужны три функции.
- numpy.arange()
- numpy.reshape()
- numpy.nditer()
import numpy as np
.arange(16) .reshape(4, 4)
for x in np.nditer(a):
	print(x)
Объяснение:
Большая часть этого примера похожа на наш первый пример, за исключением того, что мы добавили дополнительную функцию numpy.reshape(). Функция numpy.reshape() обычно используется для придания формы нашему массиву или списку. В основном на непрофессиональном языке он преобразует размеры массива-как в этом примере мы использовали функцию reshape(), чтобы сделать массив numpy 2D-массивом.
Error handling
There are two classes of exceptions which can occur during formatting:
exceptions generated by the formatter code itself, and exceptions
generated by user code (such as a field object’s ‘getattr’ function).
In general, exceptions generated by the formatter code itself are
of the «ValueError» variety — there is an error in the actual «value»
of the format string. (This is not always true; for example, the
string.format() function might be passed a non-string as its first
parameter, which would result in a TypeError.)
The text associated with these internally generated ValueError
exceptions will indicate the location of the exception inside
the format string, as well as the nature of the exception.
For exceptions generated by user code, a trace record and
dummy frame will be added to the traceback stack to help
in determining the location in the string where the exception
occurred. The inserted traceback will indicate that the
error occurred at:
File "<format_string>;", line XX, in column_YY
where XX and YY represent the line and character position
information in the string, respectively.
Пример 11: Типовое форматирование с помощью format() и переопределения метода __format __()
import datetime
# datetime formatting
date = datetime.datetime.now()
print("It's now: {:%Y/%m/%d %H:%M:%S}".format(date))

# complex number formatting
complexNumber = 1+2j
print("Real part: {0.real} and Imaginary part: {0.imag}".format(complexNumber))

# custom __format__() method
class Person:
    def __format__(self, format):
        if(format == 'age'):
            return '23'
        return 'None'

print("Adam's age is: {:age}".format(Person()))
Выход
It's now: 2016/12/02 04:16:28
Real part: 1.0 and Imaginary part: 2.0
Adam's age is: 23
Вот:
- Для datetime: текущее datetime передается как позиционный аргумент методу format(). И, внутренне используя метод __format __(), format() получает доступ к году, месяцу, дню, часу, минутам и секундам.
- Для комплексных чисел: 1 + 2j внутренне преобразуется в объект ComplexNumber. Затем, получив доступ к его атрибутам real и imag, число форматируется.
- Переопределение __format __(): как и datetime, вы можете переопределить свой собственный метод __format __() для настраиваемого форматирования, который возвращает возраст при доступе как {: age}.
Вы также можете использовать функции объекта __str __() и __repr __() с сокращенными обозначениями.
Как и __format __(), вы можете легко переопределить методы объекта __str __() и __repr_().
The Python String .format() Method
The Python string method was introduced in version 2.6. It’s similar in many ways to the string modulo operator, but goes well beyond in versatility. The general form of a Python call is shown below:
Note that this is a method, not an operator. You call the method on , which is a string containing replacement fields. The and to the method specify values that are inserted into in place of the replacement fields. The resulting formatted string is the method’s return value.
In the string, replacement fields are enclosed in curly braces (). Anything not contained in curly braces is literal text that’s copied directly from the template to the output. If you need to include a literal curly bracket character, like or , in the template string, then you can escape this character by doubling it:
>>>
Formatting class and dictionary members using format()
Python internally uses for class members in the form «.age». And, it uses lookup for dictionary members in the form «».
Example 8: Formatting class members using format()
Output
Adam's age is: 23
Here, object is passed as a keyword argument p.
Inside the template string, Person’s name and age are accessed using and respectively.
Example 9: Formatting dictionary members using format()
Output
Adam's age is: 23
Similar to class, dictionary is passed as a keyword argument p.
Inside the template string, person’s name and age are accessed using and respectively.
There’s an easier way to format dictionaries in Python using .
is a format parameter (minimum field width).
Функция filter
Функции более высокого порядка часто используются для фильтрации данных. Языки функционального программирования предлагают универсальную функцию , получающую набор элементов для фильтрации, и фильтрующую функцию, которая определяет, нужно ли исключить конкретный элемент из последовательности или нет. Встроенная в Python функция выполняет именно такую задачу. В результирующем списке будут только те значения, для которых значение функции для элемента последовательности истинно. Вот общий формат функции :
В данном формате предикативная_функция – это ссылка на стандартную функцию либо лямбда-функция, которая возвращает истину либо ложь, и последовательность – это итерируемая последовательность, т.е. список, кортеж, диапазон или строковые данные.
Например, ниже приведена однострочная функция для определения четности числа:
Чтобы отфильтровать все числа последовательности и оставить только четные, применим функцию :
Приведенный выше фрагмент кода можно переписать по-другому, поместив лямбда функцию в качестве первого аргумента:
И снова, в обоих случаях функция возвращает ленивый объект-последовательность, который нужно вычислить, чтобы увидеть результат. В иной ситуации в программе может иметься процесс, который потребляет по одному элементу за один раз. В этом случае в него можно подавать по одному элементу, вызывая встроенную функцию .
Примечание. Для предотвращения выхода за пределы ленивой последовательности необходимо отслеживать возникновение ошибки StopIteration. Например,
Функция enumerate
Встроенная функция enumerate возвращает индекс элемента и сам элемент последовательности в качестве кортежа. Вот общий формат функции enumerate:
В данном формате последовательность – это итерируемая последовательность, т.е. список, кортеж, диапазон или строковые данные. Функция enumerate возвращает ленивый объект-последовательность, который нужно вычислить, чтобы увидеть результат.
Например, в приведенном ниже интерактивном сеансе показано применение этой функции к списку букв. В результате ее выполнения будет получена ленивая последовательность со списком кортежей, где каждый кортеж представляет собой индекс и значение буквы.
В строке 2 применена функция , которая преобразовывает ленивую последовательность в список. Функция enumerate также позволяет применять заданную функцию к каждому элементу последовательности с учетом индекса:
Функция в строке 1 переводит строковое значение второго элемента кортежа в верхний регистр и присоединяет к нему преобразованное в строковый тип значение первого элемента. Здесь – это кортеж, в котором – это индекс элемента, и – строковое значение элемента.
Python format Example
The following set of examples helps to understand the Format function in Python Programming Language.
Python format String {} Example 1
The Python format string function uses curly braces {} as the replacement placeholders. It means one {} accepts one argument from format function.
Python format String {} output
Here we declared a string variable, instead of providing the string value directly inside a print statement. Next, we called that msg using format function.
Python format string {} Example 2
The format function uses {} as the place holders for replacement fields. Anything that is outside the {} treated as the Python string literal, which prints as it is. In this Python format string example, the first statement replaces the {} with Hello and prints the World as it is. The second statement replaces the {} after the Learn with Python. The last one replaces the {} after the Employee Age is with 25.
Python format Multiple arguments Example
We are using multiple arguments inside the format function. In this situation, the Python print format function uses the order that we specified inside the format.
For example, within the first statement, the first curly braces fill or replace with Tutorial, and the second curly braces replace with Gateway. It always follows the same order.
format function with Multiple arguments output
Here we declared two variables. Next, we used those string variables inside a format function.
format function with variables output
Python format Index Example
So far, we used the {}. That’s why those curly braces are replaced by the position of arguments in a format function. In this example, we used the index values to change the position.
The second statement prints 2nd argument at {1}, first argument value at {0}, and third argument value at {2} place holder.
Python format using Key value Example
In python, you can also use the keyword parameters such as key = value within the format function.
In this String function example, within the first statement, key1 is lang and value1 = Python. Next, key2 = com and value2 = Tutorial Gateway. It means the key replaced by value1 and key2 with value2.
format function using Key value output
Python format function to truncate string
You can use this format function to truncate the string as well. In this example, we show how to use the Python format function to truncate the string value.
The first statement truncate the string to the length of 5. The next statement truncates to length 7, and the third one returns the first 10 characters from a string.
Truncate string using a format function output