Сила единицы измерения em в css
Содержание:
em Unit
em is borrowed from the typography world, and it’s a unit that allows setting the font-size of an element relative to the font-size of its parent.
Let’s take this simple example:
With that example, the child would have a font-size of 27px (1.5 * 18px = 27px).
If the parent element doesn’t specify a value for font-size, a value will be looked for higher up in the DOM tree. If no font-size is specified all the way up to the root element (), then the browser default of 16px is used.
Pretty simple and straight-forward right? em units can be used for much more than just setting font-size however, and they can be used pretty much everywhere units are expected (padding, margin, width, height, max-width,…you get the picture!) When em units are used on other properties than font-size, the value is relative to the element’s own font-size.
Let’s add to our example:
- The padding top and bottom on will be 54px. That’s 2 times the font-size of our current element’s font size (2 * 27px)
- The padding left and right on will be of 27px. That’s 1 time the font-size of our element.
Remember: when em units are used on font-size, the size is relative to the font-size of the parent. When used on other properties, it’s relative to the font-size of the element itself.
Compounding Effect: Trouble in Paradise
So far everything is well and good with using the em unit, but a problem can come about from the fact that the unit can compound from one level to the other.
Let’s keep a similar basic example:
But let’s use it in our markup like this:
I’m 15px I’m 30px, as expected I’m 60px, trouble starts! I’m 120px, now we’re really in trouble!
So, as you can see, the effect of em units can be compounding when multiple em-font-sized elements are within one another. This can become a problem and can lead to unintended consequences in your designs.
This problem is the reason why the rem unit was created.
Practical Application
There may be some debate among web designers and I’m sure different people have different preferred approaches, however my recommendation is as follows.
Use Units For:
Any sizing that should scale depending on the font-size of an element other than the root.
Generally speaking, the only reason you’ll need to use units is to scale an element which has non default font sizing.
As per our example above, design components like menu items, buttons, and headings may have their own explicitly stated font sizes. If you change these font sizes, you want the entire component to scale proportionately.
Common properties this guideline will apply to are , , , and settings, when used on elements with non default font sizing.
I recommend that when you do employ units, the font size of the element they’re used on should be set in units to preserve scalability but avoid inheritance confusion.
Typically Don’t Use Units for Font Sizes
It’s quite common to see units used for font sizing, particularly in headings, however I would suggest that designs are more manageable if units are typically used for font sizing.
The reason headings often use units is they’re a better choice than units, being relative to regular text size. However units can achieve this goal equally well. If any font size adjustment on the element is made, the heading sizes will still scale too.
Try changing the font size on the element in this CodePen to see for yourself:
More often than not, we don’t want our font sizes to scale based on any element other than the root, with only a few exceptions.
One example where we might want based font sizing could be a drop down menu, where we have second level menu item text sized depending on the font size of the first level. Another example might be a font icon used inside a button, where the icon’s size should relate to the button’s text size.
However most elements in a web design will tend not to have this type of requirement, so you’ll generally want to use units for font sizing, with units only where specifically needed.
Use units for:
Any sizing that doesn’t need units for the reasons described above, and that should scale depending on browser font size settings.
This accounts for almost everything in a standard design including most heights, most widths, most padding, most margins, border widths, most font sizes, shadows, basically almost every part of your layout.
In a nutshell, everything that can be made scalable with units, should be.
Tip
When creating layouts it’s often easier to think in pixels but output in units.
You can have pixel to calculations done automatically via a preprocessor like Stylus / Sass / Less, or a postprocessor like PostCSS with the PXtoRem plugin.
Alternatively, you can use PXtoEM to manually do your conversions.
Always Use Media Queries
Importantly, when using units to create a uniformly scalable design, your media queries should also be in units. This will ensure that whatever a user’s browser font size, your media queries will respond to it and adjust your layout.
For example, if a user scales up text very high, your layout may need to snap down from a two columns to a single column, just as it might on a smaller screened mobile device.
If your breakpoints are at fixed pixel widths, only a different viewport size can trigger them. However with based breakpoints they will respond to different font sizing too.
Don’t Use or For:
Multi Column Layout Widths
Column widths in a layout should typically be based so they can fluidly fit unpredictably sized viewports.
However single columns should still generally incorporate values via a setting.
For example:
This keeps the column flexible and scalable, but prevents it from becoming too wide for the text therein to be comfortably readable.
When an Element Should be Strictly Unscalable
In a typical web design there won’t be many parts of your layout that can’t be designed for scalability. However occasionally you will come across elements that really do need to use explicit fixed values for the purpose of preventing scaling.
The precondition for employing fixed sizing values should be that if the element in question were scaled it would break. This really doesn’t come up often, so before you’re tempted to whip out those units, ask yourself if using them is an absolute necessity.
Относительные единицы, зависящие от шрифта
Относительные единицы измерения, зависящие от шрифта, ссылаются на заранее установленный размер шрифта или значение свойства font-family:
- ex (высота символа x);
- ch (ширина символа ноль (0));
- единица измерения em в CSS (высота шрифта текущего элемента);
- rem (размер шрифта корневого элемента).
ex
Определяется как “высота символа x текущего шрифта ИЛИ половина 1 em”. То есть высота строчной буквы x установленного шрифта. При изменении значения свойства font-family единица измерения ex изменяется.
em
Единица измерения em CSS имеет значение, равное размеру шрифта основного или родительского элемента. Например, если размер шрифта родительского элемента 30px, то значение 1em будет вычисляться как 30px (30 х 1) для всех дочерних элементов. Число не обязательно должно быть целым. Если в примере заменить 1em на 0,5, то значение будет 15px (30 х 0,5).
Единица измерения em принимает значение родительского тега. Это может привести к нежелательным результатам при использовании вложенных друг в друга элементов.
Допустим, что у нас есть три вложенных друг в друга элемента. Первый элемент (корневой) имеет размер шрифта 30px, а два вложенных элемента — шрифт в 2em. Элемент, вложенный в корневой, будет иметь размер шрифта, вычисляемый как 60px (30 х 2). А элемент, вложенный в него, будет иметь размер шрифта, вычисляемый как 120px (60 х 2).
rem
rem подобна em CSS, но ее значение всегда остается равным размеру шрифта корневого элемента. Единица измерения rem пригодится при разработке адаптивных сайтов, потому что позволяет масштабировать всю страницу, изменив размер шрифта в HTML-элементе.
Циклы делают переменные CSS недействительными во время вычисления значения
Рассмотрим следующий фрагмент Sass:
Результат будет примерно таким:
CSS-переменные — это совсем другая история, естественное следствие их реактивности. Посмотрим на тот же фрагмент, но с CSS-переменными:
Переменная, зависящая от самой себя, создала бы бесконечный цикл, которого не должно быть в декларативном языке, таком как CSS. Чтобы избежать этого, циклы делают все задействованные переменные недействительными во время вычисления значения. Сюда входят циклы длины 1 (в примере выше) и более длинные циклические цепочки, где переменная A зависит от B, которая зависит от C, и так далее до Z, которая зависит от A. Все 26 (A..Z) были бы недействительными во время вычисления значения, что сделало бы их значение равным начальному, и это по существу дало бы такой же результат, как если бы они никогда не были установлены.
Wrapping Up
Let’s have a quick bullet point recap of what we’ve covered:
- and units are computed into pixel values by the browser, based on font sizes in your design.
- units are based on the font size of the element they’re used on.
- units are based on the font size of the element.
- units can be influenced by font size inheritance from any parent element
-
units can be influenced by font size inheritance from browser font settings.
- Use units for sizing that should scale depending on the font size of an element other than the root.
- Use units for sizing that doesn’t need units, and that should scale depending on browser font size settings.
- Use units unless you’re sure you need units, including on font sizes.
- Use units on media queries
- Don’t use or in multi column layout widths — use instead.
- Don’t use or if scaling would unavoidably cause a layout element to break.
I hope you’ve now built a robust and complete picture of exactly how and units work, and through that know how to best leverage them in your designs.
I encourage you to try the usage guidelines contained in this tutorial for yourself, and enjoy the fully fledged scalability and responsiveness of the layouts they’ll enable you to create.
Using Only REMs to Make a Header Element
Say you have a header element () that looks like this:
I’m a header!
The header’s styles should be similar to the following if you sized everything in :
So far so good.
Next, let’s create a slightly bigger header element since it’s common to have differently-sized elements on the same website. While doing so, let’s try to inherit as many styles as possible.
The markup of the bigger header element might be something like this:
The CSS would be:
Unfortunately, the code doesn’t turn out well. You can see that there’s too little breathing space between the edge and text of .
Not enough breathing space between edge and text on this large header
If you insist on using only s, the only way to fix this problem is to redeclare the on the large header:
More padding the large header now!
Notice the pattern here? ’s is twice as large as ’s. Consequently, on is twice as large as on .
What would happen if we have more headers of different sizes, or if the headers have to change in size? You can already see how coding the entire site in can cause duplication and super complex code.
We can simplify the code such that there’s no need to redeclare on if we don’t mind using both and :
As you can see, can be incredibly helpful when you have a property that needs to scale with it’s font size. This is where the first rule was born.
Next, let’s take a look at what happens if you use an only approach for the same header.
Absolute Lengths
The absolute length units are fixed and a length expressed in any of these will appear as exactly that size.
Absolute length units are not recommended for use on screen, because screen sizes vary so much.
However, they can be used if the output medium is known, such
as for print layout.
| Unit | Description |
|---|---|
| cm | centimeters Try it |
| mm | millimeters Try it |
| in | inches (1in = 96px = 2.54cm) Try it |
| px * | pixels (1px = 1/96th of 1in) Try it |
| pt | points (1pt = 1/72 of 1in) Try it |
| pc | picas (1pc = 12 pt) Try it |
* Pixels (px) are relative to the viewing device. For low-dpi devices, 1px is one device pixel (dot) of the display. For printers and high resolution
screens 1px implies multiple device pixels.
Conclusion
As already mentioned, Simurai deserves the credit for making this technique more widely known. Of course, as he mentions, this is nothing new and the basic concept has been used by many experienced developers for years — but maybe not so much in the context of web components, or modules.
As Simurai says, I think this is a nice method to use when building a CSS framework or library of components, and, if nothing else, I think the technique really drives home the point about how powerful em units are.
If you have any feedback or experience with a similar technique, or have any ideas for how this concept can be improved, I’d be glad to hear your comments.
rem Unit
The rem unit, short for root em is a relative unit that’ll always be based upon the font-size value of the root element, which is the element. And if the element doesn’t have a specified font-size, the browser default of 16px is used.
So that means that, by using the rem unit, the values of parent elements are ignored, and only the value of the root is taken into consideration.
With a similar example, but in rem:
I’m 15px
I’m 32px, as expected
I’m 32px, yep!
I’m 32px, like clockwork!
As you can see, using rem units allow us to avoid the compounding effect of em units. With rem things are always and consistently based on the font-size or the root element, so there are no surprises.
The same goes for other values than font-size (margin, padding,…) Using rem units on those will still be relative to the font-size of the root element.
Conclusion
We end here our encounter with CSS rem units. It is obvious that there are many advantages in using these units in our code, like responsiveness, scalability, improved reading experience, and greater flexibility in defining components. Rem units not a universal silver bullet solution but, with careful deployment, they can solve many problems that have irked developers for years. It’s up to each one of us to unlock the full potential of rems. Start your editors, experiment and share your results with the rest of us.
For more on CSS sizing units, see:
- A Look at Length Units in CSS
- The New CSS3 Relative Font Sizing Units
- The Power of em Units in CSS
Какие бывают единицы измерения CSS
После рассмотрения способов задания цветов CSS автор видеоурока перейдет к подробному рассказу о единицах измерения CSS — размеров шрифтов, отступов и прочих элементов веб-страничек, где необходимо задание размеров.
Пиксели — самые распространенные единицы измерения CSS
Самым распространенным и известным определением размеров является задание их в пикселях. Базовым размером шрифта, который по умолчанию применяется большинством браузеров, является 16px.
Ключевые слова как вариант единиц измерения шрифтов в CSS
Для определения размера шрифта CSS также предлагает 7 ключевых слов, которые задают этот размер относительно базового: xx-small, x-small, small, medium, large, x-large и xx-large. Базовым является medium (16px), остальные уменьшают или увеличивают базовый размер. Эти единицы измерения CSS используют крайне редко.
Единицы измерения CSS — проценты
Задание единиц измерения CSS в процентах означает определение размеров относительно величин, заданных браузером либо размеров, прописанных в родительском блоке. Базовый размер шрифта (16px) равнозначен 100%. Относительные размеры могут изменяться, если наследуются значения тега-предка. Все вложенные теги наследуют его и используют для вычисления своих размеров.
Исключения!
- При установке свойства margin-left в % процент берется от ширины родительского блока, а не от его margin-left.
- При установке свойства line-height в % процент берется от текущего размера шрифта, а вовсе не от line-height родителя.
- Для width/height процент берется обычно от ширины/высоты родителя, но при position: fixed процент задается от ширины/высоты окна (а не родителя или документа).
Единицы измерения CSS — em
Следующие единицы измерения размеров в CSS — em. 1 em равен, как и при задании размеров в процентах, базовому размеру. Принцип работы механизма наследования с em точно такой же как и с процентами.
Современные единицы измерения CSS — rem
С появлением CSS3 появилась новая единица измерения размеров CSS — rem, что означает root element. Его значение основано на значении шрифта корневого root-элемента. В подавляющем большинстве случаев это относится к базовому размеру шрифта, а корневым элементом считается HTML. Для использования единиц измерения CSS rem можно установить базовый размер шрифта для элемента HTML, а затем применять rem для определения значений шрифтов относительно этого базового размера.
.main-menu {
font-size: .5rem; /*.5rem = 10px*/
}
.heading {
font-size: 1.5rem; /*1.5rem = 30px*/
}
Единицы измерения CSS относительно viewport — vw и vh
В CSS3 также появились такие новые единицы измерения, как vw и vh, они определяются относительно размеров области просмотра, т.е. размера viewport.
- 1vw = 1% ширины окна;
- 1vh = 1% высоты окна.
К этому типу единиц измерения относятся и следующие:
- vmin — наименьшее значение из vw и vh;
- vmax — наибольшее значение из vw и vh.
Эти единицы созданы для поддержки мобильных устройств, поскольку любые размеры, которые заданы в них, автоматически масштабируются в соответствии с размерами экрана, что очень удобно при создании адаптивных сайтов.
Этим видеоуроком завершится наш курс по основам CSS. Надеемся, полученные вами знания очень пригодятся вам в дальнейшем вашем развитии как веб-разработчика.
Приятного всем просмотра! Учитесь с удовольствием! Всегда ваш Loftblog.
Таблица соотношений px, pt, em %
| Пункт, pt | Пиксель, px | Единица, em | Процент,% |
| 6pt | 8px | 0.5em | 50% |
| 7pt | 9px | 0.55em | 55% |
| 7.5pt | 10px | 0.625em | 62.5% |
| 8pt | 11px | 0.7em | 70% |
| 9pt | 12px | 0.75em | 75% |
| 10pt | 13px | 0.8em | 80% |
| 10.5pt | 14px | 0.875em | 87.5% |
| 11pt | 15px | 0.95em | 95% |
| 12pt | 16px | 1em | 100% |
| 13pt | 17px | 1.05em | 105% |
| 13.5pt | 18px | 1.125em | 112.5% |
| 14pt | 19px | 1.2em | 120% |
| 14.5pt | 20px | 1.25em | 125% |
| 15pt | 21px | 1.3em | 130% |
| 16pt | 22px | 1.4em | 140% |
| 17pt | 23px | 1.45em | 145% |
| 18pt | 24px | 1.5em | 150% |
| 20pt | 26px | 1.6em | 160% |
| 22pt | 29px | 1.8em | 180% |
| 24pt | 32px | 2em | 200% |
| 26pt | 35px | 2.2em | 220% |
| 27pt | 36px | 2.25em | 225% |
| 28pt | 37px | 2.3em | 230% |
| 29pt | 38px | 2.35em | 235% |
| 30pt | 40px | 2.45em | 245% |
| 32pt | 42px | 2.55em | 255% |
| 34pt | 45px | 2.75em | 275% |
| 36pt | 48px | 3em | 300% |
Различия CSS-переменных и переменных препроцессора
CSS-препроцессоры — это программы, которые выполняются один раз, для генерации статического CSS-кода. В них переменные ведут себя, как переменные императивного языка программирования, с лексической областью видимости и множеством значений в процессе выполнения. Их можно использовать в любом месте таблицы стилей: селекторах, условных выражениях, свойствах, значениях и т.д., даже для генерации только фрагмента значения или селектора.
CSS-переменные можно использовать только в значениях и только для целых токенов. Они реактивны и остаются активными на протяжении всего времени существования страницы. Они используют динамическую область видимости для каждого элемента и не могут быть частью императивных вычислений, поскольку имеют только одно значение для каждого состояния. Когда CSS-переменные устанавливаются извне (например, через HTML или JavaScript), следует использовать их для чистых данных, а не для CSS-значений, таких как длина или проценты.
Относительные единицы измерений
Относительные единицы измерений применяются в верстке намного чаще. Они определяют размер какого-либо элемента относительно другого размера. Таблицы стилей, которые используют относительные единицы, легче масштабируются из одной среды вывода в другую.
| Единица | Относительно чего измеряется |
|---|---|
| % | % от высоты шрифта родительского элемента |
| em | Высота шрифта текущего элемента (по умолчанию в браузерах обычно =16px) |
| rem | Размер шрифта корневого элемента |
| ex | Высота символа «x» шрифта элемента в нижнем регистре |
| ch | Ширина символа «0» (ZERO, U + 0030) в шрифте элемента |
| vw | 1% ширины окна просмотра |
| vh | 1% высоты окна просмотра |
| vmin | 1% меньшего размера окна просмотра, т.е. меньшее значение из 1vw или 1vh. |
| vmax | 1% большего размера окна просмотра, т.е. большее значение из 1vw или 1vh. |
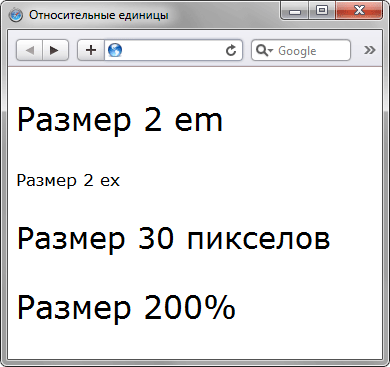
В примерах мы рассмотрим назначение различных размеров шрифта. Но это не значит, что единицы измерений применяются только для шрифтов. Их часто используют для назначения ширины элементов, межстрочного расстояния или внешних отступов.
Начнем с настроек браузера и единицы rem (root em)
Это единица, соответствующая размеру «корневого» элемента, а именно — тега html. Для него не так часто задаются стили, поэтому размер берется из настроек браузера.
В каждом браузере есть настройки шрифтов по умолчанию. Посмотреть их в Хроме можно, нажав в меню «Настройки» на ссылку «расширенные настройки». В открывшемся окне задается тип шрифта по умолчанию для различных семейств шрифта (с засечками, без засечек и моноширинный), а также его размер. Чаще всего, это 16px. Именно он берется за «корневой» — «root» em — rem. От этого размера и рассчитывается единицы, указанные в rem.
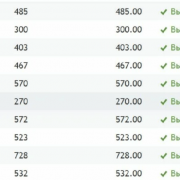
В инспекторе свойств для выделенного абзаца со стилевым правилом
p {font-size: 1rem;}
| 1 | p{font-size1rem;} |
видно, что размер шрифта как раз составляет 16px.
Примечание: чтобы посмотреть размер шрифта, сделайте правый клик на элементе и из контекстного меню внизу выберите пункт «Просмотреть код». Либо нажмите клавишу F12 и стрелочкой в квадратике выберите нужный элемент на странице.
Если вы хотите переопределить этот размер, задайте размер шрифта для html:
html {font-size: 20px}
| 1 | html{font-size20px} |
И еще добавим правило для body, чтобы проверить, как изменится размер шрифта для абзацев:
body { font-size: 18px; }
| 1 | body{font-size18px;} |
Тем не менее, размер шрифта для абзаца с правилом , остался связанным с корневым элементом, и изменился до 20px:
Теперь он размером 20px. Т.е. соответствует размеру шрифта, заданному для html.
Примечание: Единица не поддерживается в браузере IE ниже 9-й версии.
User Changed Their Browser’s Font Setting.
Many developers like to believe that users don’t change their browser’s since it’s hidden deeeep inside the settings.
Well, it’ll be awesome if all users exhibit this behavior because we don’t have to do this experiment! 🙂
Unfortunately, there’s no data to proof that users don’t change their browser’s s, so it’s still our duty as developers to bake the flexibility into our websites.
In this experiment, I enlarged the default of the four browsers I tested with in the following way (incase you wanted to follow along):
- Chrome: Go to , , .
- Firefox: Go to , , .
- Internet Explorer: Click on , then
The only browser I couldn’t figure out where to set the font-size was Safari. So I used a proxy instead. I change the settings such that the smallest font-size is larger than 16px. To do so, go to , , .
This was the only test that all browsers behaved in the same way:
Results from all browsers for scenario 3
As you can see, the pixel queries triggered earlier than or queries.
There aren’t any bugs here. This is the correct implementation since px are absolute units. The breakpoint should remain at 400px no matter what the user set’s their default to.
and , on the other hand, is based on the of the browser. Hence, their media queries should get updated when the user changes their default setting.
So… I’m sorry to break your bubble, pixel fans, but it’s a no-go for pixel based queries.
(Here’s a more detailed explanation for people who found this last experiment confusing.)
Try to imagine you’ve coded up a website that has a breakpoint at 600px. This 600px breakpoint is perfect for a font-size of 16px (the default).
Let’s call the viewport smaller than 600px the small viewport, while that larger than 600px the medium viewport.
Let’s further assume that you only changed the layout at 600px. You used a one-column layout below 600px, and a two-column layout above 600px.
Now, change your browser font-size setting to 20px and look at your website at 650px.
If you used or based media queries, your user would see a one-column layout at 650px. This behavior would be consistent with the first two scenarios.
If you used based media queries, your user would see a two-column layout at 650px. This behavior would be inconsistent with the above scenarios. (And the design would not fit the screen).
CSS Properties
align-contentalign-itemsalign-selfallanimationanimation-delayanimation-directionanimation-durationanimation-fill-modeanimation-iteration-countanimation-nameanimation-play-stateanimation-timing-functionbackface-visibilitybackgroundbackground-attachmentbackground-blend-modebackground-clipbackground-colorbackground-imagebackground-originbackground-positionbackground-repeatbackground-sizeborderborder-bottomborder-bottom-colorborder-bottom-left-radiusborder-bottom-right-radiusborder-bottom-styleborder-bottom-widthborder-collapseborder-colorborder-imageborder-image-outsetborder-image-repeatborder-image-sliceborder-image-sourceborder-image-widthborder-leftborder-left-colorborder-left-styleborder-left-widthborder-radiusborder-rightborder-right-colorborder-right-styleborder-right-widthborder-spacingborder-styleborder-topborder-top-colorborder-top-left-radiusborder-top-right-radiusborder-top-styleborder-top-widthborder-widthbottombox-decoration-breakbox-shadowbox-sizingbreak-afterbreak-beforebreak-insidecaption-sidecaret-color@charsetclearclipclip-pathcolorcolumn-countcolumn-fillcolumn-gapcolumn-rulecolumn-rule-colorcolumn-rule-stylecolumn-rule-widthcolumn-spancolumn-widthcolumnscontentcounter-incrementcounter-resetcursordirectiondisplayempty-cellsfilterflexflex-basisflex-directionflex-flowflex-growflex-shrinkflex-wrapfloatfont@font-facefont-familyfont-feature-settingsfont-kerningfont-sizefont-size-adjustfont-stretchfont-stylefont-variantfont-variant-capsfont-weightgapgridgrid-areagrid-auto-columnsgrid-auto-flowgrid-auto-rowsgrid-columngrid-column-endgrid-column-gapgrid-column-startgrid-gapgrid-rowgrid-row-endgrid-row-gapgrid-row-startgrid-templategrid-template-areasgrid-template-columnsgrid-template-rowshanging-punctuationheighthyphens@importisolationjustify-content@keyframesleftletter-spacingline-heightlist-stylelist-style-imagelist-style-positionlist-style-typemarginmargin-bottommargin-leftmargin-rightmargin-topmax-heightmax-width@mediamin-heightmin-widthmix-blend-modeobject-fitobject-positionopacityorderoutlineoutline-coloroutline-offsetoutline-styleoutline-widthoverflowoverflow-xoverflow-ypaddingpadding-bottompadding-leftpadding-rightpadding-toppage-break-afterpage-break-beforepage-break-insideperspectiveperspective-originpointer-eventspositionquotesresizerightrow-gapscroll-behaviortab-sizetable-layouttext-aligntext-align-lasttext-decorationtext-decoration-colortext-decoration-linetext-decoration-styletext-indenttext-justifytext-overflowtext-shadowtext-transformtoptransformtransform-origintransform-styletransitiontransition-delaytransition-durationtransition-propertytransition-timing-functionunicode-bidiuser-selectvertical-alignvisibilitywhite-spacewidthword-breakword-spacingword-wrapwriting-modez-index
Case 2: Properties of Some Elements Scale With The Component’s Font-Size
Case 1 is easy to understand. The downsides though, are that it’s tough for you to stay true to your modular scale, maintain good vertical rhythms and ensure that every component is sized well AT the same time (especially when building responsive websites).
Sometimes you just need to tune a small section of your component instead of resizing everything at once. For example, you might want to change only the header at a larger viewport.
 Only the headers change in size when the viewport changes
Let’s start styling this case by taking a look at the basic styles we wrote above:
Since we’re only changing the header’s s at , we can safely size every property in (with the exception of the header’s and properties)
You can then change the header’s at different viewports by simply adding a media query on them:
Tada! Notice how only the header changes as we resize the browser now? That’s how you build for case 2 🙂
One more thing.
Since it’s a best practice to use only a handful of typography sizes, I often abstract the property away from the component. This way, it becomes easy to ensure that your typography remains consistent across all components.
That’s it for case 2! Here’s a Codepen for you to play with:
See the Pen REM vs EM – Case 2 by Zell Liew (@zellwk) on CodePen.
Here’s a question you’ll probably ask, so I thought I’ll answer it first: Which method should you use?
I’ll say it depends on your design.
Personally, I find myself working with Case 2 more often than Case 1 since I prefer abstracting away typography into a file of it’s own.
Изменения, которые нужно учесть
Во время написания этого поста, уже после глубокого изучения и понимания концепции логических свойств, я заметил несколько упущенных моментов, которые следует поправить в будущем:
- заменить на
- заменить на
Но, похоже, пока не стоит этого ждать, по крайней мере в отношении . Это свойство обновили буквально только что и в его названии по-прежнему присутствует . Пример: .
Но кто знает, может этот пост попадётся на глаза правильным людям из W3C 🙂
Резюмируя
Вот и всё. Я надеюсь, что вам понравилась эта статья и вы узнали что-то новое. Я буду признателен, если вы поаплодируете или поделитесь этим постом 🙂
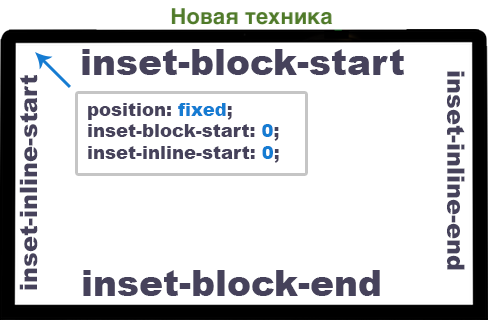
Позиционирование в CSS
Свойства, которые мы раньше использовали для позиционирования, , , , , превратились в новые свойства с префиксом : , , , .
Для английского (LTR):
- =
- =
- =
- =
/* Старая техника */.popup { position: fixed; top: 0; bottom: 0; left: 0; right: 0;}/* Новая техника */.popup { position: fixed; inset-block-start: 0; /* top - для английского */ inset-block-end: 0; /* bottom - для английского */ inset-inline-start: 0; /* left - для английского */ inset-inline-end: 0; /* right - для английского */}
Бросив беглый взгляд, вы можете задаться вопросом, какого чёрта я должен использовать такие сложные имена?! Но на то есть веская причина. Новые имена свойств можно комбинировать в шорткаты, подобно текущим , , .
Пример:
.popup { position: fixed; inset: 0 0 0 0; /* top, right, bottom, left - для английского */}