Autohotkey
Содержание:
Send variants
Send: By default, Send is synonymous with SendEvent; but it can be made a synonym for SendInput or SendPlay via SendMode.
SendRaw: Similar to Send, except that all characters in Keys are interpreted and sent literally. See for details.
SendInput and SendPlay : SendInput and SendPlay use the same syntax as Send but are generally faster and more reliable. In addition, they buffer any physical keyboard or mouse activity during the send, which prevents the user’s keystrokes from being interspersed with those being sent. SendMode can be used to make Send synonymous with SendInput or SendPlay. For more details about each mode, see and below.
SendEvent : SendEvent sends keystrokes using the same method as the pre-1.0.43 Send command. The rate at which keystrokes are sent is determined by SetKeyDelay.
Introduction and Simple Examples
Hotkeys are sometimes referred to as shortcut keys because of their ability to easily trigger an action (such as launching a program or keyboard macro). In the following example, the hotkey Win+N is configured to launch Notepad. The pound sign stands for Win, which is known as a modifier key:
#n::
Run Notepad
return
In the final line above, serves to finish the hotkey. However, if a hotkey needs to execute only a single line, that line can be listed to the right of the double-colon. In other words, the is implicit:
#n::Run Notepad
To use more than one modifier with a hotkey, list them consecutively (the order does not matter). The following example uses to indicate Ctrl+Alt+S:
^!s::
Send Sincerely,{enter}John Smith  ; This line sends keystrokes to the active (foremost) window.
return
Parameters
When a function is defined, its parameters are listed in parentheses next to its name (there must be no spaces between its name and the open-parenthesis). If a function does not accept any parameters, leave the parentheses empty; for example: .
ByRef Parameters: From the function’s point of view, parameters are essentially the same as unless they are defined as ByRef as in this example:
Swap(ByRef Left, ByRef Right)
{
    temp := Left
    Left := Right
    Right := temp
}
In the example above, the use of ByRef causes each parameter to become an alias for the variable passed in from the caller. In other words, the parameter and the caller’s variable both refer to the same contents in memory. This allows the Swap function to alter the caller’s variables by moving Left’s contents into Right and vice versa.
By contrast, if ByRef were not used in the example above, Left and Right would be copies of the caller’s variables and thus the Swap function would have no external effect.
Since return can send back only one value to a function’s caller, ByRef can be used to send back extra results. This is achieved by having the caller pass in a variable (usually empty) in which the function stores a value.
When passing large strings to a function, ByRef enhances performance and conserves memory by avoiding the need to make a copy of the string. Similarly, using ByRef to send a long string back to the caller usually performs better than something like .
: If something other than a modifiable variable is passed to a ByRef parameter, the function behaves as though the keyword «ByRef» is absent. For example, stores the value of A_Index in i, but the value assigned to Left is discarded once the Swap function returns.
: The function can be used to determine whether the caller supplied a variable for a given ByRef parameter.
Known limitations:
- Fields of objects are not considered variables for the purposes of ByRef. For example, if is passed to a ByRef parameter, it will behave as though ByRef was omitted.
- It is not possible to pass Clipboard, , or to a function’s ByRef parameter, even when #NoEnv is absent from the script.
- Although a function may call itself recursively, if it passes one of its own or non-ByRef parameters to itself ByRef, the new layer’s ByRef parameter will refer to its own local variable of that name rather than the previous layer’s. However, this issue does not occur when a function passes to itself a , , or ByRef parameter.
- If a parameter in a function-call resolves to a variable (e.g. or or ), other parameters to its left or right can alter that variable before it is passed to the function. For example, would unexpectedly pass 1 and 0 when Var is initially 0, even when the function’s first parameter is not ByRef. Since this behavior is counterintuitive, it might change in a future release.
- ByRef is not directly supported in functions called by COM clients, or when calling COM methods. Instead, the script receives or must pass a containing the VarType and address of the value.
6 — Variables
Variables are like little post-it notes that hold some information. They can be used to store text, numbers, data from functions and commands or even mathematical equations. Without them, programming and scripting would be much more tedious.
Variables can be assigned a few ways. We’ll cover the most common forms. Please pay attention to the equal sign ().
- Legacy text assignment
-
MyVar = Text
This is the simplest form for a variable, a legacy assignment. Simply type in your text and done.
- Legacy variable assignment
-
MyVar = %MyVar2%
Same as above, but you are assigning a value of a variable to another variable.
- Legacy mixed assignment
-
MyVar = %MyVar2% some text %MyVar3%.
A combination of the two legacy assignments above.
- Expression text assignment
-
MyVar := "Text"
This is an expression assignment, due to the before the . Any text needs to be in quotes.
- Expression variable assignment
-
MyVar := MyVar2
In expression mode, variables do not need percent signs.
- Expression number assignment
-
MyVar := 6 + 8 / 3 * 2 - Sqrt(9)
Thanks to expressions, you can do math!
- Expression mixed assignment
-
MyVar := "The value of 5 + " MyVar2 " is: " 5 + MyVar2
A combination of the three expression assignments above.
Equal signs (=) with a symbol in front of it such as etc. are called assignment operators and always require an expression.
a. When to use percents
One of the most common issues with AutoHotkey involving variables is when to use the percent signs (%). Hopefully this will clear some confusion.
When to use percent signs:
- When you are using commands (see above), except when the parameter is OutputVar or InputVar.
- When you are assigning a value to a variable using the legacy mode (an equal sign with no symbol in front of it).
When not to use percent signs:
- In parameters that are input or output variables. For example:
- On the left side of an assignment:
- On the left side of legacy (non-expression) if-statements:
- Everywhere in expressions. For example:
  if (Var1 != Var2)
  Var1 := Var2 + 100
b. Getting user input
Sometimes you want to have the user to choose the value of stuff. There are several ways of doing this, but the simplest way is InputBox. Here is a simple example on how to ask the user a couple of questions and doing some stuff with what was entered:
InputBox, OutputVar, Question 1, What is your first name?
if (OutputVar = "Bill")
    MsgBox, That's an awesome name`, %OutputVar%.

InputBox, OutputVar2, Question 2, Do you like AutoHotkey?
if (OutputVar2 = "yes")
    MsgBox, Thank you for answering %OutputVar2%`, %OutputVar%! We will become great friends.
else
    MsgBox, %OutputVar%`, That makes me sad.
c. Other Examples?
MsgBox, 4,, Would you like to continue?
IfMsgBox, No
    return  ; If No, stop the code from going further.
MsgBox, You pressed YES.  ; Otherwise, the user picked yes.
; Some examples showing when to use percents and when not:
Var = Text  ; Assign some text to a variable (legacy).
Number := 6  ; Assign a number to a variable (expression).
Var2 = %Var%  ; Assign a variable to another (legacy).
Var3 := Var  ; Assign a variable to another (expression).
Var4 .= Var  ; Append a variable to the end of another (expression).
Var5 += Number  ; Add the value of a variable to another (expression).
Var5 -= Number  ; Subtract the value of a variable from another (expression).
Var6 := SubStr(Var, 2, 2)  ; Variable inside a function. This is always an expression.
Var7 = %Var% Text  ; Assigns a variable to another with some extra text (legacy).
Var8 := Var " Text"  ; Assigns a variable to another with some extra text (expression).
MsgBox, %Var%  ; Variable inside a command.
StringSplit, Var, Var, x  ; Variable inside a command that uses InputVar and OutputVar.
if (Number = 6)  ; Whenever an IF has parentheses, it'll be an expression. So no percent signs.
if (Var != Number)  ; Whenever an IF has parentheses, it'll be an expression. So no percent signs.
if Number = 6  ; Without parentheses, the IF is legacy. However, only variables on the 'right side' need percent signs.
if Var1 < %Var2%  ; Without parentheses, the IF is legacy. However, only variables on the 'right side' need percent signs.
Special Keys
If your keyboard or mouse has a key not listed above, you might still be able to make it a hotkey by using the following steps:
- Ensure that at least one script is running that is using the keyboard hook. You can tell if a script has the keyboard hook by opening its main window and selecting «View->Key history» from the menu bar.
- Double-click that script’s tray icon to open its main window.
- Press one of the «mystery keys» on your keyboard.
- Select the menu item «View->Key history»
- Scroll down to the bottom of the page. Somewhere near the bottom are the key-down and key-up events for your key. NOTE: Some keys do not generate events and thus will not be visible here. If this is the case, you cannot directly make that particular key a hotkey because your keyboard driver or hardware handles it at a level too low for AutoHotkey to access. For possible solutions, see further below.
- If your key is detectable, make a note of the 3-digit hexadecimal value in the second column of the list (e.g. 159).
- To define this key as a hotkey, follow this example:
SC159:: ; Replace 159 with your key's value.
MsgBox, %A_ThisHotkey% was pressed.
return
Reverse direction: To remap some other key to become a «mystery key», follow this example:
; Replace 159 with the value discovered above. Replace FF (if needed) with the
; key's virtual key, which can be discovered in the first column of the Key History screen.
#c::Send {vkFFsc159} ; See  for more details.
Alternate solutions: If your key or mouse button is not detectable by the Key History screen, one of the following might help:
-
Reconfigure the software that came with your mouse or keyboard (sometimes accessible in the Control Panel or Start Menu) to have the «mystery key» send some other keystroke. Such a keystroke can then be defined as a hotkey in a script. For example, if you configure a mystery key to send Ctrl+F1, you can then indirectly make that key as a hotkey by using in a script.
-
Try AHKHID. You can also try searching the forum for a keywords like , or .
-
The following is a last resort and generally should be attempted only in desperation. This is because the chance of success is low and it may cause unwanted side-effects that are difficult to undo:
Disable or remove any extra software that came with your keyboard or mouse or change its driver to a more standard one such as the one built into the OS. This assumes there is such a driver for your particular keyboard or mouse and that you can live without the features provided by its custom driver and software.
The Top of the Script (the Auto-execute Section)
After the script has been loaded, it begins executing at the top line, continuing until a Return, Exit, hotkey/hotstring label, or the physical end of the script is encountered (whichever comes first). This top portion of the script is referred to as the auto-execute section.
Note: While the script’s first hotkey/hotstring label has the same effect as return, other hotkeys and labels do not.
If the script is not persistent, it will terminate after the auto-execute section has completed. Otherwise, it will stay running in an idle state, responding to events such as hotkeys, hotstrings, , custom menu items, and timers. A script is automatically persistent if it contains hotkeys, hotstrings, OnMessage() or GUI, and in a few other cases. The #Persistent directive can also be used to explicitly make the script persistent.
Every thread launched by a hotkey, hotstring, menu item, , or timer starts off fresh with the default values for the following attributes as set in the auto-execute section. If unset, the standard defaults will apply (as documented on each of the following pages): AutoTrim, CoordMode, Critical, DetectHiddenText, DetectHiddenWindows, FileEncoding, ListLines, SendLevel, SendMode, SetBatchLines, SetControlDelay, SetDefaultMouseSpeed, SetFormat, SetKeyDelay, SetMouseDelay, SetRegView, SetStoreCapsLockMode, SetTitleMatchMode, SetWinDelay, StringCaseSense, and Thread.
If the auto-execute section takes a long time to complete (or never completes), the default values for the above settings will be put into effect after 100 milliseconds. When the auto-execute section finally completes (if ever), the defaults are updated again to be those that were in effect at the end of the auto-execute section. Thus, it’s usually best to make any desired changes to the defaults at the top of scripts that contain hotkeys, hotstrings, timers, or custom menu items. Also note that each thread retains its own collection of the above settings. Changes made to those settings will not affect other threads.
Return, Exit, and General Remarks
If the flow of execution within a function reaches the function’s closing brace prior to encountering a Return, the function ends and returns a blank value (empty string) to its caller. A blank value is also returned whenever the function explicitly omits Return’s parameter.
When a function uses the Exit command to terminate the current thread, its caller does not receive a return value at all. For example, the statement would leave unchanged if exits. The same thing happens if a function causes a runtime error such as running a nonexistent file (when is not in effect).
A function may alter the value of ErrorLevel for the purpose of returning an extra value that is easy to remember.
To call a function with one or more blank values (empty strings), use an empty pair of quotes as in this example: .
Since calling a function does not start a new thread, any changes made by a function to settings such as SendMode and SetTitleMatchMode will go into effect for its caller too.
The caller of a function may pass a nonexistent variable or array element to it, which is useful when the function expects the corresponding parameter to be . For example, calling would create the variable automatically as a or global (depending on whether the caller is inside a function and whether it has the in effect).
When used inside a function, ListVars displays a function’s along with their contents. This can help debug a script.
Как пользоваться
Дальше давайте переходить к практике и разбираться, где бесплатно скачать последнюю версию данного предложения, как его установить, а также как написать свой первый скрипт при помощи AutoHotkey.
Загрузка и установка
Начинать мы будем именно с установки. Тем более, что как таковой, ее здесь нет. Данная программа работает сразу после запуска. Рассмотрим, как его осуществить:
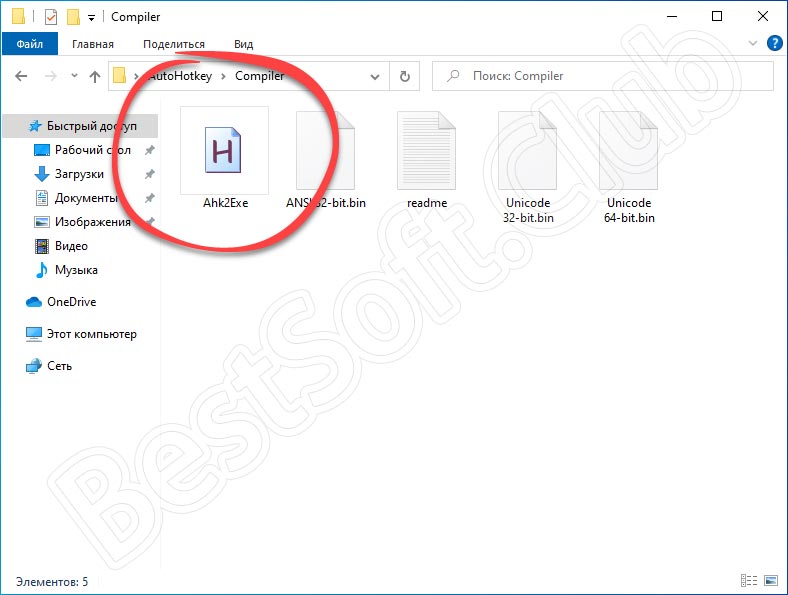
- Сначала мы загружаем архив с приложением, прокрутив страничку ниже и воспользовавшись кнопкой для его скачивания. Распаковываем исполняемый файл и запускаем его двойным левым кликом.
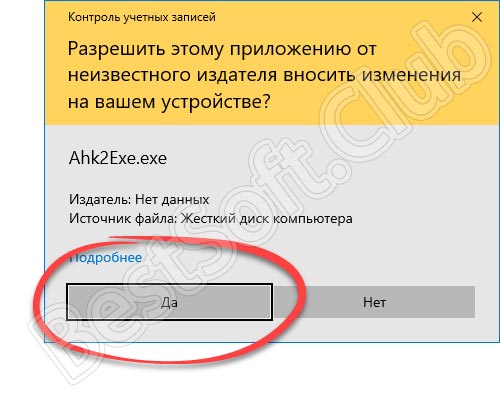
- Теперь нам необходимо предоставить доступ к администраторским полномочиям. В противном случае приложение не сможет корректно работать.
- На этом все. Наша программа установленная и теперь можно переходить непосредственно к работе с ней.
Инструкция по работе
Теперь давайте в общих чертах разберемся, как пользоваться данным приложением. Первое, что следует знать, это скриптовый язык программирования, который тут используется. Без него ни одного макроса написать, к сожалению, не получится. А сам алгоритм использования программы выглядит следующим образом:
- Вы пишите макрос, которым должна руководствоваться в своей работе AutoHotkey.
- Далее при помощи программы открываем данный скрипт и, при необходимости, преобразуем его в EXE-файл.
- Дальше мы можем использовать файл где угодно.
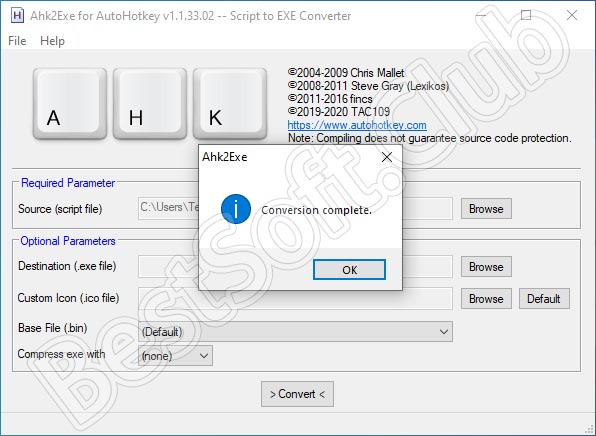
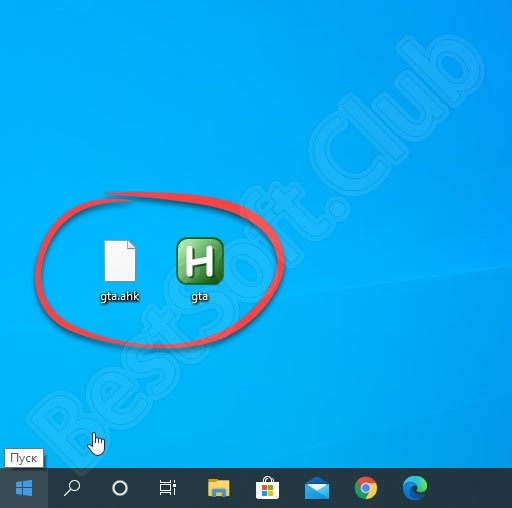
Вот так выглядит сам скрипт, а также созданный с его помощью исполняемый файл.
Create a Script
There are a couple of common ways to create a script file:
- In Notepad (or a of your choice), save a file with the filename extension. On some systems you may need to enclose the name in quotes to ensure the editor does not add another extension (such as .txt).
Be sure to save the file as UTF-8 with BOM if it will contain non-ASCII characters. For details, see the .
- In Explorer, right-click in empty space in the folder where you want to save the script, then select New and AutoHotkey Script. You can then type a name for the script (taking care not to erase the extension if it is visible).
See Scripting Language for details about how to write a script.
SendPlay [v1.0.43+]
Warning: SendPlay may have no effect at all if UAC is enabled, even if the script is running as an administrator. For more information, refer to the .
SendPlay’s biggest advantage is its ability to «play back» keystrokes and mouse clicks in a broader variety of games than the other modes. For example, a particular game may accept only when they have the .
Of the three sending modes, SendPlay is the most unusual because it does not simulate keystrokes and mouse clicks per se. Instead, it creates a series of events (messages) that flow directly to the active window (similar to ControlSend, but at a lower level). Consequently, SendPlay does not trigger hotkeys or hotstrings.
Like , SendPlay’s keystrokes do not get interspersed with keystrokes typed by the user. Thus, if the user happens to type something during a SendPlay, those keystrokes are postponed until afterward.
Although SendPlay is considerably slower than SendInput, it is usually faster than the traditional mode (even when KeyDelay is -1).
Both Win (LWin and RWin) are automatically blocked during a SendPlay if the keyboard hook is installed. This prevents the Start Menu from appearing if the user accidentally presses Win during the send. By contrast, keys other than LWin and RWin do not need to be blocked because the operating system automatically postpones them until after the SendPlay (via buffering).
SendPlay does not use the standard settings of SetKeyDelay and SetMouseDelay. Instead, it defaults to no delay at all, which can be changed as shown in the following examples:
SetKeyDelay, 0, 10, Play  ; Note that both 0 and -1 are the same in SendPlay mode.
SetMouseDelay, 10, Play
SendPlay is unable to turn on or off CapsLock, NumLock, or ScrollLock. Similarly, it is unable to change a key’s state as seen by unless the keystrokes are sent to one of the script’s own windows. Even then, any changes to the left/right modifier keys (e.g. RControl) can be detected only via their neutral counterparts (e.g. Control). Also, SendPlay has other limitations described on the .
Unlike and , the user may interrupt a SendPlay by pressing Ctrl+Alt+Del or Ctrl+Esc. When this happens, the remaining keystrokes are not sent but the script continues executing as though the SendPlay had completed normally.
Although SendPlay can send LWin and RWin events, they are sent directly to the active window rather than performing their native operating system function. To work around this, use . For example, would show the Start Menu’s Run dialog.
Language Syntax
When are quotation marks used with commands and their parameters?
Double quotes («) have special meaning only within . In all other places, they are treated literally as if they were normal characters. However, when a script launches a program or document, the operating system usually requires quotes around any command-line parameter that contains spaces, such as in this example: .
When exactly are variable names enclosed in percent signs?
Variable names are always enclosed in percent signs except in cases illustrated in bold below:
- In parameters that are input or output variables:
- On the left side of an assignment:
- On the left side of traditional (non-expression) if-statements:
- Everywhere in . For example:
If (Var1 <> Var2)
      Var1 := Var2 + 100
For further explanation of how percent signs are used, see and . Percent signs can also have other meanings:
- The causes a command parameter to be interpreted as an expression.
- Escaped percent signs () and percent signs in have no special meaning (they are interpreted as literal percent signs).
When should percent signs and commas be escaped?
Literal percent signs must be escaped by preceding them with an accent/backtick. For example: Literal commas must also be escaped () except when used in MsgBox or the last parameter of any command (in which case the accent is permitted but not necessary).
When commas or percent signs are enclosed in quotes within an , the accent is permitted but not necessary. For example: .
5 — Commands vs. Functions()
AutoHotkey has two main types of things used by the scripter to create code: Commands and functions.
A list of all commands and built-in functions can be found here.
Commands
You can tell what a command is by looking at its syntax (the way it looks). Commands do not use parentheses around the parameters like functions do. So a command would look like this:
Command, Parameter1, Parameter2, Parameter3
When using commands, you cannot squish other commands onto the same line as a previous command (exception: IfEqual). You cannot put commands inside the parameters of other commands. For example:
MsgBox, Hello Run, notepad.exe   ; Wrong
MsgBox, Hello, Run, notepad.exe  ; Wrong

MsgBox, Hello      ; Correct
Run, notepad.exe
need
You can do math in parameters if you force an expression with a single , but that will not be covered.
Functions
As stated above, functions are different because they use parentheses. A typical function looks like:
Function(Parameter1, Parameter2, Parameter3)
Functions have a few main differences:
- You can do math in them:
SubStr(37 * 12, 1, 2)
SubStr(A_Hour - 12, 2)
- Variables do not need to be wrapped in percent signs:
SubStr(A_Now, 7, 2)
- Functions can go inside of functions:
SubStr(A_AhkPath, InStr(A_AhkPath, "AutoHotkey"))
- Text needs to be wrapped in quotes:
SubStr("I'm scripting, awesome!", 16)
A function usually return a value differently than a command does. Commands need an OutputVar parameter, functions do not. The most common way assigning the value of a function to a variable is like so:
MyVar := SubStr("I'm scripting, awesome!", 16)
This isn’t the only way, but the most common. You are using to store the return value of the function that is to the right of the operator. See Functions for more details.
In short:
; These are commands:
MsgBox, This is some text.
StringReplace, Output, Input, AutoHotkey, AutoHotKey, All
SendInput, This is awesome{!}{!}{!}

; These are functions:
SubStr("I'm scripting, awesome!", 16)
FileExist(VariableContainingPath)
Output := SubStr("I'm scripting, awesome!", 16)
a. Code blocks
Code blocks are lines of code surrounded by little curly brackets ( and ). They group a section of code together so that AutoHotkey knows it’s one big family and that it needs to stay together. They are most often used with functions and control flow statements such as If and Loop. Without them, only the first line in the block is called.
In the following code, both lines are run only if MyVar equals 5:
if (MyVar = 5)
{
    MsgBox, MyVar equals %MyVar%!!
    ExitApp
}
In the following code, the message box is only shown if MyVar equals 5. The script will always exit, even if MyVar is not 5:
if (MyVar = 5)
    MsgBox, MyVar equals %MyVar%!!
    ExitApp
This is perfectly fine since the if-statement only had one line of code associated with it. It’s exactly the same as above, but I outdented the second line so we know it’s separated from the if-statement:
if (MyVar = 5)
    MsgBox, MyVar equals %MyVar%!!
MsgBox, We are now 'outside' of the if-statement. We did not need curly brackets since there was only one line below it.
Основные возможности
- автоматизация различных действий путем эмуляции нажатия определенных клавиш на мыши и клавиатуре;
- написание или запись макросов с использованием рекордера;
- назначение горячих клавиш;
- быстрая расшифровка аббревиатур;
- создание произвольных форм для ввода информации;
- изменение назначения любых клавиш;
- обработка сигналов, переданных внешними устройствами управления;
- преобразование скриптов;
- управление громкостью и другими настройками звуковых карт;
- выполнение мониторинга системы;
- изменение содержимого в буфере обмена;
- отображение на экране надписей и диалоговых окон;
- автоматизация действий в играх;
- любые операции с текстовыми файлами и др.
Плюсы и минусы
Плюсы:
- автоматический запуск практически любых операций на ПК;
- встроенный скриптовый язык;
- переназначение любых клавиш;
- поддержка разных устройств для вывода.
Минусы:
некоторые сложности в освоении.
Похожие программы
Auto-Clicker. Программа для запоминания и последующего воспроизведения всех действий компьютерной мыши. Записанные действия в ней можно повторять произвольное количество раз, настраивая скорость их воспроизведения.
Macro Recorder. Приложение, которое может автоматизировать все рутинные процессы на компьютере. С его помощью можно создавать макросы, которые будут самостоятельно запускать необходимые программы, выполнять клики мышкой, вводить текст и т. д.
Как пользоваться приложением
Для того чтобы с помощью программы назначить автоматическое выполнение какого-либо действия, нужно создать скрипт. Он представляет собой всплывающее окно с пометкой «Я рогалег». С этой целью используем команду MsgBox, которую можно вызвать любым текстом. Надпись и команду необходимо вписать в любой текстовый редактор, так как сама программа как такового отдельного окна не имеет. Далее сохраняем файл, обязательно указав для него расширение «ahk». Скрипт будет выполнен при нажатии на него двойным щелчком.
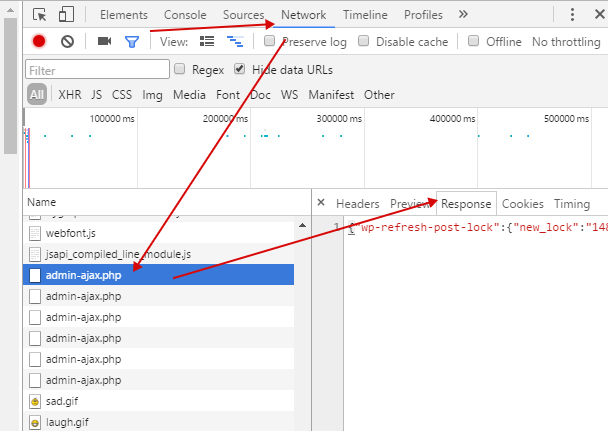
Выполнение скрипта
При запуске скрипта появится значок «Autohotkey». Нажав на него правой кнопкой, вы сможете выбрать необходимые команды.
Выбор команд
Код, который должен автоматически выполняться при запуске скрипта, помещается вверху файла. Идентификаторы нужно указывать для горячих клавиш.
Рассмотрим, как это действует, на примере назначения автоматического запуска блокнота Notepad++ при нажатии определенных клавиш.
Для начала набираем «#n:: Run notepad++» и сохраняем файл. Дважды щелкаем по нему и набираем команду «Win+n». В области уведомления появится значок, а программа будет запущена при нажатии указанной комбинации клавиш.
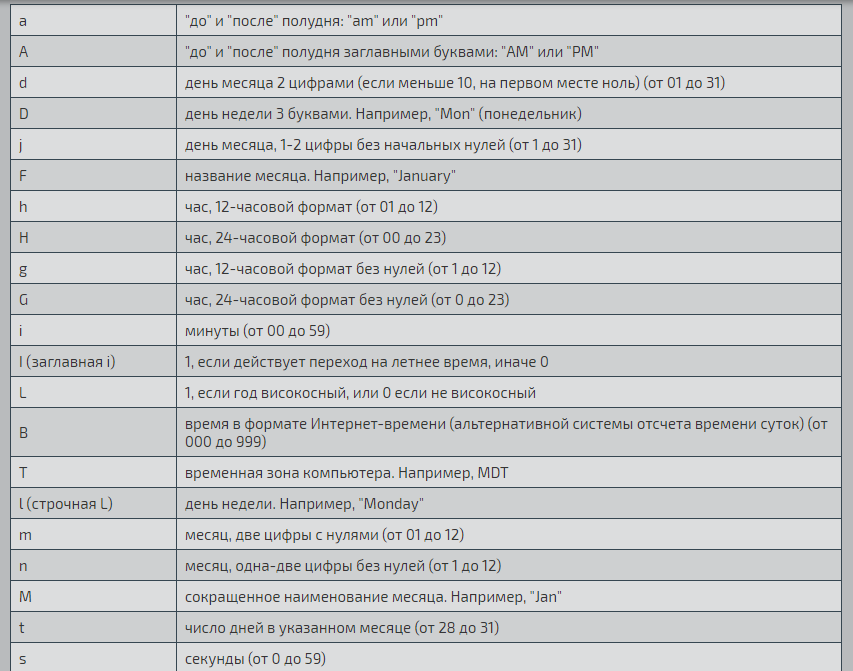
В команде значок «#n» определяет кнопки, «::» — разделяет обозначения самих клавиш от команд. Остальные базовые кнопки обозначаются таким образом:
Обозначения кнопок
AutoHotkey поможет легко и быстро выполнять любые операции и действия, которые вам приходится часто производить на своем ПК.
Скачать AutoHotkey
Там представлено несколько несколько версий, разберёмся в них:
- AutoHotkey 1.1.* — это актуальная версия, которая активно разрабатывается. Ранее была известна как AutoHotkey_L.
- AutoHotkey 1.0.* — развитие этой версии остановлено несколько лет назад, ранее была известна как AutoHotkey Basic, Classic, Vanilla.
- AutoHotkey 2.0-a* — альфа выпуск новой версии AutoHotkey v2.
Ветка AutoHotkey 2.0-a* является работоспособной, но в ней поменялся синтаксис языка по этой причине большинство готовых скриптов, которые вы можете найти в Интернете, в ней работать не будут.
То есть скачиваем версию AutoHotkey 1.1.*. Если вы хотите скачать установщик, то нажмите на кнопку «Download AutoHotkey Installer». Для скачивания портативной версии нажмите «Download AutoHotkey .zip».
Скачайте установщик, им проще пользоваться, чем портативной версией.
Context-sensitive Hotkeys
The directives #IfWinActive/Exist and #If can be used to make a hotkey perform a different action (or none at all) depending on a specific condition. For example:
#IfWinActive, ahk_class Notepad
^a::MsgBox You pressed Ctrl-A while Notepad is active. Pressing Ctrl-A in any other window will pass the Ctrl-A keystroke to that window.
#c::MsgBox You pressed Win-C while Notepad is active.

#IfWinActive
#c::MsgBox You pressed Win-C while any window except Notepad is active.

#If MouseIsOver("ahk_class Shell_TrayWnd") ; For MouseIsOver, see .
WheelUp::Send {Volume_Up}     ; Wheel over taskbar: increase/decrease volume.
WheelDown::Send {Volume_Down} ;