Модуль threading в python, многопоточная обработка данных
Содержание:
Контроль доступа к ресурсам
Помимо синхронизации операций с потоками, также важно иметь возможность контролировать доступ к общим ресурсам, чтобы предотвратить повреждение данных. Встроенные в Python структуры данных (списки, словари и т
д.) являются поточно-ориентированными. Другие структуры данных, реализованные в Python, и более простые типы (целые числа и числа с плавающей запятой) имеют такой защиты. Для защиты от одновременного доступа к объекту используйте объект Lock
Встроенные в Python структуры данных (списки, словари и т. д.) являются поточно-ориентированными. Другие структуры данных, реализованные в Python, и более простые типы (целые числа и числа с плавающей запятой) имеют такой защиты. Для защиты от одновременного доступа к объекту используйте объект Lock.
import logging
import random
import threading
import time

logging.basicConfig(level=logging.DEBUG,
                    format='(%(threadName)-10s) %(message)s',
                    )

class Counter(object):
    def __init__(self, start=0):
        self.lock = threading.Lock()
        self.value = start
    def increment(self):
        logging.debug('Waiting for lock')
        self.lock.acquire()
        try:
            logging.debug('Acquired lock')
            self.value = self.value + 1
        finally:
            self.lock.release()

def worker(c):
    for i in range(2):
        pause = random.random()
        logging.debug('Sleeping %0.02f', pause)
        time.sleep(pause)
        c.increment()
    logging.debug('Done')

counter = Counter()
for i in range(2):
    t = threading.Thread(target=worker, args=(counter,))
    t.start()

logging.debug('Waiting for worker threads')
main_thread = threading.currentThread()
for t in threading.enumerate():
    if t is not main_thread:
        t.join()
logging.debug('Counter: %d', counter.value)
В этом примере функция worker() увеличивает экземпляр Counter, который управляет Lock, чтобы два потока не могли одновременно изменить свое внутреннее состояние. Если Lock не использовался, можно пропустить изменение значения атрибута.
$ python threading_lock.py

(Thread-1  ) Sleeping 0.47
(Thread-2  ) Sleeping 0.65
(MainThread) Waiting for worker threads
(Thread-1  ) Waiting for lock
(Thread-1  ) Acquired lock
(Thread-1  ) Sleeping 0.90
(Thread-2  ) Waiting for lock
(Thread-2  ) Acquired lock
(Thread-2  ) Sleeping 0.11
(Thread-2  ) Waiting for lock
(Thread-2  ) Acquired lock
(Thread-2  ) Done
(Thread-1  ) Waiting for lock
(Thread-1  ) Acquired lock
(Thread-1  ) Done
(MainThread) Counter: 4
Чтобы выяснить, применил ли другой поток блокировку, не задерживая текущий поток, передайте значение False аргументу blocking функции acquire().
В следующем примере worker() пытается применить блокировку три раза и подсчитывает, сколько попыток нужно сделать. А lock_holder() выполняет циклическое переключение между снятием и запуском блокировки с короткими паузами в каждом состоянии, используемом для имитации загрузки.
import logging
import threading
import time

logging.basicConfig(level=logging.DEBUG,
                    format='(%(threadName)-10s) %(message)s',
                    )

def lock_holder(lock):
    logging.debug('Starting')
    while True:
        lock.acquire()
        try:
            logging.debug('Holding')
            time.sleep(0.5)
        finally:
            logging.debug('Not holding')
            lock.release()
        time.sleep(0.5)
    return

def worker(lock):
    logging.debug('Starting')
    num_tries = 0
    num_acquires = 0
    while num_acquires < 3:
        time.sleep(0.5)
        logging.debug('Trying to acquire')
        have_it = lock.acquire(0)
        try:
            num_tries += 1
            if have_it:
                logging.debug('Iteration %d: Acquired',  num_tries)
                num_acquires += 1
            else:
                logging.debug('Iteration %d: Not acquired', num_tries)
        finally:
            if have_it:
                lock.release()
    logging.debug('Done after %d iterations', num_tries)


lock = threading.Lock()

holder = threading.Thread(target=lock_holder, args=(lock,), name='LockHolder')
holder.setDaemon(True)
holder.start()

worker = threading.Thread(target=worker, args=(lock,), name='Worker')
worker.start()
worker() требуется более трех итераций, чтобы применить блокировку три раза.
$ python threading_lock_noblock.py

(LockHolder) Starting
(LockHolder) Holding
(Worker    ) Starting
(LockHolder) Not holding
(Worker    ) Trying to acquire
(Worker    ) Iteration 1: Acquired
(Worker    ) Trying to acquire
(LockHolder) Holding
(Worker    ) Iteration 2: Not acquired
(LockHolder) Not holding
(Worker    ) Trying to acquire
(Worker    ) Iteration 3: Acquired
(LockHolder) Holding
(Worker    ) Trying to acquire
(Worker    ) Iteration 4: Not acquired
(LockHolder) Not holding
(Worker    ) Trying to acquire
(Worker    ) Iteration 5: Acquired
(Worker    ) Done after 5 iterations
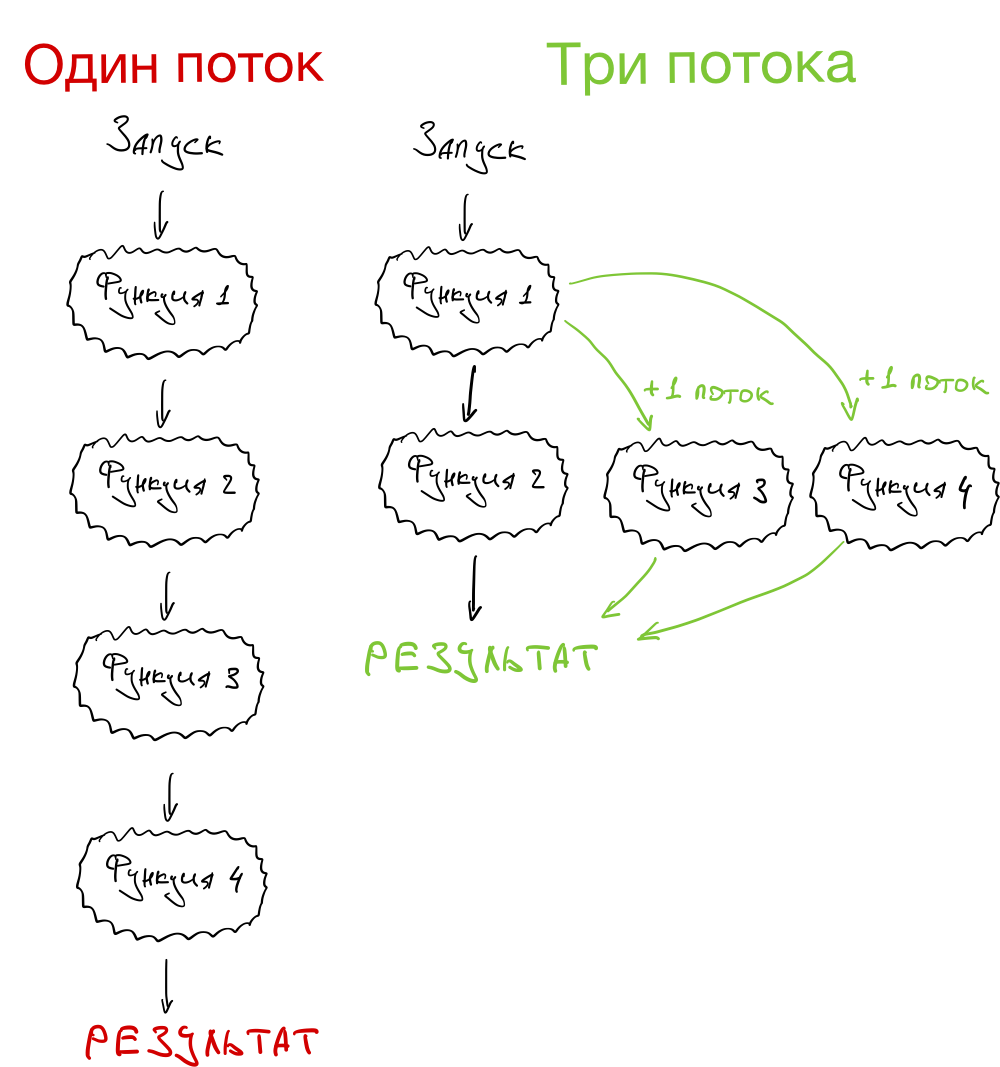
Многопоточность
Представим такую ситуацию:
- У вас на руке смарт-часы, которые собирают данные о вашем пульсе, УФ-излучении и движениях. На смарт-часах работает программа, которая обрабатывает эти данные.
- Программа состоит из четырёх функций. Первая собирает данные с датчиков. Три другие обрабатывают эти данные и делают выводы.
- Пока первая функция не собрала нужные данные, ничего другого не происходит.
- Как только данные введены, запускаются три оставшиеся функции. Они не зависят друг от друга и каждая считает своё.
- Как только все три функции закончат работу, программа выдаёт нужный результат.
А теперь давайте посмотрим, как это выглядит в однопоточной и многопоточной системе. Видно, что если процессор позволяет делать несколько дел одновременно, в многопоточном режиме программа будет работать быстрее:
Сопоставление шаблонов
Одна масштабная фича, о которой вы, конечно, слышали, — это структурное сопоставление шаблонов, добавляющее оператор известное выражение case из других языков. Мы знаем, как работать с case, но посмотрите на вариацию в Python это не просто switch/case, но также несколько мощных особенностей, которые мы должны исследовать.
Простое сопоставление шаблонов состоит из ключевого слова match, за которым следует выражение, а его результат проверяется на соответствие шаблонам, указанным в последовательных операторах case:
В этом простом примере мы воспользовались переменной day как выражением, которое затем сравнивается с конкретными строками в case. Кроме строк, вы также можете заметить case с маской _ — это эквивалент ключевого слова default в других языках. Хотя этот оператор можно опустить, в этом случае может произойти no-op, по существу это означает, что вернётся None.
Еще один момент, на который стоит обратить внимание в коде выше, это оператор |, позволяющий комбинировать несколько литералов | (другой его вариант — or). Как я уже упоминал, новое сопоставление шаблонов не заканчивается на базовом синтаксисе, напротив — оно привносит дополнительные возможности, например сопоставление сложных шаблонов:
Как я уже упоминал, новое сопоставление шаблонов не заканчивается на базовом синтаксисе, напротив — оно привносит дополнительные возможности, например сопоставление сложных шаблонов:
Во фрагменте выше мы воспользовались кортежем как выражением сопоставления. Однако мы не ограничены кортежами: работать будет любой итерируемый тип. Также выше видно, что маска (wildcard) _ может применяться внутри сложных шаблонов и не только сама по себе, как в предыдущих примерах. Простые кортежи или списки — не всегда лучший подход, поэтому, если вы предпочитаете классы, код можно переписать так:
Здесь видно, что с шаблонами, написанными в стиле конструкторов, можно сопоставить атрибуты класса. При использовании этого подхода отдельные атрибуты также попадают в переменные (как и в показанные ранее кортежи), с которыми затем можно работать в соответствующем операторе case.
Выше мы можем увидеть другие особенности сопоставления шаблонов: во-первых выражение в case — это гард, который также является условием в if. Это полезно, когда сопоставления по значению не достаточно и вам нужны дополнительные проверки. Посмотрите на оставшееся выражение case: видно, что и ключевые слова, (name-name) и позиционные аргументы работают с синтаксисом, похожим на синтаксис конструкторов; то же самое верно для маски _ (или отбрасываемой переменной).
Сопоставление шаблонов также позволяет работать с вложенными шаблонами. Вложенные шаблоны могут использовать любой итерируемый тип: и конструируемый объект, и несколько таких объектов, которые возможно итерировать:
В таких сложных шаблонах для дальнейшей обработки может быть полезно записать подшаблон в переменную. Это можно сделать с помощью ключевого слова as, как показано выше, во втором case.
The Threading Module
The newer threading module included with Python 2.4 provides much more powerful, high-level support for threads than the thread module discussed in the previous section.
The threading module exposes all the methods of the thread module and provides some additional methods −
-
threading.activeCount() − Returns the number of thread objects that are active.
-
threading.currentThread() − Returns the number of thread objects in the caller’s thread control.
-
threading.enumerate() − Returns a list of all thread objects that are currently active.
In addition to the methods, the threading module has the Thread class that implements threading. The methods provided by the Thread class are as follows −
-
run() − The run() method is the entry point for a thread.
-
start() − The start() method starts a thread by calling the run method.
-
join() − The join() waits for threads to terminate.
-
isAlive() − The isAlive() method checks whether a thread is still executing.
-
getName() − The getName() method returns the name of a thread.
-
setName() − The setName() method sets the name of a thread.
Семафоры
Семафор — это более продвинутый механизм блокировки. В семафоре есть внутренний счетчик, вместо флага блокировки, и блокирует он только в том случае, если большее количество потоков (чем указано) попытается удержать семафор. В зависимости от того, как инициализирован семафор, это позволяет нескольким потокам получить доступ к одной и той же части кода одновременно.
Python
import threading
semaphore = threading.BoundedSemaphore()
semaphore.acquire() # уменьшает счетчик (-1)
… доступ к общим ресерсам
semaphore.release() # увеличивает счетчик (+1)
|
1 2 3 4 5 6 |
importthreading semaphore=threading.BoundedSemaphore() semaphore.acquire()# уменьшает счетчик (-1) …доступкобщимресерсам semaphore.release()# увеличивает счетчик (+1) |
Счетчик уменьшается, когда к семафору получают доступ, и увеличивается, когда доступ к нему теряют. Если счетчик доходит до нуля, когда к семафору получен доступ, то поток блокируется. Когда счетчик увеличивается и его показатель выше нуля – один из заблокированных потоков (если таковые имеются) снова заработает. Семафоры обычно используются для ограничения доступа к ресурсу с ограниченными возможностями, такие как подключение к сети или сервер базы данных. Просто установите счетчик на максимум, и семафор позаботиться об остальном.
Python
max_connections = 10
semaphore = threading.BoundedSemaphore(max_connections)
|
1 2 3 |
max_connections=10 semaphore=threading.BoundedSemaphore(max_connections) |
Если вы не укажите значение для счетчика, счетчик инициализируется как 1. Модуль threading предлагает два варианта работы семафоров. Класс Semaphore обеспечивает безлимитный семафор, который позволяет вам вызывать release любое количество раз для увеличения счетчика. Чтобы избежать простых программных ошибок, как правило, лучше использовать класс BoundedSemaphore, который воспринимает как ошибку вызов release чаще, чем вы вызывали acquire.
Hands-On on this Python Threading Tutorial
Python threading library
Python has several ways to implement multithreading. The modern way to do it is using the library, which contains the class. As we will see, working with this library is extremely intuitive. We also want to use the library to experiment threads, but this is not strictly needed in production. Thus, at the very beginning of your script, add the following lines.
import threading
import time
Now we can start working with threads!
Define a test function to run in threads
First thing, we need to define a function we want to run in a thread. Our function will do almost nothing, but we will use the function to emulate a huge workload. The function makes your program (or thread) stop and wait for a given amount of seconds.
When you have a function that you want to run in a thread, it is best practice to use a thread identifier as the first parameter. This way, you know what thread you are running from inside the function as well. However, you also need to pass this value when creating the thread, but we will get to that. For now, just create this function.
def do_something(id, message=''):
  time.sleep(4)
  print("Thread #" + str(id) + " finished with message: " + message)
This function simply waits 4 seconds sand then prints the given message with the thread ID.
Running it synchronously “the standard way”
At this point, we can create a global list of messages that we want to print. Here is an example.
messages =
If we were to run the function with all the messages synchronously we would roughly need 16 seconds (4 seconds per message). In fact, we can do a simple test using the function. This returns the epoch time in seconds, and we can use it twice to see how much time elapsed from the beginning to the end of the script.
start = time.time()

for i, msg in enumerate(messages):
  do_something(i, msg)

print("It took " + str(time.time()-start) + " seconds")
And here is the output. The time elapsed between printing lines, of course, was about 4 seconds.
Running it with threads
Now we can dive in the real python threading tutorial. We can rewrite this part of the script to work with threads, and distribute the load among them. Here we need to work with three different functions.
Creating the thread
To create a thread, you need to instantiate a object. The constructor wants to know a target function: the function that you want to run within the thread. It also want to know a list of parameters you want to pass to the function, if you need it. You provide the function name as , and the parameters as a tuple for the parameter. Below, a sample code to create a thread.
thread = threading.Thrad(target=function_name, args=(arg1, arg2, arg3))
From now on, you can perform operation on this thread object you just created.
Starting and joining the thread
Once you have a thread object, you can decide to start it with the function, and to join it with the function, as simple as that. The code is pretty straight forward, as you can see below.
thread.start()
thread.join()
In order to call , you need to call first. However, you don’t need to call the two one after the other. In fact, you might want to perform some code after starting the thread, and before joining it. Even more, you may not join a thread all.
The whole script
Combining the commands above, we can create a way more efficient snippet that leverages threads. Here it is.
start = time.time()
threads = []

for i, msg in enumerate(messages):
  threads.append(threading.Thread(target=do_something, args=(i, msg,)))
  threads.start()
for thread in threads:
  thread.join()

print("It took " + str(time.time()-start) + " seconds")
As you can see, we first create and start all the threads. Then, with another loop, we join all of them. We didn’t join each thread just after starting on purpose. If we did, the script would have waited for the first thread to finish before starting the second. Of course, we don’t want that. If we run this script you won’t see any output for about 4 seconds, then all four lines of the output will appear together. It will run in a little more than 4 seconds, take a look.
Реентерабельные замки (RLock)
Класс RLock – это версия замка, который выполняет функцию блокировки только в том случае, если замок удерживает другой поток. В то время как обычные замки блокируют тогда, когда тот же поток пытается получить к одному и тому же замку дважды, реентерабельный замок блокирует только в том случае, если другой поток уже держит замок. Если нынешний поток пытается получить доступ к замку, который и так удерживается, осуществление данной операции проходит в привычном порядке.
Python
lock = threading.Lock()
lock.acquire()
lock.acquire() # заблокирует
lock = threading.RLock()
lock.acquire()
lock.acquire() # не будет блокировать
|
1 2 3 4 5 6 7 |
lock=threading.Lock() lock.acquire() lock.acquire()# заблокирует lock=threading.RLock() lock.acquire() lock.acquire()# не будет блокировать |
В основном это используется для вложенного доступа к общим ресурсам, как показано в предыдущем примере. Для того, чтобы наладить методы доступа в нашем примере, просто замените обычный Lock на RLock и вложенные вызовы заработают так, как надо.
Python
import threading
lock = threading.RLock()
def get_first_part():
lock.acquire()
try:
# берем данные для первой части из общих ресурсах.
finally:
lock.release()
return data
def get_second_part():
lock.acquire()
try:
# берем данные для второй части из общих ресурсах.
finally:
lock.release()
return data
|
1 2 3 4 5 6 7 8 9 10 11 12 13 14 15 16 17 18 19 |
importthreading lock=threading.RLock() defget_first_part() lock.acquire() try # берем данные для первой части из общих ресурсах. finally lock.release() returndata defget_second_part() lock.acquire() try # берем данные для второй части из общих ресурсах. finally lock.release() returndata |
При этом вы можете выбрать отдельные части, или обе за раз, не застревая и не получая взаимоисключающих данных
Обратите внимание на то, что этот замок отслеживает уровень рекурсии, так что вам все раз нужно вызвать release по одному разу для каждого вызова для получения доступа
Синтаксис менеджера контекста
Контекстные менеджеры отлично подходят, чтобы открывать и закрывать файлы, работать с соединениями баз данных и делать многое другое, а в Python 3.10 они станут немного удобнее. Изменение позволяет в скобках указывать несколько контекстных менеджеров, что удобно, если вы хотите создать в одном операторе with несколько менеджеров:
В коде выше видно, что мы даже можем ссылаться на переменную, созданную одним контекстным менеджером (… as some_file) в следующем за ним менеджере!
Это всего лишь два из многих новых форматов в Python 3.10. Улучшенный синтаксис довольно гибок, поэтому я не буду утруждать себя и показать все возможные варианты; я почти уверен, что новый Python обработает всё, что вы ему скормите.
Когда нужен Daemon Thread?
В большом проекте некоторые потоки предназначены для выполнения фоновых задач, таких как отправка данных, периодическая сборка мусора и т.д. Это может быть выполнено no-Daemon. Но если используется no-Daemon, основной поток должен отслеживать их вручную. Однако, используя Daemon Thread, основной поток может полностью забыть об этой задаче, и эта задача будет либо завершена, либо уничтожена при выходе из основного потока.
Обратите внимание, что вы должны использовать Daemon Thread только для несущественных задач, когда вы не возражаете, если она не завершится или останется между ними
Ограничение одновременного доступа к ресурсам
Как разрешить доступ к ресурсу нескольким worker одновременно, но при этом ограничить их количество. Например, пул соединений может поддерживать фиксированное число одновременных подключений, или сетевое приложение может поддерживать фиксированное количество одновременных загрузок. Semaphore является одним из способов управления соединениями.
import logging
import random
import threading
import time

logging.basicConfig(level=logging.DEBUG,
                    format='%(asctime)s (%(threadName)-2s) %(message)s',
                    )

class ActivePool(object):
    def __init__(self):
        super(ActivePool, self).__init__()
        self.active = []
        self.lock = threading.Lock()
    def makeActive(self, name):
        with self.lock:
            self.active.append(name)
            logging.debug('Running: %s', self.active)
    def makeInactive(self, name):
        with self.lock:
            self.active.remove(name)
            logging.debug('Running: %s', self.active)

def worker(s, pool):
    logging.debug('Waiting to join the pool')
    with s:
        name = threading.currentThread().getName()
        pool.makeActive(name)
        time.sleep(0.1)
        pool.makeInactive(name)

pool = ActivePool()
s = threading.Semaphore(2)
for i in range(4):
    t = threading.Thread(target=worker, name=str(i), args=(s, pool))
    t.start()
В этом примере класс ActivePool является удобным способом отслеживания того, какие потоки могут запускаться в данный момент. Реальный пул ресурсов будет выделять соединение для нового потока и восстанавливать значение, когда поток завершен. В данном случае он используется для хранения имен активных потоков, чтобы показать, что только пять из них работают одновременно.
$ python threading_semaphore.py

2013-02-21 06:37:53,629 (0 ) Waiting to join the pool
2013-02-21 06:37:53,629 (1 ) Waiting to join the pool
2013-02-21 06:37:53,629 (0 ) Running:
2013-02-21 06:37:53,629 (2 ) Waiting to join the pool
2013-02-21 06:37:53,630 (3 ) Waiting to join the pool
2013-02-21 06:37:53,630 (1 ) Running:
2013-02-21 06:37:53,730 (0 ) Running:
2013-02-21 06:37:53,731 (2 ) Running:
2013-02-21 06:37:53,731 (1 ) Running:
2013-02-21 06:37:53,732 (3 ) Running:
2013-02-21 06:37:53,831 (2 ) Running:
2013-02-21 06:37:53,833 (3 ) Running: []
What is Parallelism?
Earlier machines used to have only one core within the CPU where all the processing used to take place.
Why is the number of cores important- It is because it tells about the capacity of the machine to handle multiple things. If you have 16 cores, then you can do 16 different operations at the exact same time.
Let us say you want to perform 16 different addition operations and assume each operation takes 1 second. In a single-core machine, you have to perform these operations one by one, which means the 16 addition operations get done in 16 seconds. Now in a 16 core machine, you can deploy the 16 addition operations to each core at the same time and get the job done in 1 second. This is called Parallelism.
Thread-specific Data
While some resources need to be locked so multiple threads can use
them, others need to be protected so that they are hidden from threads
that do not own them. The class creates an object
capable of hiding values from view in separate threads.
threading_local.py
import random
import threading
import logging


def show_value(data):
    try
        val = data.value
    except AttributeError
        logging.debug('No value yet')
    else
        logging.debug('value=%s', val)


def worker(data):
    show_value(data)
    data.value = random.randint(1, 100)
    show_value(data)


logging.basicConfig(
    level=logging.DEBUG,
    format='(%(threadName)-10s) %(message)s',
)

local_data = threading.local()
show_value(local_data)
local_data.value = 1000
show_value(local_data)

for i in range(2):
    t = threading.Thread(target=worker, args=(local_data,))
    t.start()
The attribute is not present for any thread until
it is set in that thread.
$ python3 threading_local.py

(MainThread) No value yet
(MainThread) value=1000
(Thread-1  ) No value yet
(Thread-1  ) value=33
(Thread-2  ) No value yet
(Thread-2  ) value=74
To initialize the settings so all threads start with the same value,
use a subclass and set the attributes in .
threading_local_defaults.py
import random
import threading
import logging


def show_value(data):
    try
        val = data.value
    except AttributeError
        logging.debug('No value yet')
    else
        logging.debug('value=%s', val)


def worker(data):
    show_value(data)
    data.value = random.randint(1, 100)
    show_value(data)


class MyLocal(threading.local):

    def __init__(self, value):
        super().__init__()
        logging.debug('Initializing %r', self)
        self.value = value


logging.basicConfig(
    level=logging.DEBUG,
    format='(%(threadName)-10s) %(message)s',
)

local_data = MyLocal(1000)
show_value(local_data)

for i in range(2):
    t = threading.Thread(target=worker, args=(local_data,))
    t.start()
is invoked on the same object (note the
value), once in each thread to set the default values.
$ python3 threading_local_defaults.py

(MainThread) Initializing <__main__.MyLocal object at
0x101c6c288>
(MainThread) value=1000
(Thread-1  ) Initializing <__main__.MyLocal object at
0x101c6c288>
(Thread-1  ) value=1000
(Thread-1  ) value=18
(Thread-2  ) Initializing <__main__.MyLocal object at
0x101c6c288>
(Thread-2  ) value=1000
(Thread-2  ) value=77
See also
- Standard library documentation for threading
- – Lower level thread API.
-
– Thread-safe queue, useful for passing messages
between threads. -
– An API for working with processes that
mirrors the API.
Starting a New Thread
To spawn another thread, you need to call following method available in thread module −
thread.start_new_thread ( function, args )
This method call enables a fast and efficient way to create new threads in both Linux and Windows.
The method call returns immediately and the child thread starts and calls function with the passed list of args. When function returns, the thread terminates.
Here, args is a tuple of arguments; use an empty tuple to call function without passing any arguments. kwargs is an optional dictionary of keyword arguments.
Example
#!/usr/bin/python

import thread
import time

# Define a function for the thread
def print_time( threadName, delay):
   count = 0
   while count < 5:
      time.sleep(delay)
      count += 1
      print "%s: %s" % ( threadName, time.ctime(time.time()) )

# Create two threads as follows
try:
   thread.start_new_thread( print_time, ("Thread-1", 2, ) )
   thread.start_new_thread( print_time, ("Thread-2", 4, ) )
except:
   print "Error: unable to start thread"

while 1:
   pass
When the above code is executed, it produces the following result −
Thread-1: Thu Jan 22 15:42:17 2009
Thread-1: Thu Jan 22 15:42:19 2009
Thread-2: Thu Jan 22 15:42:19 2009
Thread-1: Thu Jan 22 15:42:21 2009
Thread-2: Thu Jan 22 15:42:23 2009
Thread-1: Thu Jan 22 15:42:23 2009
Thread-1: Thu Jan 22 15:42:25 2009
Thread-2: Thu Jan 22 15:42:27 2009
Thread-2: Thu Jan 22 15:42:31 2009
Thread-2: Thu Jan 22 15:42:35 2009
Although it is very effective for low-level threading, but the thread module is very limited compared to the newer threading module.
Condition Objects
A condition variable is always associated with some kind of lock; this can be
passed in or one will be created by default. Passing one in is useful when
several condition variables must share the same lock. The lock is part of
the condition object: you don’t have to track it separately.
A condition variable obeys the :
using the statement acquires the associated lock for the duration of
the enclosed block. The and
methods also call the corresponding methods of
the associated lock.
Other methods must be called with the associated lock held. The
method releases the lock, and then blocks until
another thread awakens it by calling or
. Once awakened,
re-acquires the lock and returns. It is also possible to specify a timeout.
The method wakes up one of the threads waiting for
the condition variable, if any are waiting. The
method wakes up all threads waiting for the condition variable.
Note: the and methods
don’t release the lock; this means that the thread or threads awakened will
not return from their call immediately, but only when
the thread that called or
finally relinquishes ownership of the lock.
The typical programming style using condition variables uses the lock to
synchronize access to some shared state; threads that are interested in a
particular change of state call repeatedly until they
see the desired state, while threads that modify the state call
or when they change
the state in such a way that it could possibly be a desired state for one
of the waiters. For example, the following code is a generic
producer-consumer situation with unlimited buffer capacity:
# Consume one item
with cv
    while not an_item_is_available():
        cv.wait()
    get_an_available_item()

# Produce one item
with cv
    make_an_item_available()
    cv.notify()
The loop checking for the application’s condition is necessary
because can return after an arbitrary long time,
and the condition which prompted the call may
no longer hold true. This is inherent to multi-threaded programming. The
method can be used to automate the condition
checking, and eases the computation of timeouts:
# Consume an item
with cv
    cv.wait_for(an_item_is_available)
    get_an_available_item()
To choose between and ,
consider whether one state change can be interesting for only one or several
waiting threads. E.g. in a typical producer-consumer situation, adding one
item to the buffer only needs to wake up one consumer thread.
Subclassing Thread
It is also possible to start a thread by subclassing threading.Thread. Depending on the design of your application, you may prefer this approach. Here, you extend threading.Thread and provide the implementation of your task in the run() method.
import threading
import random, time

class MyTask(threading.Thread):
    def __init__(self, sleepFor):
        self.secs = sleepFor
        threading.Thread.__init__(self)

    def run(self):
        print self, 'begin sleep(', self.secs, ')'
        time.sleep(self.secs)
        print self, 'end sleep(', self.secs, ')'
And here is the usage of the class defined above.
tasks = []
for x in xrange(0, 5):
    t = MyTask(random.randint(1, 10))
    tasks.append(t)
    t.start()

print 'joining ..'
while threading.active_count() > 1:
    for t in tasks:
        t.join()
        print t, 'is done.'
print 'all done.'
Daemon потоки non-daemon
До этого момента примеры программ ожидали, пока все потоки не завершат свою работу. Иногда программы порождают такой поток, как демон. Он работает, не блокируя завершение основной программы.
Использование демона полезно, если не удается прервать поток или завершить его в середине работы, не потеряв и не повредив при этом данные.
Чтобы пометить поток как demon, вызовите метод setDaemon() с логическим аргументом. По умолчанию потоки не являются «демонами», поэтому передача в качестве аргумента значения True включает режим demon.
import threading
import time
import logging

logging.basicConfig(level=logging.DEBUG,
                    format='(%(threadName)-10s) %(message)s',
                    )

def daemon():
    logging.debug('Starting')
    time.sleep(2)
    logging.debug('Exiting')

d = threading.Thread(name='daemon', target=daemon)
d.setDaemon(True)

def non_daemon():
    logging.debug('Starting')
    logging.debug('Exiting')

t = threading.Thread(name='non-daemon', target=non_daemon)

d.start()
t.start()
Обратите внимание, что в выводимых данных отсутствует сообщение «Exiting» от потока-демона. Все потоки, не являющиеся «демонами» (включая основной поток), завершают работу до того, как поток-демон выйдет из двухсекундного сна
$ python threading_daemon.py

(daemon    ) Starting
(non-daemon) Starting
(non-daemon) Exiting
Чтобы дождаться завершения работы потока-демона, используйте метод join().
import threading
import time
import logging

logging.basicConfig(level=logging.DEBUG,
                    format='(%(threadName)-10s) %(message)s',
                    )

def daemon():
    logging.debug('Starting')
    time.sleep(2)
    logging.debug('Exiting')

d = threading.Thread(name='daemon', target=daemon)
d.setDaemon(True)

def non_daemon():
    logging.debug('Starting')
    logging.debug('Exiting')

t = threading.Thread(name='non-daemon', target=non_daemon)

d.start()
t.start()

d.join()
t.join()
Метод join() позволяет demon вывести сообщение «Exiting».
$ python threading_daemon_join.py

(daemon    ) Starting
(non-daemon) Starting
(non-daemon) Exiting
(daemon    ) Exiting
Также можно передать аргумент задержки (количество секунд, в течение которых поток будет неактивным).
import threading
import time
import logging

logging.basicConfig(level=logging.DEBUG,
                    format='(%(threadName)-10s) %(message)s',
                    )

def daemon():
    logging.debug('Starting')
    time.sleep(2)
    logging.debug('Exiting')

d = threading.Thread(name='daemon', target=daemon)
d.setDaemon(True)

def non_daemon():
    logging.debug('Starting')
    logging.debug('Exiting')

t = threading.Thread(name='non-daemon', target=non_daemon)

d.start()
t.start()

d.join(1)
print 'd.isAlive()', d.isAlive()
t.join()
Истекшее время ожидания меньше, чем время, в течение которого поток-демон спит. Поэтому поток все еще «жив» после того, как метод join() продолжит свою работу.
$ python threading_daemon_join_timeout.py

(daemon    ) Starting
(non-daemon) Starting
(non-daemon) Exiting
d.isAlive() True