Псевдоэлементы
Содержание:
Расширенный синтаксис
Вы можете оставить свойство content пустым, и создать блок.
#example:before {
   content: "";
   display: block;
   width: 100px;
   height: 100px;
}
Если вы удалите свойство content, псевдоэлемент
работать не будет. По крайней мере, это совойство должно оставаться пустым.
Вы должны знать, что некоторые используют эти элементы в
виде ::before и ::after. Разницы никакой нет, браузеры поддерживают такой
синтаксис также.
Еще один момент использования. Вы можете применить
псевдоэлемент к каждому из html элементов.
:before {
   content: "#";
}
Но это используется в личных целях. Этот код вставляет # перед
контентом в каждом DOM элементе. Даже если вы удалите все теги на странице, вы
сможете видеть два символа ## на странице. Это используется, сам не знаю для
чего, но такое есть.
CSS Reference
CSS ReferenceCSS Browser SupportCSS SelectorsCSS FunctionsCSS Reference AuralCSS Web Safe FontsCSS Font FallbacksCSS AnimatableCSS UnitsCSS PX-EM ConverterCSS ColorsCSS Color ValuesCSS Default ValuesCSS Entities
CSS Properties
align-content
align-items
align-self
all
animation
animation-delay
animation-direction
animation-duration
animation-fill-mode
animation-iteration-count
animation-name
animation-play-state
animation-timing-function
backface-visibility
background
background-attachment
background-blend-mode
background-clip
background-color
background-image
background-origin
background-position
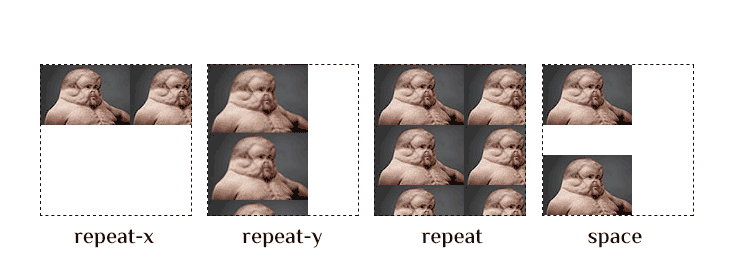
background-repeat
background-size
border
border-bottom
border-bottom-color
border-bottom-left-radius
border-bottom-right-radius
border-bottom-style
border-bottom-width
border-collapse
border-color
border-image
border-image-outset
border-image-repeat
border-image-slice
border-image-source
border-image-width
border-left
border-left-color
border-left-style
border-left-width
border-radius
border-right
border-right-color
border-right-style
border-right-width
border-spacing
border-style
border-top
border-top-color
border-top-left-radius
border-top-right-radius
border-top-style
border-top-width
border-width
bottom
box-decoration-break
box-shadow
box-sizing
break-after
break-before
break-inside
caption-side
caret-color
@charset
clear
clip
clip-path
color
column-count
column-fill
column-gap
column-rule
column-rule-color
column-rule-style
column-rule-width
column-span
column-width
columns
content
counter-increment
counter-reset
cursor
direction
display
empty-cells
filter
flex
flex-basis
flex-direction
flex-flow
flex-grow
flex-shrink
flex-wrap
float
font
@font-face
font-family
font-feature-settings
font-kerning
font-size
font-size-adjust
font-stretch
font-style
font-variant
font-variant-caps
font-weight
gap
grid
grid-area
grid-auto-columns
grid-auto-flow
grid-auto-rows
grid-column
grid-column-end
grid-column-gap
grid-column-start
grid-gap
grid-row
grid-row-end
grid-row-gap
grid-row-start
grid-template
grid-template-areas
grid-template-columns
grid-template-rows
hanging-punctuation
height
hyphens
@import
isolation
justify-content
@keyframes
left
letter-spacing
line-height
list-style
list-style-image
list-style-position
list-style-type
margin
margin-bottom
margin-left
margin-right
margin-top
max-height
max-width
@media
min-height
min-width
mix-blend-mode
object-fit
object-position
opacity
order
outline
outline-color
outline-offset
outline-style
outline-width
overflow
overflow-x
overflow-y
padding
padding-bottom
padding-left
padding-right
padding-top
page-break-after
page-break-before
page-break-inside
perspective
perspective-origin
pointer-events
position
quotes
resize
right
row-gap
scroll-behavior
tab-size
table-layout
text-align
text-align-last
text-decoration
text-decoration-color
text-decoration-line
text-decoration-style
text-indent
text-justify
text-overflow
text-shadow
text-transform
top
transform
transform-origin
transform-style
transition
transition-delay
transition-duration
transition-property
transition-timing-function
unicode-bidi
user-select
vertical-align
visibility
white-space
width
word-break
word-spacing
word-wrap
writing-mode
z-index
Метод 5: Псевдоэлементы с наложением цвета при наведении
Одна из последних тенденций в графическом дизайне — эффекта наложения цвета при наведении. Для этого можно использовать псевдоэлементы:
Пример
Код HTML:
<ul>
   <li>
      <img alt="Image" src="images/thumb.jpeg">
      <p>Lorem Ipsum</p>
   </li>
   <li>
     <img alt="Image" src="images/thumb.jpeg">
     <p>Lorem Ipsum</p>
   </li>
</ul>
Код li active CSS:
ul li                { width: 49%; padding: 0 5px; display: inline-block; text-align: center; position: relative;}
ul li img            { max-width: 100%; height: auto;}
ul li p              { margin: 0; padding: 20px; background: #ffffff;}
ul li::after         { height: 100%; content: ""; background: rgba(0,0,0,0.8); position: absolute; top: 0; left: 5px; right: 5px; opacity: 0;}
ul li:hover::after,
ul li:hover::before  { opacity: 1; cursor: pointer;}
ul li::before        { content: "Hover Text"; position: absolute; top: calc(50% - 12px); left: calc(50% - 40px); color: #ffffff; opacity: 0; z-index: 10;}
Результат:
hover active CSS
CSS Reference
CSS ReferenceCSS Browser SupportCSS SelectorsCSS FunctionsCSS Reference AuralCSS Web Safe FontsCSS Font FallbacksCSS AnimatableCSS UnitsCSS PX-EM ConverterCSS ColorsCSS Color ValuesCSS Default ValuesCSS Entities
CSS Properties
align-content
align-items
align-self
all
animation
animation-delay
animation-direction
animation-duration
animation-fill-mode
animation-iteration-count
animation-name
animation-play-state
animation-timing-function
backface-visibility
background
background-attachment
background-blend-mode
background-clip
background-color
background-image
background-origin
background-position
background-repeat
background-size
border
border-bottom
border-bottom-color
border-bottom-left-radius
border-bottom-right-radius
border-bottom-style
border-bottom-width
border-collapse
border-color
border-image
border-image-outset
border-image-repeat
border-image-slice
border-image-source
border-image-width
border-left
border-left-color
border-left-style
border-left-width
border-radius
border-right
border-right-color
border-right-style
border-right-width
border-spacing
border-style
border-top
border-top-color
border-top-left-radius
border-top-right-radius
border-top-style
border-top-width
border-width
bottom
box-decoration-break
box-shadow
box-sizing
break-after
break-before
break-inside
caption-side
caret-color
@charset
clear
clip
clip-path
color
column-count
column-fill
column-gap
column-rule
column-rule-color
column-rule-style
column-rule-width
column-span
column-width
columns
content
counter-increment
counter-reset
cursor
direction
display
empty-cells
filter
flex
flex-basis
flex-direction
flex-flow
flex-grow
flex-shrink
flex-wrap
float
font
@font-face
font-family
font-feature-settings
font-kerning
font-size
font-size-adjust
font-stretch
font-style
font-variant
font-variant-caps
font-weight
gap
grid
grid-area
grid-auto-columns
grid-auto-flow
grid-auto-rows
grid-column
grid-column-end
grid-column-gap
grid-column-start
grid-gap
grid-row
grid-row-end
grid-row-gap
grid-row-start
grid-template
grid-template-areas
grid-template-columns
grid-template-rows
hanging-punctuation
height
hyphens
@import
isolation
justify-content
@keyframes
left
letter-spacing
line-height
list-style
list-style-image
list-style-position
list-style-type
margin
margin-bottom
margin-left
margin-right
margin-top
max-height
max-width
@media
min-height
min-width
mix-blend-mode
object-fit
object-position
opacity
order
outline
outline-color
outline-offset
outline-style
outline-width
overflow
overflow-x
overflow-y
padding
padding-bottom
padding-left
padding-right
padding-top
page-break-after
page-break-before
page-break-inside
perspective
perspective-origin
pointer-events
position
quotes
resize
right
row-gap
scroll-behavior
tab-size
table-layout
text-align
text-align-last
text-decoration
text-decoration-color
text-decoration-line
text-decoration-style
text-indent
text-justify
text-overflow
text-shadow
text-transform
top
transform
transform-origin
transform-style
transition
transition-delay
transition-duration
transition-property
transition-timing-function
unicode-bidi
user-select
vertical-align
visibility
white-space
width
word-break
word-spacing
word-wrap
writing-mode
z-index
Пример использования
<!DOCTYPE html>
<html>
	<head>
		<title>Использование jQuery метода .before() (добавление элемента)</title>
		<script src = "https://ajax.googleapis.com/ajax/libs/jquery/3.1.0/jquery.min.js"></script>
		<script>
	$( document ).ready(function(){
	  $( "p:first" ).before( "<b>Hello world!</b>" ); // добавляем содержимое перед первым элементом <p> в документе
	});
		</script>
	</head>
	<body>
		<p>Первый абзац</p>
		<p>Второй абзац</p>
	</body>
</html>
В этом примере с использованием jQuery метода .before() мы добавляем перед первым элементом <p> в документе текстовое содержимое, заключенное в элемент <b> (жирное начертание текста).
Результат нашего примера:
Пример использования jQuery метода .before() (добавление элемента)
В следующем примере мы рассмотрим как передать методу .before() несколько параметров.
<!DOCTYPE html>
<html>
	<head>
		<title>Использование jQuery метода .before() (добавление нескольких элементов)</title>
		<script src = "https://ajax.googleapis.com/ajax/libs/jquery/3.1.0/jquery.min.js"></script>
		<script>
	$( document ).ready(function(){
	  var h3 ="<h3>Заголовок третьего уровня</h3>", // создаем две переменные
	      hr = document.createElement( "hr" ); // создаем элемент <hr> и помещаем в переменную
	  $( "p:first" ).before( "<b>Hello world!</b>", ["<h2>Заголовок второго уровня</h2>", h3, hr] ); // добавляем содержимое перед первым элементом <p> в документе
	});
		</script>
	</head>
	<body>
		<p>Первый абзац</p>
		<p>Второй абзац</p>
	</body>
</html>
В этом примере с использованием jQuery метода .before() мы добавляем перед первым элементом
несколько различных элементов
Обращаю Ваше внимание, что метод .before() может принимать любое количество аргументов и следующая запись будет делать тоже самое, что и запись рассмотренная в примере:
$( "p:first" ).before( "<b>Hello world!</b>", "<h2>Заголовок второго уровня</h2>", h3, hr ); // допускается передавать параметры не в массиве
Результат нашего примера:
Пример использования jQuery метода .before() (добавление нескольких элементов)
В следующем примере мы в качестве параметра метода .before() передадим jQuery объект.
<!DOCTYPE html>
<html>
	<head>
		<title>Использование jQuery метода .before() (передача jQuery объекта)</title>
		<script src = "https://ajax.googleapis.com/ajax/libs/jquery/3.1.0/jquery.min.js"></script>
		<script>
	$( document ).ready(function(){
	  $( ".first" ).before( $( ".third" ) ); // перемещаем содержимое перед элементом с классом .first
	});
		</script>
	</head>
	<body>
		<ul>
			<li class = "first">1</p>
			<li class = "second">2</p>
			<li class = "third">3</p>
		</ul>
	</body>
</html>
В этом примере с использованием jQuery метода .before() мы добавляем перед элементом
с классом «first» элемент
с классом «third»Обратите внимание, что при этом элемент не клонируется, а перемещается
Результат нашего примера:
Пример использования jQuery метода .before() (передача jQuery объекта)
В следующем примере мы в качестве параметра метода .before() передадим функцию.
<!DOCTYPE html>
<html>
	<head>
		<title>Использование jQuery метода .before() (использование функции)</title>
		<script src = "https://ajax.googleapis.com/ajax/libs/jquery/3.1.0/jquery.min.js"></script>
		<script>
	$( document ).ready(function(){
	  $( "p:first" ).before(function( index, html ){
            return "<ul><li>Индекс элемента: " + index + "</li><li>Содержимое элемента: " + html + "</li></ul>";
	  });
	});
		</script>
	</head>
	<body>
		<p>Первый абзац</p>
		<p>Второй абзац</p>
	</body>
</html>
В этом примере с использованием jQuery метода .before() и функции, переданной в качестве параметра метода, мы выводим после каждого элемента <p> в документе маркированный список (<ul>), который содержит информацию о индексе элемента и его содержимом.
Результат нашего примера:
Пример использования jQuery метода .before() (использование функции)jQuery DOM методы
Значение until и before и разница в употреблении
Начнем с предлога until.
Рассмотрим несколько предложений:
- I want to stay in bed until 11. – Я хочу оставаться в постели до 11 часов.
- He works until 10 pm every day. – Он работает до 10 вечера каждый день.
- I don’t sleep until 9 o’clock. Я не сплю до 6 часов (вплоть до 6 часов).
- The museum is closed until tomorrow. Музей закрыт до завтра.
- I’m cooking lunch until 2pm today. Сегодня я готовлю обед до 2 часов дня.
Во всех этих случаях предлог until в значении до указывает нам на момент, вплоть до которого совершается действие. То есть действие во всех этих предложениях будет длиться и закончится как раз в указанное время.
- I want to stay in bed until 11. – Я хочу оставаться в постели до 11. Это значит, что она будет в кровати, пока не пробьет 11, ранее она не встанет.
- He works until 10 pm every day. – Он работает вплоть до 22 часов вечера и заканчивает работу в 22, не ранее. Действие продолжается до указанного времени.
- I don’t sleep until 9 o’clock. – Это значит, что я нахожусь в бодрствующем состоянии вплоть до 9 часов. После 9 я ложусь спать, но до 9 – точно нет. Действие продолжается снова до указанного времени.
- The museum is closed until tomorrow. – Это значит, что до завтрашнего дня музей будет находиться в закрытом состоянии, откроется он только завтра и точно не раньше.
- I’m cooking lunch until 2pm today. – Я готовлю обед вплоть до 14 часов дня и закончу его готовить не раньше двух.
Теперь рассмотрим предлог before.

Несколько примеров:
- I never go to bed before 1.00. Я никогда не ложусь спать ранее часа.
- Come before 5 o’clock. Приходи до 5 часов.
- She always cooks lunch before 3. Она всегда готовит обед до трех.
- They played football before dinner. Они поиграли в футбол перед ужином (до ужина).
Во всех этих предложениях before имеет значение предшествования, действие происходит ранее указанного времени, но не длится вплоть до указанного времени.
I never go to bed before 1.00. Когда мы говорим это, мы имеем в виду, что мы не идем спать в любое время ранее часа. В данном случае на русский язык мы переводим данный предлог как «ранее».
Come before 5 o’clock. Это значит, что мы просим прийти ранее пяти, не указывая в какое конкретно время нужно прийти
Важно, чтобы человек пришел ранее этого времени. Он может прийти в час, в два, в 12 часов.
She always cooks lunch before 3
Это значит, что она готовит обед ранее трех часов. Как и в предыдущем примере. Она может готовить его в любое время ранее 3 часов. Но это не значит, что она закончит готовить в 3, может и раньше.
They played football before dinner. Они поиграли в футбол раньше, чем настало время ужинать. Они играли не вплоть до начала ужина, а ранее.
Таким образом:
- Until означает, что действие будет продолжаться до того момента как не наступит указанное время. I’m cooking lunch until 2pm today. – Процесс готовки будет продолжаться вплоть до двух часов, раньше двух я не закончу готовить.
- Before означает прежде, ранее, но не обязательно до указанного времени. She always cooks lunch before Она готовит обед ранее трех часов, но необязательно, что она закончит в 3. Результат – в данном случае готовая еда – может произойти в любой момент до указанного временного отрезка.
Возьмем два похожих примера.
- They played football until 6. Действие закончилось в 6.
- They played football before 6. Действие закончилось ранее 6 в любой момент ранее указанного времени.
Для лучшего понимания, эти действия можно изобразить на рисунке.

Вас могут заинтересовать также следующие темы по английскому языку:
CSS Properties
align-contentalign-itemsalign-selfallanimationanimation-delayanimation-directionanimation-durationanimation-fill-modeanimation-iteration-countanimation-nameanimation-play-stateanimation-timing-functionbackface-visibilitybackgroundbackground-attachmentbackground-blend-modebackground-clipbackground-colorbackground-imagebackground-originbackground-positionbackground-repeatbackground-sizeborderborder-bottomborder-bottom-colorborder-bottom-left-radiusborder-bottom-right-radiusborder-bottom-styleborder-bottom-widthborder-collapseborder-colorborder-imageborder-image-outsetborder-image-repeatborder-image-sliceborder-image-sourceborder-image-widthborder-leftborder-left-colorborder-left-styleborder-left-widthborder-radiusborder-rightborder-right-colorborder-right-styleborder-right-widthborder-spacingborder-styleborder-topborder-top-colorborder-top-left-radiusborder-top-right-radiusborder-top-styleborder-top-widthborder-widthbottombox-decoration-breakbox-shadowbox-sizingbreak-afterbreak-beforebreak-insidecaption-sidecaret-color@charsetclearclipclip-pathcolorcolumn-countcolumn-fillcolumn-gapcolumn-rulecolumn-rule-colorcolumn-rule-stylecolumn-rule-widthcolumn-spancolumn-widthcolumnscontentcounter-incrementcounter-resetcursordirectiondisplayempty-cellsfilterflexflex-basisflex-directionflex-flowflex-growflex-shrinkflex-wrapfloatfont@font-facefont-familyfont-feature-settingsfont-kerningfont-sizefont-size-adjustfont-stretchfont-stylefont-variantfont-variant-capsfont-weightgapgridgrid-areagrid-auto-columnsgrid-auto-flowgrid-auto-rowsgrid-columngrid-column-endgrid-column-gapgrid-column-startgrid-gapgrid-rowgrid-row-endgrid-row-gapgrid-row-startgrid-templategrid-template-areasgrid-template-columnsgrid-template-rowshanging-punctuationheighthyphens@importisolationjustify-content@keyframesleftletter-spacingline-heightlist-stylelist-style-imagelist-style-positionlist-style-typemarginmargin-bottommargin-leftmargin-rightmargin-topmax-heightmax-width@mediamin-heightmin-widthmix-blend-modeobject-fitobject-positionopacityorderoutlineoutline-coloroutline-offsetoutline-styleoutline-widthoverflowoverflow-xoverflow-ypaddingpadding-bottompadding-leftpadding-rightpadding-toppage-break-afterpage-break-beforepage-break-insideperspectiveperspective-originpointer-eventspositionquotesresizerightrow-gapscroll-behaviortab-sizetable-layouttext-aligntext-align-lasttext-decorationtext-decoration-colortext-decoration-linetext-decoration-styletext-indenttext-justifytext-overflowtext-shadowtext-transformtoptransformtransform-origintransform-styletransitiontransition-delaytransition-durationtransition-propertytransition-timing-functionunicode-bidiuser-selectvertical-alignvisibilitywhite-spacewidthword-breakword-spacingword-wrapwriting-modez-index
Особенности псевдоэлементов before и after
-
1.Псевдоэлементы должны указываться сразу после селектора через двойное двоеточие без пробела, как показано в примерах выше. Однако допускается и использование одинарного двоеточия.
PHP
.block-class:before
1 .block-classbefore - 2.Псевдоэлемет является строчным элементом, поэтому если в CSS свойстве content ничего не указано то его ширина по умолчанию будет равна нулю. Так же для строчных элементов не применяется вертикальные отступы margin. Чтобы они начали работать и элемент стал на всю ширину ему нужно дописать CSS свойство display:block;
-
3.Вы можете использовать только один псевдоэлемент на селектор. То есть нельзя использовать сразу 2 псевдоэлемента для одного блока.
Запись .block-class::before::after или #content::first-line::after будет неправильной. - 4.Кроме псевдоэлементов ::before и ::after существуют и другие, такие как ::selection, ::first-line, ::first-letter, о которых я расскажу в одной из следующих статей.

Спасибо что посетили мой сайт!
С уважением Юлия Гусарь
CSS Свойства
align-contentalign-itemsalign-selfallanimationanimation-delayanimation-directionanimation-durationanimation-fill-modeanimation-iteration-countanimation-nameanimation-play-stateanimation-timing-functionbackface-visibilitybackgroundbackground-attachmentbackground-blend-modebackground-clipbackground-colorbackground-imagebackground-originbackground-positionbackground-repeatbackground-sizeborderborder-bottomborder-bottom-colorborder-bottom-left-radiusborder-bottom-right-radiusborder-bottom-styleborder-bottom-widthborder-collapseborder-colorborder-imageborder-image-outsetborder-image-repeatborder-image-sliceborder-image-sourceborder-image-widthborder-leftborder-left-colorborder-left-styleborder-left-widthborder-radiusborder-rightborder-right-colorborder-right-styleborder-right-widthborder-spacingborder-styleborder-topborder-top-colorborder-top-left-radiusborder-top-right-radiusborder-top-styleborder-top-widthborder-widthbottombox-decoration-breakbox-shadowbox-sizingcaption-sidecaret-color@charsetclearclipcolorcolumn-countcolumn-fillcolumn-gapcolumn-rulecolumn-rule-colorcolumn-rule-stylecolumn-rule-widthcolumn-spancolumn-widthcolumnscontentcounter-incrementcounter-resetcursordirectiondisplayempty-cellsfilterflexflex-basisflex-directionflex-flowflex-growflex-shrinkflex-wrapfloatfont@font-facefont-familyfont-kerningfont-sizefont-size-adjustfont-stretchfont-stylefont-variantfont-weightgridgrid-areagrid-auto-columnsgrid-auto-flowgrid-auto-rowsgrid-columngrid-column-endgrid-column-gapgrid-column-startgrid-gapgrid-rowgrid-row-endgrid-row-gapgrid-row-startgrid-templategrid-template-areasgrid-template-columnsgrid-template-rowshanging-punctuationheighthyphens@importisolationjustify-content@keyframesleftletter-spacingline-heightlist-stylelist-style-imagelist-style-positionlist-style-typemarginmargin-bottommargin-leftmargin-rightmargin-topmax-heightmax-width@mediamin-heightmin-widthmix-blend-modeobject-fitobject-positionopacityorderoutlineoutline-coloroutline-offsetoutline-styleoutline-widthoverflowoverflow-xoverflow-ypaddingpadding-bottompadding-leftpadding-rightpadding-toppage-break-afterpage-break-beforepage-break-insideperspectiveperspective-originpointer-eventspositionquotesresizerighttab-sizetable-layouttext-aligntext-align-lasttext-decorationtext-decoration-colortext-decoration-linetext-decoration-styletext-indenttext-justifytext-overflowtext-shadowtext-transformtoptransformtransform-origintransform-styletransitiontransition-delaytransition-durationtransition-propertytransition-timing-functionunicode-bidiuser-selectvertical-alignvisibilitywhite-spacewidthword-breakword-spacingword-wrapwriting-modez-index
Псевдоэлементы :Before и :After с фоновым изображением
Принцип добавления псевдоэлементов с фоновым изображение похож на предыдущий пример, но только в качестве контента будет использоваться изображение. Можно использовать как отдельные изображения (иконки), так и спрайты.
В качестве примера я приготовил небольшой спрайт.
Пример css спрайта
А теперь давайте разберём, как добавить псевдоэлементы с изображением.
Код html будет тот же.
<span class=”psevdo”>Здесь может быть любой текст.</span>
А вот css стили будут отличаться. Отличие в том, что свойство content будет пустым. Значение будет подставляться из свойства background.
.psevdo:before{
content: ""; /*поле контент оставляем пустым*/
float: left; /*обтекание по левому краю*/
position: relative; /*позиционирование*/
top: 4px; /*отступ сверху*/
left: 4px; /*отступ слева*/
background: url(glyphicons.png) -3px -3px no-repeat; /*фоновое изображение, позиция, не размножать*/
display: block; /*блочный элемент*/
height: 25px; /*высота*/
width: 25px; /*ширина*/
}
.psevdo:after{
content: "";
position: absolute;
top: 8px;
left: 188px;
background: url(glyphicons.png) -25px 10px no-repeat;
display: block;
height: 25px;
width: 25px;
}
В результате применения этих стилей – я получил вот такой эффект.
Готовый пример
Естественно, в каждом конкретном примере свойства css будут отличаться.
А теперь рассмотрим вариант, когда в качестве контента будут иконки специальных шрифтов. Этот вариант мне нравится больше всего.
Bonus step: Advanced overlays with blend modes

I’ve been toying with background blend modes for a little while now, but it blew me away when I discovered . This allows a developer to blend multiple elements together!
Use on your overlay and you’ve got some fun new combinations to try out.
The support for various blend modes are pretty weak in the Microsoft browsers, but you can still use them today with clever progressive enhancement. If you want them to be built in Edge, you can let Microsoft know about your passion here.
Until that time, let’s use queries to make sure our code still respects our friends using Edge and IE. The above code removes the transparency from our overlay and lets the blend mode do it for us. Instead of removing it, let’s negate it behind a support query.
This way in browsers that don’t support blend modes, we get our average, but nice overlay and in browsers that do, we get some really neat effects on our banner.